82JS-040
Importing the Address Book from Another Canon Machine (Remote UI)
How to use the Remote UI to import Address Book data to the machine that was exported from another machine to a computer is described here.
IMPORTANT
Importing Address Book data will overwrite the Address Book entries currently registered on the machine.
1
Start the web browser.
2
Enter "http://<the IP address of the machine>/" in the address field, and press the [ENTER] key on the keyboard.
If you want to use an IPv6 address, enclose the IPv6 address with brackets (e.g. http://[fe80::2e9e:fcff:fe4e:dbce]/).

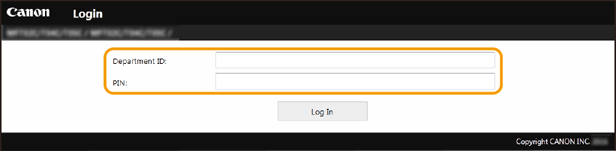
3
Select [System Manager Mode], enter the appropriate ID in [System Manager ID] and PIN in [System Manager PIN], and then click [Log In].
If an access PIN is specified in [Remote UI Access PIN], enter the access PIN.
If Department ID Management is enabled,
Enter the appropriate ID in [Department ID] and PIN in [PIN], and then click [Log In].
4
Select [Settings/Registration].
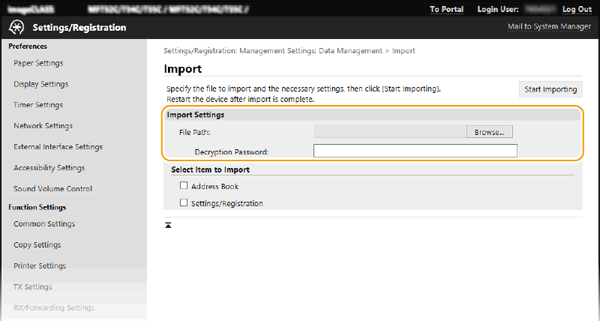
5
Select [Data Management]  [Import].
6
Click [Browse] in [File Path], and select the file to import.
If the imported file was secured with a password when it was exported, enter the password in [Decryption Password].
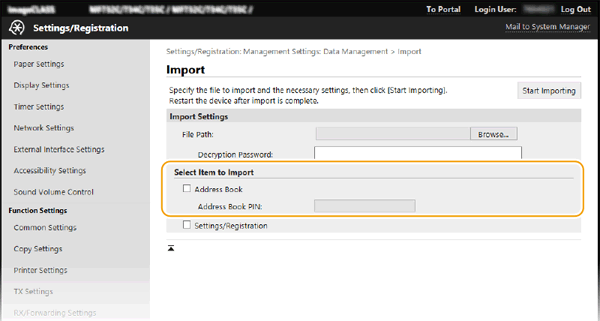
7
Select [Address Book], and click [Start Importing].
If an Address Book PIN is specified for the Address Book, enter the PIN in [Address Book PIN].
IMPORTANT
It may take a few minutes for importing to complete. Do not turn OFF the machine while it is importing. If the machine is turned OFF while it is importing, the data may be corrupted or the machine may be damaged.
Make sure that printing or other processes are not in progress before starting to import. Also do not try to operate the machine while it is importing.
8
Click [OK].
The Address Book data is imported to the machine.