82JS-03W
Editing the Address Book from a Computer (Remote UI)
You can register a new destination or edit an already registered destination in the Address Book of the machine from a web browser on your computer.
1
Check the IP address of the machine.
IPv4 address: <Status Monitor>  <Network Information>
  <IPv4>
  Check the setting.
 <Network Information>
  <IPv4>
  Check the setting.
IPv6 address: <Status Monitor>  <Network Information>
  <IPv6>
  Select the setting you want to check
  Check the setting.
 <Network Information>
  <IPv6>
  Select the setting you want to check
  Check the setting.
2
Start the web browser.
3
Enter "http://<the IP address of the machine>/" in the address field, and press the [ENTER] key on the keyboard.
If you want to use an IPv6 address, enclose the IPv6 address with brackets (e.g. "http://[fe80:2e9e:fcff:fe4e:dbce]/").
A security alert may be displayed when the Remote UI communication is encrypted. When certificate settings or TLS settings have no errors, continue browsing the Web site.

4
Select [System Manager Mode], enter the appropriate ID in [System Manager ID] and PIN in [System Manager PIN], and then click [Log In].
If an access PIN is specified in [Remote UI Access PIN], enter the access PIN.
If Department ID Management is enabled,

Enter the appropriate ID in [Department ID] and PIN in [PIN], and then click [Log In].

5
Click [Address Book].
If a screen to enter the Address Book PIN appears,

Adding or editing a destination in the Address Book is restricted. Follow these steps to enter the Address Book PIN.
1
Enter the Address Book PIN
2
Click [OK].
6
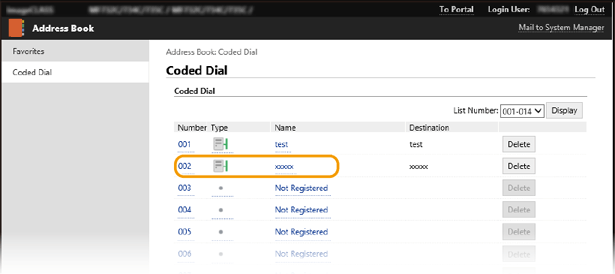
Click [Coded Dial].
Register a frequently used destination as a favorite by clicking [Favorites] so you can easily select it in the Address Book.
7
Click [Number], [Type], or [Name].
To register a new destination, click the number for which "Not Registered" is specified under [Name], and then proceed to step 8.
To edit a registered destination, click [Number], [Type], or [Name] of the destination to edit, click [Edit], and then proceed to step 9.
To delete a destination, click [Delete].

8
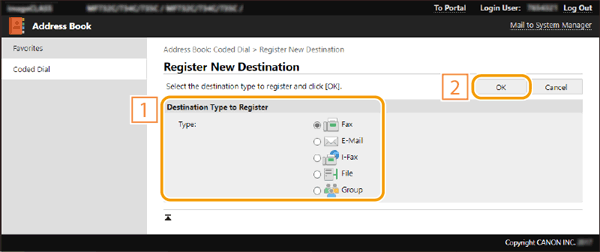
Select the type of destination to register, and click [OK].
To register a shared folder or FTP server destination, select [File].

9
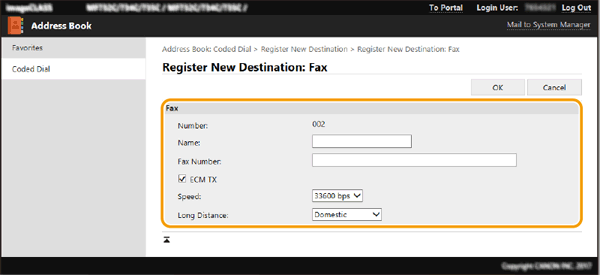
Specify the destination settings.
To register or edit a fax destination,


[Name]
Enter the name of the destination.
[Fax Number]
Enter the fax number of the destination.
[ECM TX]
Select this check box to allow errors occurring in an image that is being sent to be corrected to prevent an improper image from being sent.
[Speed]
If it takes time for transmissions to start, such as when there is a poor telephone connection, you can adjust the transmission start speed downward.
[Long Distance]
Specify [International (1)] to [International (3)] according to the transmission conditions when registering international fax numbers.
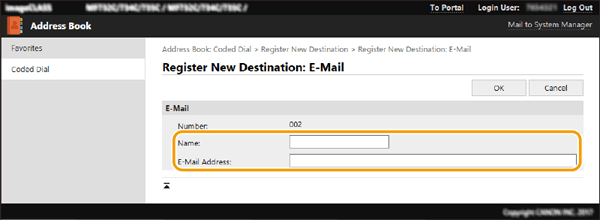
To edit an e-mail or I-Fax destination,


[Name]
Enter the name of the destination.
[E-Mail Address]/[I-Fax Address]
Enter the e-mail address of the destination.
To register a shared folder or FTP server destination,

10
Click [OK].