82JS-02U
Printing from a Computer Causes an Error (Network Environment)
If you change the IP address of the machine or add a printer, an error might occur and printing may not be possible.
This problem occurs when there is a problem with the print port setting. Log in to the computer as an administrator and configure the settings.
1
In Windows, select [ Start]
  [
[ Settings].
 Start]
  [
[ Settings].
2
Click [Devices].
3
Click [Printers & scanners].
4
Click the driver icon for the machine, and click [Manage].
5
Click [Printer properties].
6
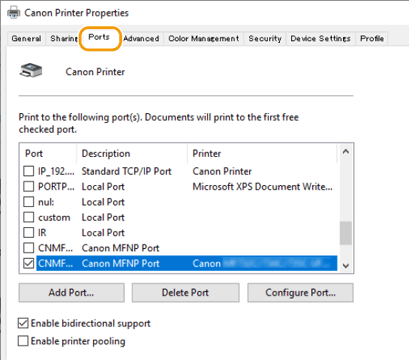
Click the [Ports] tab.

7
Add a port.
Add a new port if you have changed the IP address of the machine, or if you did not select the correct port when you installed the driver from the Windows printer folder. Select the type of port to be added according to your environment.
To add an MFNP port (IPv4 only),

This port can automatically detect the IP address of the machine. Even if you change the IP address of the machine, the connection is maintained if the machine and the computer are on the same subnet. Therefore, you do not need to add a new port each time you change the IP address. Usually, select this option.
1
Click [Add Port].
2
Select [Canon MFNP Port] in [Available port types], and click [New Port].
3
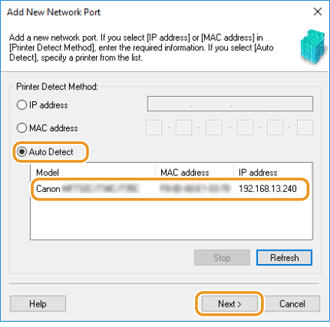
Select [Auto Detect], select the machine when it appears, and click [Next].
If the machine is not displayed, click [Refresh]. If it still does not appear, select [IP address] or [MAC address], enter the IP address or MAC address of the machine, and then click [Next].

4
Click [Add]  [Finish].
 [Finish].
5
Click [Close].
To add a standard TCP/IP port,

This is a built-in port for Windows. If you change the IP address of the machine, you need to add a new port each time. Select this option if you are using the machine in a IPv6 environment or if you cannot add an MFNP port.
1
Click [Add Port].
2
Select [Standard TCP/IP Port] in [Available port types], and click [New Port].
3
Click [Next].
4
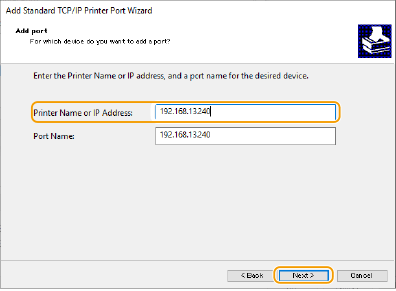
Enter the IP address or DNS name of the machine, and click [Next].
[Port Name] is entered automatically. Change it if necessary.

NOTE
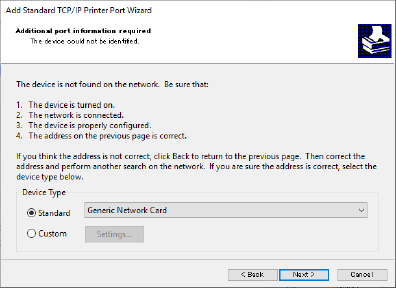
If the following screen is displayed, follow the instructions on the screen.

*To set [Device Type], select [Canon Network Printing Device with P9100] for [Standard].
5
Click [Finish].
6
Click [Close].
8
Change the port type and number.
If you change the print protocol (LPD or RAW) settings or the port number on the machine, also change the settings on the computer to the same settings. This operation is not required for the WSD port.
For an MFNP port,

1
Click [Configure Port].
2
Select [RAW] or [LPR] in [Protocol Type], and change [Port Number].
3
Click [OK].
For a standard TCP/IP port,

1
Click [Configure Port].
2
Select [Raw] or [LPR] in [Protocol].
If you selected [Raw], change the [Port Number].
If you selected [LPR], enter "lp" in [Queue Name].
3
Click [OK].
9
Click [Close].