82JS-014
Previewing a Received Fax without Printing
How to preview a received fax document saved in the machine's memory by accessing the Remote UI from a computer or a mobile device is described here.
Follow step 1 and step 2.
Step 1 Enabling fax documents to be saved in memory for previewing
1
Select <Menu> in the Home screen.
2
Select <Function Settings>  <Receive/Forward>
  <Common Settings>.
 <Receive/Forward>
  <Common Settings>.
3
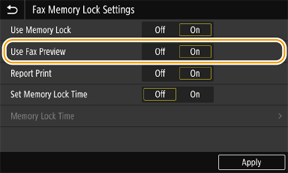
Select <Set Fax/I-Fax Inbox>  <Fax Memory Lock Settings>.
 <Fax Memory Lock Settings>.
If a login screen appears,

Department ID Management or System Manager IDs are set on the machine. Follow the steps below to log in.
1
Enter the Department ID.
2
Enter the PIN.
3
Select <Log In>.
4
Select <On> in <Use Memory Lock>.
5
Select <On> in <Use Fax Preview>.

6
Select <Apply>.
Step 2 Previewing and checking a fax document saved in memory
1
Start the web browser.
2
Enter "http://<the IP address of the machine>/" in the address field, and press the [ENTER] key on the keyboard.
If you want to use an IPv6 address, enclose the IPv6 address with brackets (e.g. http://[fe80::2e9e:fcff:fe4e:dbce]/).

3
Select [System Manager Mode], enter the [System Manager ID] and [System Manager PIN], and then click [Log In].
If Department ID Management is set,

Enter the registered [Department ID] and [PIN], and then click [Log In].

4
Click [Status Monitor/Cancel].
5
Click [RX]  [Job Status].
 [Job Status].
6
Click the number under [Job Number].
The preview of the received document corresponding to the number is displayed.
Deleting unnecessary fax documents,

Once a fax document is deleted, it cannot be recovered.
1
Click [Delete].
2
Click [OK].
The document saved in memory is deleted.
Printing the selected document, 

1
Click [Job Status].
2
Click [Print] corresponding to the document you want to print.
The selected document is printed.
Printing all the saved documents, 

1
Click [Job Status].
2
Click [Print All].
All the documents saved in memory are printed.