82JS-00L
Scanning and Sending to a Shared Folder on a Computer (Windows)
You can enable the machine to access and send scanned data to a shared folder on a computer.
Perform step 1 to step 3.
This section uses Windows 10 as an example.
IMPORTANT
Be sure to set a password for any user who logs in to the destination computer. If no password is set, sending might result in an error.
Step 1 Creating a shared folder on a computer
1
Right-click on the computer's desktop, and select [New]  [Folder].
2
Assign a name to the created folder.
After setting the folder, scanned data is saved to the folder. Steps are described with the name set to "Scan".
3
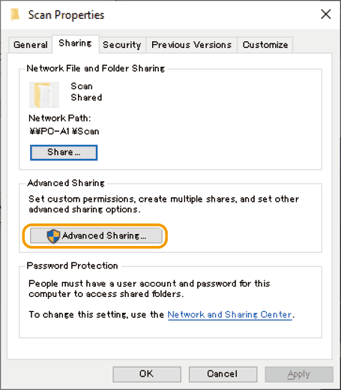
Right-click the [Scan] folder, and select [Properties].
4
Select the [Sharing] tab.
5
Click [Advanced Sharing].
6
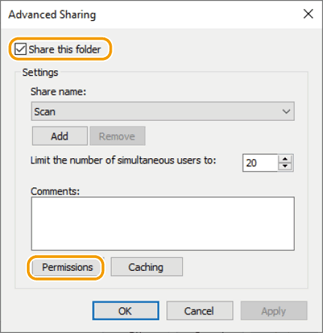
Select [Share this folder], and click [Permissions].
7
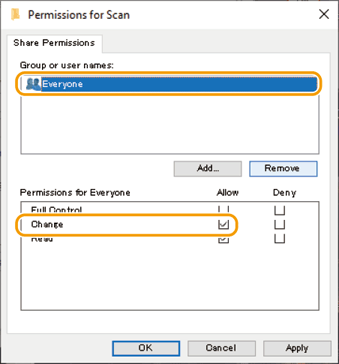
Select [Everyone] in [Group or user names], and check [Allow] for [Change].
8
Click [OK].
9
Click [OK] [Close].
A shared folder is now created on the computer.
Step 2 Registering the shared folder to the machine's address book
1
Check the computer's name (device name).
1
In Windows, select [ Start] [
 Settings].
Start] Settings].2
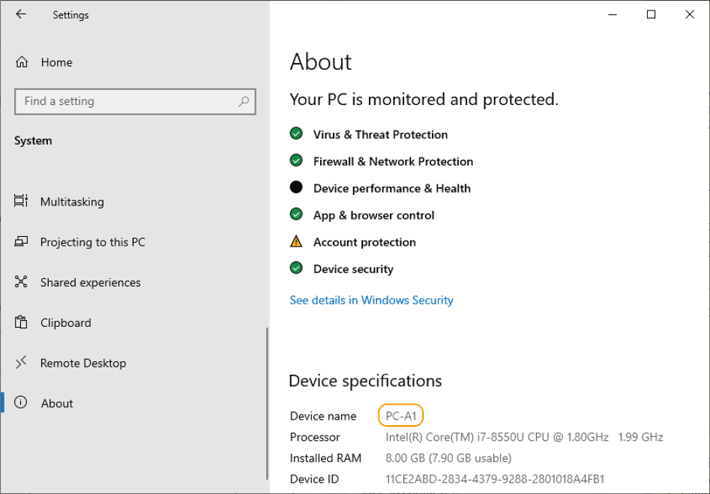
Click [System].
3
Click [About].
4
Check and write down the displayed computer name (device name).
Steps are described with the computer name as "PC-A1".
2
Check the login user name of the computer.
1
In Windows, select [ Start] [ Settings].
Start] Settings].2
Click [Accounts].
3
Check the displayed [Your info] and write it down.
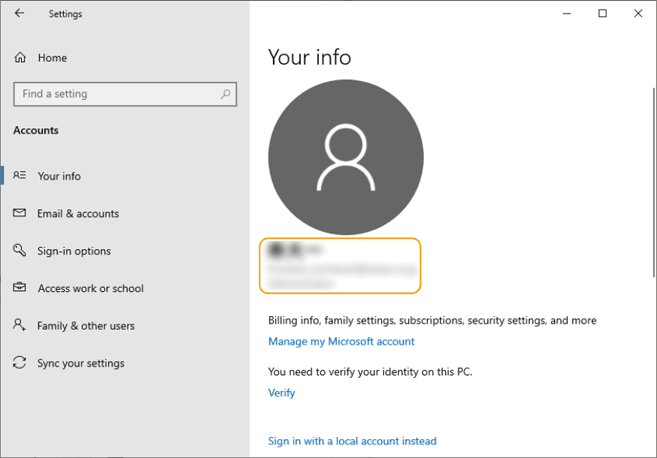
Also check the login user password.
3
Start the Send Function Setting Tool.
Enter "http://<the IP address of the machine>/sendsupport_login.html" in the address field of the web browser, and press the [ENTER] key on the keyboard.

4
Click [Start].
If a login screen appears,
Department ID Management and System Manager IDs are set on the machine. Enter the Department ID and PIN according to the following steps.
1
Enter the Department ID.
2
Enter the PIN.
3
Click [Logon].
5
Click [Store to Shared Folder Settings].
If a screen appears for entering a PIN for the address book,
1
Enter the PIN.
2
Click [OK].
6
Enter the required information.
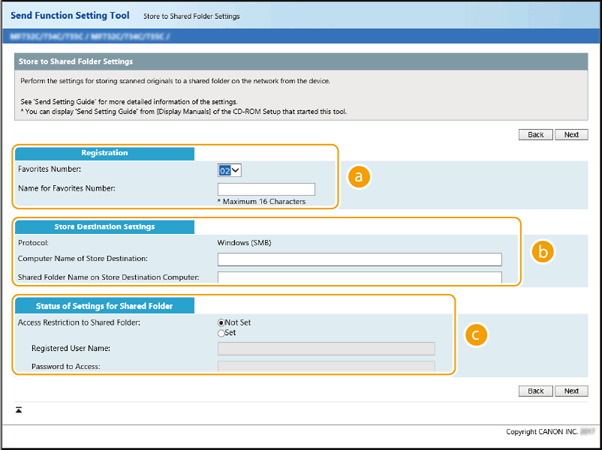
 [Registration]
[Favorites Number]
When using the Send Function Setting Tool, register scanned documents in <Favorites> in the address book. Select an unused number from the pulldown menu.
[Name for Favorites Number]
The entered name will appear in a list in the Address Book. Set a name that will be easy for you to find later.
 [Store Destination Settings]
[Computer Name of Store Destination]
Enter the computer name (device name) or the IP address of the computer that has the shared folder that you checked in step 1.
[Shared Folder Name on Store Destination Computer]
Enter the name of the shared folder or the path to the shared folder that you checked in step 2. For example, if the shared folder is the subfolder "Scan" created in the [Public] folder on the C: drive (path: "C:\users\public\Scan"), enter "users\public\Scan".
 [Status of Settings for Shared Folder]
[Access Restriction to Shared Folder]
Select [Set], and enter the user name and password you checked in step 2 in [Registered User Name] and [Password to Access].
7
Click [Next].
8
Confirm the settings and click [Register].
9
Turn off the machine, and then turn on the machine after 10 seconds.
Settings for sending scanned data are now made.
Step 3 Sending a scanned original to a shared folder
1
Place the original in the feeder or on the platen glass.
2
Select <Scan> in the Home screen.
If a login screen appears,
Authenticated transmission is set on the machine. Follow the steps below to log in.
1
Enter your user name.
2
Enter the password.
3
Select the authentication server.
4
Select <Log In>.
3
Select <File>.
4
Specify the destination.
1
Select <Address Book> in the <Specify Destination> tab.
2
Select the < > tab.
> tab.3
Select the specified destination, and select <Apply>.
5
Select <B&W Start> or <Color Start>.
If the original is placed in the feeder
After the original is scanned, the data is saved to the shared folder.
If the original is placed on the platen glass (other than when the file format is JPEG)
1
Select <Start Sending> after the original has been scanned.
The data is sent to the shared folder.
If there are multiple originals,
1
After one original is scanned, place the next original.
2
Select <Scan Next>.
3
Repeat steps 1 to 2 until all originals have been scanned.
4
Select <Start Sending>.
The data is sent to the shared folder.