82JU-031
Streaks (Lines)/Uneven Printing Appears in Printouts

There are a variety of possible causes, such as paper and operating environment.
Perform step 1 to step 3 to check.
Step 1 Checking the paper
Are you using appropriate paper?
Check paper that can be used, and replace with appropriate paper.
Are you using paper that has a lot of paper dust? (MF746Cx / MF744Cdw / MF742Cdw)
If you use paper that has a lot of paper dust, images might be faint or have streaks.
Setting <Corr. Img. Corrup. by Ppr. Dust> to <On> might improve results. However, setting this to <On> might slow down printing.
<Menu>  |
Do faint printing and unevenness appear only with certain types of paper and usage environments? (MF746Cx / MF744Cdw / MF742Cdw / MF657Cdw / MF655Cdw / MF651Cw / MF645Cx / MF643Cdw / MF641Cw)
Changing the <Reduce Toner Flaking> setting might improve results.
MF746Cx / MF744Cdw / MF742Cdw
The effect is stronger with <Mode 2> than <Mode 1>. Try starting with <Mode 1>.
Using a stronger effect might cause paper to curl or slower printing.
<Menu> |
MF657Cdw / MF655Cdw / MF651Cw / MF645Cx / MF643Cdw / MF641Cw
When set to <On>, an image ghost might appear in areas that are not printed.
<Menu> |
Do black horizontal streaks appear at the lead edge of the paper? (MF553dw / MF552dw / MF543x / MF542x / MF455dw / MF453dw / MF449x / MF446x / MF445dw / MF443dw)
Wrinkles may occur when using damp paper, or streaks might appear at the lead edge of the paper when printing images with halftones.
Setting <Rdc. Wrinkles(Humidity)/Streaks> to <On> may improve results. However, setting this to <On> will slow down printing.
<Menu> |
Step 2 Checking the maintenance status of the machine
Is the platen glass clean?
If the platen glass or the underside of the feeder is dirty or soiled, originals or printed paper might become dirty. Clean the platen glass and underside of the feeder.
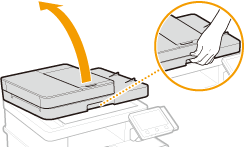
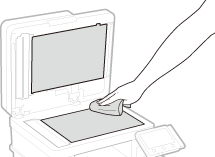
How to clean the platen glass,
Prepare a dampened, well-wrung-out cloth and a soft, dry cloth beforehand. Illustrations for MF746Cx are shown here.
1
Turn off the power and disconnect the power plug from the outlet.
When the power is turned off, any data waiting to be printed is erased. Documents received into memory, documents queued to be sent, and reports printed automatically after sending/receiving documents are retained without being erased.
2
Open the feeder.
3
Wipe the platen glass and the underside of the feeder.
Wipe with the dampened, well-wrung-out cloth and then with the soft, dry cloth.
4
Wait for all moisture to dry completely.
5
Close the feeder gently.
6
Plug the power cord into the wall outlet and turn on the power.
Is the fixing assembly cleaned?
If the fixing assembly is dirty, printed paper might become dirty. Clean the fixing assembly.
For MF746Cx / MF744Cdw / MF742Cdw
Load A4 or Letter size plain paper in the paper drawer or the multi-purpose tray beforehand. First run <Clean Fixing Assembly (Reduce Paper Back Side Stain)>. If this is not effective, try <Clean Fixing Assembly>.
Cleaning the fixing assembly (to improve dirtying of paper back sides),
Cleaning is more effective if performed about one hour after the last printing operation is completed.
<Menu> |
Cleaning the fixing assembly,
<Menu> |
For MF657Cdw / MF655Cdw / MF651Cw / MF645Cx / MF643Cdw / MF641Cw / MF553dw / MF552dw / MF543x / MF542x / MF455dw / MF453dw / MF449x / MF446x / MF445dw / MF443dw
Load A4 or Letter size plain paper in the paper drawer or the multi-purpose tray beforehand.
Cleaning the fixing assembly,
<Menu> |
Are color mismatch correction and color tone correction correct? (MF746Cx / MF744Cdw / MF742Cdw / MF657Cdw / MF655Cdw / MF651Cw / MF645Cx / MF643Cdw / MF641Cw)
Setting <Correct Color Mismatch> to <On> might improve results. However, setting this to <On> might slow the printing speed.
<Menu> |
Setting <Reduce Drum Streak> to <On> might improve results.
<Menu> |
Is the amount remaining in the toner cartridges low?
Check the amount remaining in the toner cartridges and replace the toner cartridges if necessary. Checking the Amount Remaining in the Toner Cartridges
Regardless of the amount displayed for the toner cartridges, they might have reached the end of their service life due to the machine's operating environment or deterioration of the inside of the toner cartridges. Replace the toner cartridges. Replacing the Toner Cartridges
Step 3 Checking environmental conditions
Is the machine located where there are sudden temperature changes?
If there are sudden temperature changes where the machine is located, condensation might occur and images and text may appear lighter or blurry. Setting <Control Condensation> to <On> will remove condensation in the machine. Also, temperature change will cause this option to run automatically.
<Menu> |
IMPORTANT
While condensation is being removed, the machine might output only blank paper without printing anything.
When set to <On>, the machine must be turned on at all times in order to maintain the effect of condensation removal.
When set to <On>, automatic shutdown is disabled.
Is the machine used in a high-humidity environment? (MF746Cx / MF744Cdw / MF742Cdw / MF657Cdw / MF655Cdw / MF651Cw / MF645Cx / MF643Cdw / MF641Cw)
Printing unevenness may occur when the product is used in an environment with high humidity. Setting <High Humidity Mode> to <On> might improve results. However, when set to <On> and used in a low-humid environment, images and text may appear blurry.
<Menu> |