82JU-00R
Scanning and Sending to a Shared Folder on a Computer (macOS)
You can enable the machine to access and send scanned data to a shared folder on a Mac.
Perform step 1 to step 3.
This section uses macOS 10.15 as an example.
IMPORTANT
Be sure to set a password for any user who logs in to the destination Mac. If no password is set, sending might result in an error.
Step 1 Creating a shared folder on a Mac
1
In macOS, select [ ]
]  [System Preferences].
 ]
]  [System Preferences].
2
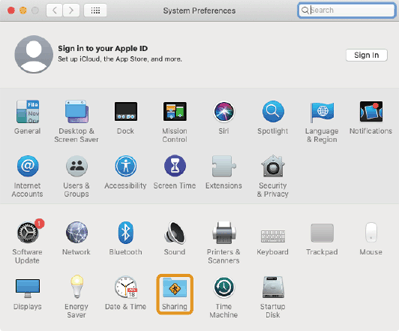
Click [Sharing].
3
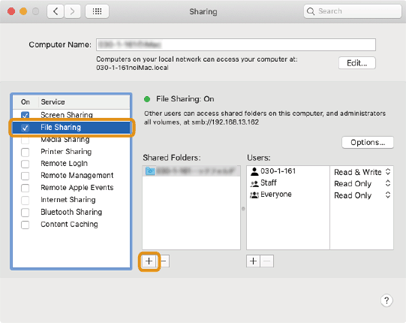
Select [File Sharing], and click [+] for [Share Folders].
4
Create a folder for sharing at any location, and click [Add].
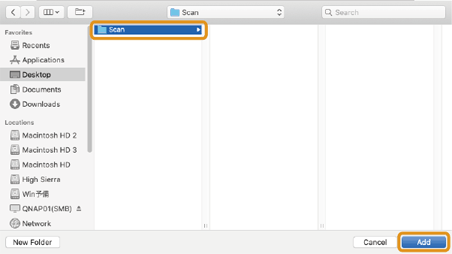
The folder [Scan] is created on the desktop as an example.
You can also select a folder that has already been created.
5
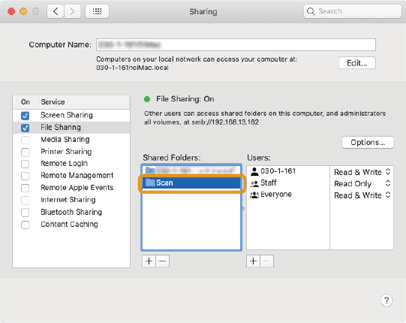
Select the folder (Scan) created with [Share Folders].
6
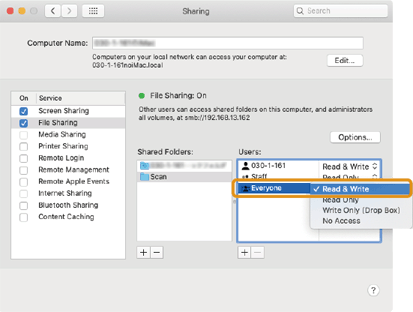
In the [Everyone] pulldown menu for [Users], select [Read & Write].
7
Close the window.
A shared folder is now created on the Mac.
Step 2 Registering the shared folder in the machine's address book
1
Check the Mac's computer name (local host name).
NOTE
The computer name is also displayed in [Computer Name] on the shared screen, but it might not be a name usable on the network. Be sure to check using the following steps.
1
In macOS, select [ ]
]  [System Preferences].
 ]
]  [System Preferences].
2
Click [Sharing].

3
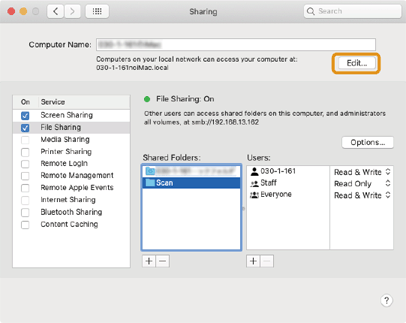
Click [Edit].
4
Check the displayed local host name and write it down.
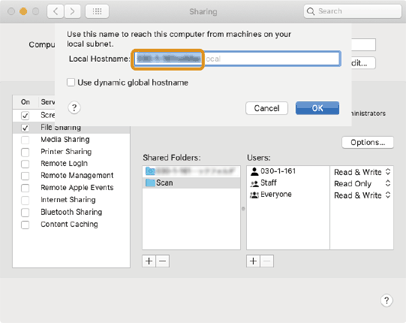
The local host name does not include the grayed-out portion.
Steps are described with the computer name as "PC-A1".
5
Click [OK].
2
Check the Mac login user name.
1
In macOS, select [ ]
]  [System Preferences].
 ]
]  [System Preferences].
2
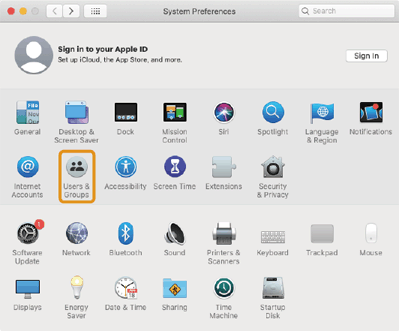
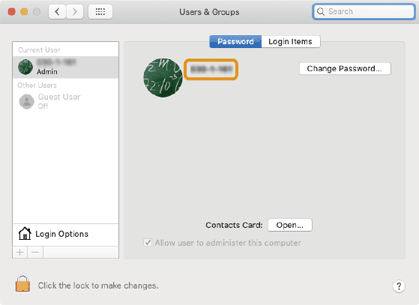
Click [User & Groups].
3
With [Current User] selected, check the login user name and write it down.
3
Start the web browser.
4
Enter "http://<the IP address of the machine>/" in the address field, and press the [ENTER] key on the keyboard.
If you are using an IPv6 address, enclose the IPv6 address with brackets (e.g. "http://[fe80:2e9e:fcff:fe4e:dbce]/").

5
Select [System Manager Mode], enter the [System Manager ID] and [System Manager PIN], and then click [Log In].
If a remote UI access PIN is set, enter the number. Contact your administrator for details.
If Department ID Management is set,

Enter the registered [Department ID] and [PIN], and then click [Log In].

6
Click [Address Book].
If a screen appears for entering a PIN for the address book

1
Enter the PIN.
2
Click [OK].
7
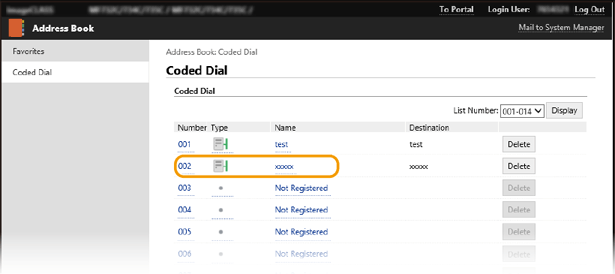
Click [Coded Dial].
8
Click [Number], [Type], or [Name] for an item with "Not Registered" displayed.
9
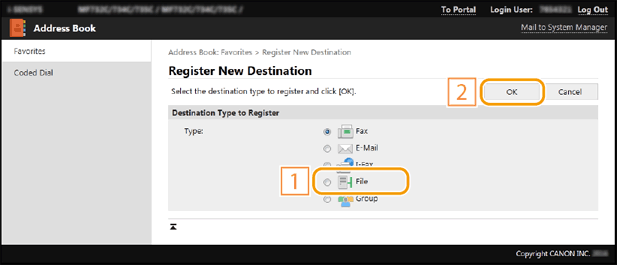
Select [File], and click [OK].
10
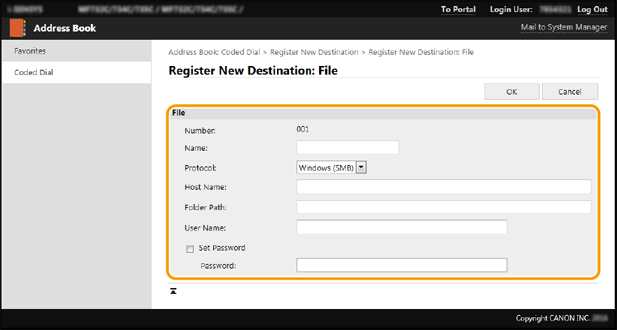
Set the destination.
[Name]
Enter a name for the destination.
[Protocol]
Select [Windows (SMB)].
[Host Name]
Enter the computer name (local host name) or IP address of the computer that you checked in step 1. You can also include the path to the shared folder (for example, "\\swan\Scan" or "\\192.168.2.100\Scan").
NOTE
If using a DNS server
You can also enter a host name (or FQDN) instead of a computer name or IP address (for a shared folder example, "\\swan.organization.company.com\Scan").
[Folder Path]
Enter the location of the folder to which you want to send data.
Use "\" as the delimiter. Specify the hierarchy level that follows the path specified in [Host Name].
NOTE
If the folder to store the document does not exist, a folder with the specified name is created when the document is sent. However, if you specify a location 2 or more hierarchy levels away that does not exist, or if you do not have write permission to the parent folder, the folder is not created and a transmission error occurs.
[User Name]
Enter the user name that you checked in step 2.
[Set Password]
If a password has been set, select the checkbox and enter the [Password].
IMPORTANT
Set the same display languages on the computer and the remote UI
[Host Name] and [Folder Path] might not be displayed correctly or might not be referenced.
11
Click [OK].
Step 3 Sending a scanned original to a shared folder
1
Place the original in the feeder or on the platen glass.
2
Select <Scan> in the Home screen.
If a login screen appears,

Authenticated transmission is set on the machine. Follow the steps below to log in.
1
Enter your user name.
2
Enter the password.
3
Select the authentication server.
4
Select <Log In>.
3
Select <File>.
4
Specify the destination.
1
Select <Address Book> in the <Specify Destination> tab.
2
Select the check box for the desired destination, and select <Apply>.
5
Select <B&W Start> or <Color Start>.
If the original is placed in the feeder
After the original is scanned, the data is saved in the shared folder.
If the original is placed on the platen glass (other than when the file format is JPEG)
1
Select <Start Sending> after the original has been scanned.
The data is sent to the shared folder.
If there are multiple originals,

1
After one original is scanned, place the next original.
2
Select <Scan Next>.
3
Repeat steps 1 to 2 until all originals have been scanned.
4
Select <Start Sending>.
The data is sent to the shared folder.