88W0-001
Sending Scan Data by E-Mail
Set necessary settings to send by e-mail from your computer. Use the following steps.
NOTE
Check and make a note of the following information beforehand.
The machine's IP address Checking the IP Address Set on the Machine
The e-mail address to register as the destination
Mail server settings information (SMTP server name*, port number*, authentication requirement, and user name, password, etc. for authentication)
*To check this information, you can refer to the instructions and help file for the application you are currently using.
Step 1 Configure the machine to send e-mail (operation from your computer)
Use the special setting tool (Send Function Setting Tool) via the Web browser installed in the machine.
1
Start up the Send Function Setting Tool.
Enter "http://<The machine's IP address>/sendsupport_login.html" in the address field of the Web browser, and press the [ENTER] key on the keyboard.

2
Click [Start].
If the login screen is displayed,

Department ID Management and System Manager IDs are enabled on the machine. Use the following steps to enter the ID and PIN.
1
Enter the Department ID.
2
Enter the PIN.
3
Click [Logon].
3
Click [Send to E-mail Settings].
If the screen prompting you to enter the Address Book PIN is displayed,

Adding and editing of destinations in the Address Book are restricted. Use the following steps to enter the PIN.
1
Enter the PIN.
2
Click [OK].
4
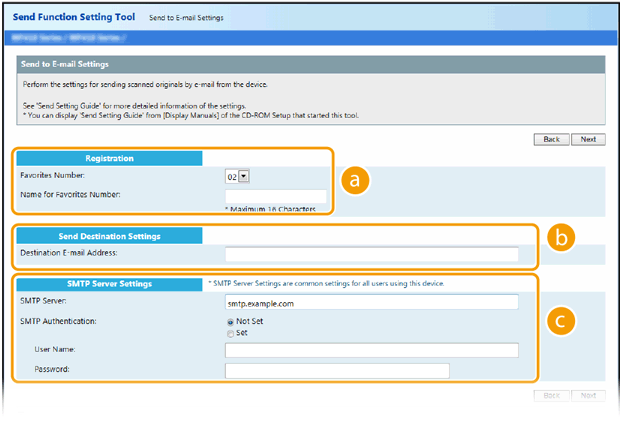
Enter the required information.

 [Registration]
[Favorites Number]
Register an e-mail address in <Favorites> in the Address Book. Select an unused number from the pulldown menu.
Register an e-mail address in <Favorites> in the Address Book. Select an unused number from the pulldown menu.
[Name for Favorites Number]
The entered name will appear in a list in the Address Book. Set a name that will be easy for you to find later.
The entered name will appear in a list in the Address Book. Set a name that will be easy for you to find later.
 [Send Destination Settings]
[Destination E-mail Address]
Enter the e-mail address that you want to send your scanned originals to.
Enter the e-mail address that you want to send your scanned originals to.
 [SMTP Server Settings]
[SMTP Server]
Enter the SMTP server name.
Enter the SMTP server name.
[SMTP Authentication]
Click the [Set] or [Not Set] radio button to match the authentication settings of the SMTP server. If [Set] is selected, enter the user name in the [User Name] text box and password in the [Password] text box.
Click the [Set] or [Not Set] radio button to match the authentication settings of the SMTP server. If [Set] is selected, enter the user name in the [User Name] text box and password in the [Password] text box.
5
Click [Next].
6
Confirm the settings and click [Register].
7
Press the power switch and turn the machine off.
To complete registering, you must turn the machine off and back on.
8
After turning the power off, wait at least 10 seconds before pressing the power switch again.
This completes e-mail send settings.
Step 2 Scan an original on the machine and send it by e-mail
1
Place the original in the feeder or on the platen glass.
2
Select <Scan> in the Home screen.
If the login screen is displayed,

Authenticated transmission is set on the machine. Follow the steps below to log in.
1
Enter your user name.
2
Enter the password.
3
Select the server for your authentication.
4
Select <Log In>.
3
Select <E-Mail>
4
Specify the destination.
1
Select <Address Book> in the <Specify Destination> tab.
2
Select <To>.
3
Select the check box for the desired destination, and select <Apply>.
5
Select <B&W Start> or <Color Start>.
If the original is placed in the feeder
Once the original is scanned, the scan data is sent to the specified e-mail address.
If the original is placed on the platen glass (other than when the file format is JPEG)
1
After the original is scanned, select <Start Sending>.
The scan data is sent to the specified e-mail address.
If scanning several originals,

1
After an original is scanned, place the next original.
2
Select <Scan Next>.
3
Repeat steps 1 to 2 until all the originals are scanned.
4
Select <Start Sending>.
The scan data is sent to the specified e-mail address.
If sending fails,

Sending mail from the machine may not be supported depending on the mail service you are using. Try using an address from a different mail service for the destination.