4WK7-03W
How to Select a Paper Tray with More Paper Loading Capacity for Large Volumes of Printing
You can specify the paper tray for each function. Check the solution below.
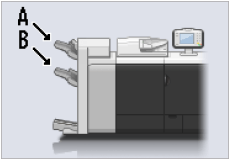
The finisher has more than one paper tray, and the lower tray can stack many more printouts than the upper tray. If you designate the lower tray for large volumes of printing, productivity improves because you do not need to remove the printed paper as often.
Finisher-AN
Paper loading capacity of tray B is larger than that of tray A. For more information on specifying the output tray, see the following.
 "Settings/Registration" > "Function Settings" > "Common" > "Paper Output Settings" > "Output Tray Designation" in the User's Guide
High Volume Stack Mode
If you set the High Volume Stack Mode to 'On', the tray order to which printouts are output is fixed. For example, when you print a job to tray A and B on the Finisher-AN with the High Volume Stack Mode 'On', the printouts are stacked on the tray B first, and after the tray B reaches its capacity, the printed paper is stacked on tray A. You can improve productivity by setting the High Volume Stack Mode to 'On' and using tray B first. For more information on the High Volume Stack Mode, see the following.
 "Settings/Registration"> "Function Settings" > "Common" > "Paper Output Settings" > "High Volume Stack Mode" in the User's Guide
NOTE
If paper with a weight of 326 g/m2 to 400 g/m2 (120.6 lb Cover to 147.9 lb Cover) is output to tray B, paper jams and scratches in high density images may occur when high rigidity paper is used.