9870-03U
[macOS] Configuring user-defined paper sizes
Follow the procedure below.
NOTE
Screens and operations may differ, depending on the environment of your computer and the following conditions.
The device you are using and its settings, firmware version, and option configuration
The driver you are using and its version
1
Select the print menu of the application.
2
On the displayed dialog, select the device you are using from [Printer].
3
Select [Manage Custom Sizes] from [Paper Size] on the pop-up menu.
4
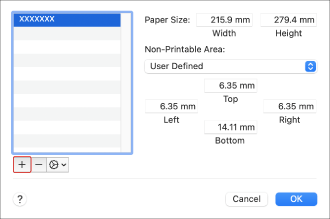
Click [+] on the bottom of the displayed dialog.

5
Configure [Paper Size] and [Non-Printable Area].
Change the name of the user-defined paper size, as necessary.
[Paper Size]
Set the horizontal and vertical length of the paper.
The paper sizes that can be printed on vary according to the device you are using. For details, refer to the manual of the device.
[Non-Printable Area]
Set the margin width.
You can also set a margin suitable for the device selected from the pop-up menu.
6
Click [OK] on the dialog box.
NOTE
If the set user-defined paper size is not displayed in [Destination Paper Size] on the [Paper Handling] panel, change the size in [Paper Size] or [Non-Printable Area] in the above procedure.