9870-00K
[Windows] Printing on paper that is not in the list of paper sizes when printing from your computer (custom paper size)
Steps for registering and printing with any paper size are described here.
Perform step 1 to step 2.
This section uses Windows 10 as an example.
NOTE
You must set the paper size on the machine beforehand.
Step 1 Registering the paper size
1
In Windows, select [ Start]
  [
[ Settings].
 Start]
  [
[ Settings].
2
Click [Devices]  [Printers & scanners].
 [Printers & scanners].
3
Select the machine and click [Manage].
4
Click [Printing preferences].
The printer driver window appears.
5
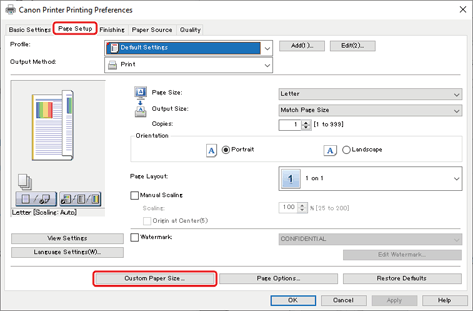
Select the [Page Setup] sheet, and then click [Custom Paper Size].

6
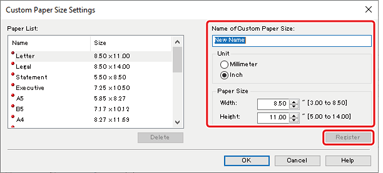
In the [Custom Paper Size Settings] dialog box, set the [Name of Custom Paper Size], [Unit], and [Paper Size], and then click [Register].

7
Click [OK]  [OK].
[OK].
 [OK].
[OK].Step 2 Specifying and printing on a registered paper size
1
In the menu in the application, select [Print].
2
Select the machine in the print window, and then click [Preferences], [Printer properties], or [Properties].
3
In the print settings window in the printer driver, click the [Page Setup] sheet.
4
Set the paper registered in [Output Size].
5
Click [OK].
6
In the print window, click [Print] or [OK].