9870-039
[Windows] Scanning with a TWAIN-compatible tool (ScanGear MF)
Steps for using ScanGear MF when scanning an original placed in the feeder or platen from a computer and using an application are described here.
IMPORTANT
The application must support TWAIN*. For details, see the instruction manual for your application.
*TWAIN is a standard for connecting image-input devices such as scanners to a computer.
1
Place the original to be scanned on the feeder or the platen.
Depending on the application, you may not be able to scan from the second original onward, or an error message may be displayed after you scan an original. If this happens, place each original one at a time and scan.
2
In the application, select the menu item to start scanning.
How to select menu items depends on the application. For details, see the instruction manual for your application.
3
Select the scanner driver (ScanGear MF) for the machine.
4
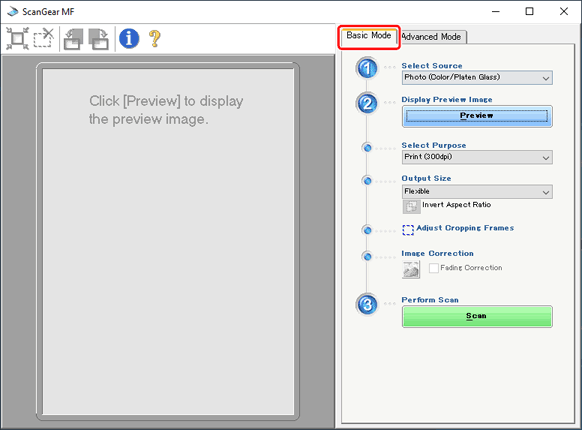
Click [Basic Mode], and configure scan settings if necessary.

Configure settings from 1 to 3 on the screen.
1
Select the type of original to be scanned with [Select Source].
2
If you placed the original on the platen, click [Preview].
The crop frame (scan area) is displayed as a dotted line in the preview.
3
Use [Select Purpose] to specify how the images you want to scan will be used.
4
Select the print size or view size in [Output Size]
[Flexible]: Select this to drag the crop frame and change its size.
[Add/Delete]: Select this to register sizes for each purpose specified in [Select Purpose].
[ Invert Aspect Ratio]: Select this to invert the height and width of the crop frame. Unavailable when [Flexible] is selected.
 Invert Aspect Ratio]: Select this to invert the height and width of the crop frame. Unavailable when [Flexible] is selected.
5
Select [Fading Correction] if necessary.
While an image is displayed in the preview, this option corrects faded colors in old photos for more vivid images. Available when [Photo (Color/Platen Glass)] or [Magazine (Color/Platen Glass)] is selected in step 1.
To configure advanced settings before scanning

Click [Advanced Mode] to set detailed data size and image quality adjustments. For a description of each item, click  to view a Help file.
 to view a Help file.
5
Click [Scan].
The scan starts and the image is sent to the application.
If you cannot scan

When using the machine with a USB connection, exit sleep mode before scanning.
The automatic online (scan standby) function might not be enabled. In the Home Screen, select <Scan>  <Remote Scanner>.
 <Remote Scanner>.