9870-038
[Windows] Scanning a double-sided original and saving it to a computer (MF Scan Utility)
How to scan a double-sided original and save it to a computer is described here.
This function is available only for models equipped with a feeder that can read on both sides.
This section uses Windows 10 as an example.
1
Place the original to be scanned on the feeder.
2
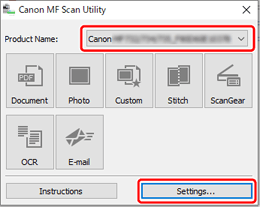
In Windows, select [ Start]
  [Canon] folder [MF Scan Utility] and start MF Scan Utility.
Start] 3
Select the machine in [Product Name], and then click [Settings].
4
In the [ ] (Scanning from a computer) sheet, select [Document Scan], [Photo Scan] or [Custom Scan] according to the type of original to be scanned.
] (Scanning from a computer) sheet, select [Document Scan], [Photo Scan] or [Custom Scan] according to the type of original to be scanned.In [Custom Scan], you can register settings for clicking [Custom] in the main window to scan.
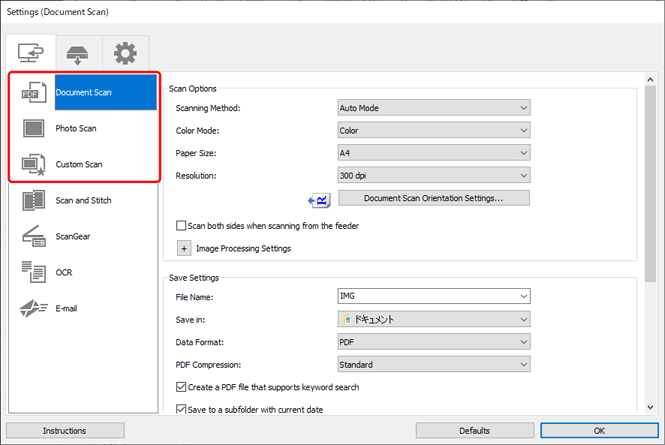
5
Select [Scan both sides when scanning from the feeder].
NOTE
If [Scan both sides when scanning from the feeder] is not displayed although the device options are set correctly, log in to the computer with an administrator account, start MF Scan Utility, and click [ScanGear] on the main screen to call ScanGear MF. [Scan both sides when scanning from the feeder] is displayed when you restart MF Scan Utility.
6
Select [Check scan results], and then click [OK].
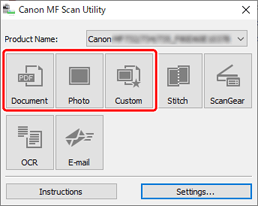
7
Click [Document], [Photo] or [Custom] you selected in step 4.
8
In the [Save Settings] dialog box that appears, check the scanned thumbnail images.
In the preview, you can rotate a scanned image by selecting the thumbnail and clicking the icon in the upper right corner.

9
Select the data format.
10
Specify the save destination, and then click [OK].
The file is saved.
If you cannot scan
When using the machine with a USB connection, exit sleep mode before scanning.
The automatic online (scan standby) function might not be enabled. In the Home Screen, select <Scan> <Remote Scanner>.