CHYE-009
Preparations Needed for Using Internet Faxes (I-Faxes)
To use Internet faxes (I-Faxes), you must configure the settings below.
Perform steps 1 to 2 in order.
NOTE
First check that the following settings have been completed:
That the Send functions are enabled
That the network settings have been configured
That the destination equipment can receive Internet faxes
Screens may differ depending on your model and the installed options.
Step 1: Configuring the Send/Receive Settings
To configure the settings for sending and receiving, you must log in as an administrator. Logging In as an Administrator
1
Set the DNS server address.
 (Settings/Registration)
 Enter the enter the DNS server IP address for your environment and press <OK>.
When the screen to confirm the changed settings appears, press <Yes>.
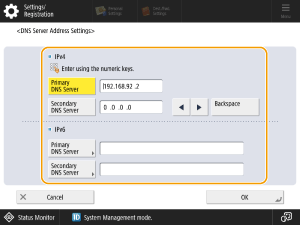
<IPv4>
Press <Primary DNS Server> and enter the IPv4 address for the DNS server.
If there is a secondary DNS server, press <Secondary DNS Server> and enter the IP address. To proceed without specifying a secondary DNS server, enter "0.0.0.0."
<IPv6>
Press <Primary DNS Server> and enter the DNS server's IPv6 address. You cannot enter addresses that begin with "ff" (multicast addresses), addresses consisting entirely of zeros (0), or link-local addresses.
If there is a secondary DNS server, press <Secondary DNS Server> and enter the IP address. You cannot enter addresses that begin with "ff" (multicast addresses), addresses consisting entirely of zeros (0), or link-local addresses. To proceed without specifying a secondary DNS server, leave the field blank.
2
Set the DNS host name and the domain name for the network to which this machine belongs.
(Settings/Registration) Specify the host name and domain name for your environment and press <OK>.
When the screen to confirm the changed settings appears, press <Yes>.
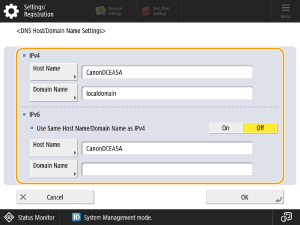
<IPv4>
Press <Host Name> and enter the host name for this machine to be registered on the DNS server using alphanumeric characters.
Press <Domain Name> and enter the name of the domain to which this machine belongs (e.g.: "example.com").
<IPv6>
When the host name and domain name are the same as those set for IPv4, press <On> in <Use Same Host Name/Domain Name as IPv4>. To configure different settings, press <Off>.
To set a different host name from that used for IPv4, press <Host Name> and enter the host name for this machine to be registered on the DNS server using alphanumeric characters.
To set a different domain name from that used for IPv4, press <Domain Name> and enter the name of the domain to which this machine belongs (e.g.: "example.com").
3
If your environment includes a dynamic DNS server, set <DNS Dynamic Update> to <On>.
(Settings/Registration) Specify the required settings for your environment and press <OK>  <Close>.
When the screen to confirm the changed settings appears, press <Yes>.
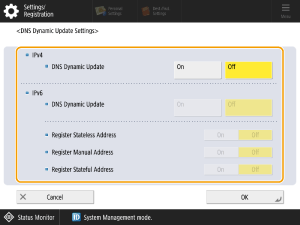
<IPv4>
If you press <On> in <DNS Dynamic Update>, these settings are automatically updated when the assigned host name and IP address change in environments such as DHCP.
<IPv6>
If you set <DNS Dynamic Update> to <On>, these settings are automatically updated when the assigned host name and IP address change in environments such as DHCP.
In <Register Stateless Address>/<Register Manual Address>/<Register Stateful Address>, set the address to be registered on the DNS server to <On>. Note that the settings will not be automatically updated if all these are set to <Off>.
4
Configure the communication settings for mail servers, etc.
(Settings/Registration) Specify the required settings for your environment and press <OK> <Close>.
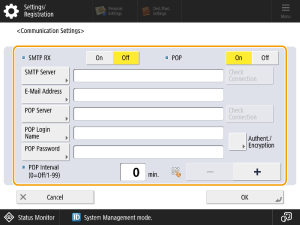
<SMTP RX>
When using this machine is to receive e-mails and I-Faxes as an SMTP server, press <On>. Note that this cannot receive as an SMTP server unless its host name is registered on the DNS server.
<SMTP Server>
Enter the SMTP server name (or IP address).
<E-Mail Address>
Enter the e-mail address for this machine.
<POP Server>
Enter the POP3 server name (or IP address).
<POP Login Name>
When using the POP3 server, enter the user name for the specified e-mail account using alphanumeric characters.
<POP Password>
When using the POP3 server, enter the password for the specified e-mail account.
<POP Interval>
Use this to set the interval (in minutes) used for automatically issuing POP commands.
<Authent./Encryption>
Specify the authentication or encryption settings.
<Check Connection>
After configuring the settings, check the <SMTP Server> or <POP Server> connection.
<POP>
To receive e-mails or I-Faxes using the POP3 server, press <On>.
When setting POP authentication before sending or setting encrypted communication with the POP server
POP authentication before sending (POP before SMTP) is a function that prevents third parties from sending unauthorized e-mails by using the POP server (incoming mail server) to confirm users before sending e-mails. If the POP server supports TLS, communication can also be encrypted.
1
Press <Authent./Encryption>.
2
Specify the required settings.
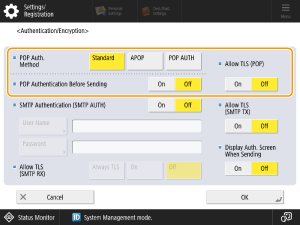
<POP Auth. Method>
Set the POP3 server authentication method. To encrypt passwords during authentication, select <APOP>. To authenticate users when receiving e-mail (POP), select <POP AUTH>.
<POP Authentication Before Sending>
To perform authentication using the POP3 server, press <On>.
<Allow TLS (POP)>
To encrypt communication with the POP3 server using TLS, press <On>. When <On> is set, you can confirm the TLS server certificate during communication with the server or add CN (Common Name) to the verification items.
<E-Mail/I-Fax Settings> <Confirm TLS Certificate for POP RX>
<E-Mail/I-Fax Settings>
3
Press <OK>.
When setting SMTP authentication and encrypted communication with the SMTP server
SMTP authentication (SMTP AUTH) verifies users by checking user names and passwords when e-mails are sent. It can also encrypt SMTP communication (sent and received). To encrypt SMTP reception using TLS, prepare key pairs beforehand.
1
Press <Authent./Encryption>.
2
Specify the required settings.
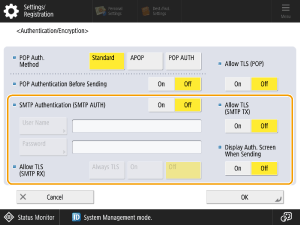
<SMTP Authentication (SMTP AUTH)>
To use SMTP authentication, press <On>, enter the user name and password for the specified e-mail account in <User Name> and <Password>.
NOTE
To perform SMTP authentication using the user name and password specified here, specify the following in <Device Settings>.
(Settings/Registration) <Function Settings> <Common> <Set Authentication Method> <Information Used for SMTP Server Authentication>
(Settings/Registration) The user name and password used for SMTP authentication can be set for each registered user. To use a user name and password for each registered user, set <Information Used for SMTP Server Authentication> to "Register Info. for Each User."
<Allow TLS (SMTP RX)>
To encrypt communication using TLS when receiving e-mails and I-Faxes using SMTP server functions, press <Always TLS> or <On>. When you do not want to receive anything other than encrypted data, select <Always TLS>.
<Display Auth. Screen When Sending>
When sending e-mails and I-Faxes, press <On> to display the user name and password entry screen.
<Allow TLS (SMTP TX)>
To encrypt communication with the SMTP server using TLS, press <On>. When <On> is set, you can confirm the TLS server certificate during communication with the server or add CN (Common Name) to the verification items.
3
Press <OK>.
5
Set the maximum data size for sending.
(Settings/Registration) Enter the maximum value and press <OK> <Close>.
Set the maximum data size for sending so that it does not exceed the limit of the mail server data size.
6
To use Full mode, specify the TX timeout.
(Settings/Registration) Set the timeout time and press <OK> <Close>.
7
To print the results when you are sent an e-mail notification of send results, specify <Print MDN/DSN upon Receipt>.
(Settings/Registration) Set this to <On> and press <Close>.
8
Specify whether e-mail is sent via a mail server.
(Settings/Registration) Set this to <On> and press <Close>.
Step 2: Registering Destinations in the Address Book
1
On the <Home> screen, press <Scan and Send>.
2
Press <Address Book> <Register New Destination> <I-Fax>.
3
Press <Name>, enter the destination name and then press <OK>.
4
Select a registered destination from <Personal Address List>, user group address list, <Address List 1> to <Address List 10> or <Address List for Administrator>.
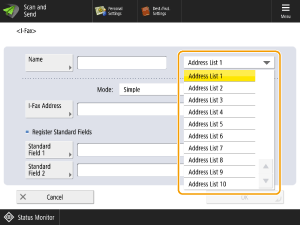
When registering destinations for your own use, select <Personal Address List>.
When registering destinations that only an Administrator can edit, select <Address List for Administrator>.
To share a destination with a registered user group, select the registered user group address list.
NOTE
<Address List 1> to <Address List 10> can be likened to 10 address books. Registering destinations in address lists for each department or business partner makes it easier to find destinations when specifying them. It also makes it easy to manage address lists by simply renaming a department or business partner.
5
Specify the required settings.
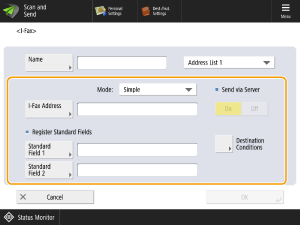
<Mode:>
Select <Full> if you want to check whether an I-Fax is delivered to the recipient's device, or select <Simple> if you want to check whether an I-Fax is delivered to a mail server. Note that you cannot confirm the send results if the recipient's device does not support <Mode:>.
NOTE
If you use Full mode to send an I-Fax to a machine that does not support Full mode, <Awaiting result...> is displayed when you press  (Status Monitor) to check the delivery status, even if the transmission is complete. It continues to be displayed until the timeout time set in <Full Mode TX Timeout> has elapsed.
(Status Monitor) to check the delivery status, even if the transmission is complete. It continues to be displayed until the timeout time set in <Full Mode TX Timeout> has elapsed.You can check the send result by checking <Job Log> of <Send> in <Status Monitor>. <OK> appears if the document was sent successfully, <NG> appears if it failed to send, and <-->appears if the results cannot be confirmed. In Simple mode, even if the delivery was successful, <-->appears because this mode does not support delivery confirmation.
<I-Fax Address>
Enter the I-Fax address. Enter a destination such as "adv01@example.com."
When sending to a device on the same network, use the following format: "adv01@192.168.11.100" (recipient's device name@[IP address]).
<Send via Server>
Specify whether or not to send I-Faxes to destinations via a mail server. Select <On> to send I-faxes via the mail server or <Off>to send data directly to a device on the same local area network (LAN). Sending directly to the device allows you to send large amounts of data without placing a burden on the mail server.
NOTE
To send an I-Fax using an IP address format other than "user name@[destination IP address]" without using a mail server, settings such as an MX (Mail eXchange) record need to be configured on the DNS server. Check with your network administrator whether this setting is available.
If you specify <Off> in <Send via Server>, you must set <On> in <Use Send via Server> beforehand. If you specify <Off>, you cannot then change the <Send via Server> setting. We recommend that you set <Allow MDN Not via Server> to <On> so that you can confirm the send results.
Even if you set <Send via Server> to <Off>, the send results for I-Faxes sent using Full mode are confirmed via the server.
Registering Standard Fields
Register standard fields when using an Internet fax service. If you do not use such a service, this setting is not necessary. For more information, contact your Internet service provider.
NOTE
When you enter a standard field and press <OK>, the field appears as "********."
6
Specify each of the settings in <Destination Conditions> and press <OK>.

<Paper Size>
Set the paper size to send. A5 is included in <A4/LTR>.
<Compression Method>
Select a file compression method. The compression rate is highest for MMR, followed by MR, and then MH. The higher the compression rate, the faster the transmission.
<Resolution>
Select a higher value to increase the resolution and image quality. Note that higher resolutions require longer transmission times.
<Divide Data>
If you set this to <On>, the data is divided into smaller sizes that do not exceed the limit and is sent as multiple deliveries. The recipient's device must support a function for re-joining the received data.
If you set <Send via Server> to <Off>, the data is sent without being divided, even if it exceeds the maximum size limit.
<Receive in Color>
This allows you to send in color if the destination device supports color. Press <On> <Next> and set the paper size and resolution.
IMPORTANT
Confirm the specifications of the recipient's device before configuring these settings. Setting conditions not supported by the recipient's device may cause an error.
7
Press <OK> <Close>.
If destinations are managed by access numbers
1
In step 7, press <Next> instead of <OK>.
2
Press <Access No.>, enter the <Access No.> and then re-enter the same number in <Confirm>.
3
Press <OK> <OK>.