CHYE-00L
Printing Just the Required Parts of a Faxed Document Received
This section describes how to temporarily save a received fax document on the machine (Memory Reception) and then print only the required parts of that document.
Perform steps 1 to 2 in order.
Step 1: Specify the Settings for Using Memory Reception
Use the procedure below to specify the settings for using Memory Reception.
1
Press  (Settings/Registration) on the <Home> screen of the machine.
(Settings/Registration) on the <Home> screen of the machine.2
Press <Function Settings>  <Receive/Forward> <Common Settings> <Set Fax/I-Fax Inbox>.
3
Press <On> in <Use Fax Memory Lock>.
4
Press <OK> <Close>.
5
On the <Home> screen, press <Fax/I-Fax Inbox>.
6
Press <Memory RX Inbox>.
If the password is set for the Memory RX Inbox, the screen appears prompting you to enter the password. Enter the password and press <OK>.
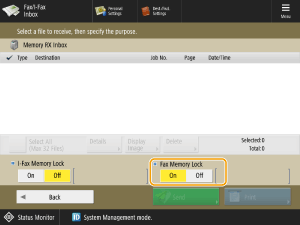
7
Select <Memory RX Inbox> and set <Fax Memory Lock> to <On>.
Step 2: Select and Print the Memory Reception Document
When the Processing/Data indicator on the control panel has a steady green light, follow the following procedures to print saved documents.
1
On the <Home> screen, press <Fax/I-Fax Inbox>.
2
Press <Memory RX Inbox>.
3
Select <Memory RX Inbox>.
A list of saved documents appears.
4
Select a document to print and press <Print>.

To check the document
Select the document to check and press <Display Image>. You can check the content of the document and select the pages to be deleted.
To delete documents
You can delete a desired document by selecting the document and pressing <Delete> <Yes>. You cannot delete multiple files simultaneously. Select files to be deleted one at a time.
NOTE
To print all the documents in memory, press <Off> for <Fax Memory Lock>.
You cannot print multiple documents simultaneously. To print multiple documents, select and print one document at a time.
5
Press <Start Printing>.
Once a document is printed, it is automatically deleted from memory.