CHYE-03L
Registering a Folder on a File Server in the Address Book
This section describes how to register a folder located on a file server in this machine's Address Book.
This description is for registration using the SMB protocol.
1
On the <Home> screen, press <Dest./Fwd. Settings>.
2
Press <Register Destinations>  <Register New Destination>
  <File>.
 <Register New Destination>
  <File>.
3
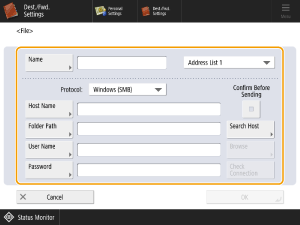
Set the destination.

<Name>
Enter the destination name. The name entered here will appear in the Address Book list view, so you should use a name that is easy to search for.
<Protocol>
Select <Windows (SMB)>.
<Host Name>
Enter the file server host name. Use any of the following methods to specify the name.
Press <Search Host> to search for the host by entering a computer's name.
Directly enter the computer name and shared folder name in <Host Name>, as follows:
\\Computer name\Shared folder name
E.g.: \\PC-A1\Scan
\\Computer name\Shared folder name
E.g.: \\PC-A1\Scan
NOTE
You can also search by pressing <Search Host> and entering the IP address of the computer to be registered.
In <Host Name>, you can directly enter the IP address of the computer to be registered and the shared folder name in the following format:
\\IP address\shared folder name
E.g.: \\192.168.100.50\Scan
\\IP address\shared folder name
E.g.: \\192.168.100.50\Scan
<Folder Path>
Specify the location of the folder to which the data will be sent.
<User Name>
Enter the user name for logging in to the file server.
<Password>
Enter the password for logging in to the file server.
<Check Connection>
After entering the host name, press this button to check that you are connected to the file server.
4
Press <OK>  <Close>.
 <Close>.
NOTE
If you set <Protocol> to <Windows (SMB)> and then specify a non-existent folder in <Folder Path>, a folder is automatically created and the file is saved in the created folder. However, if you specified non-existent folders on multiple levels, a send error occurs.