CHYE-03E
Managing this Machine's Address Lists from a Computer (Remote UI)
This section describes how to check or edit the Address Book and how to register destinations in address lists from the Remote UI.
1
Open the Remote UI and log in. Opening the Remote UI
2
On the portal page, click [Address Book].
3
Click the location where the address is to be registered ([Personal Address List], a user group address list, [Address List 01] to [Address List 10], or the [Address List for Administrators]).
The [Personal Address List] is an address list specific to the user currently logged in and can only be used during personal authentication management.
The [Address List for Administrators] is an address list that can only be used by administrators with Administrator or DeviceAdmin privileges.
If a PIN entry page appears, enter the PIN and click [OK].
To share a destination with a registered user group, select the registered user group address list.
4
Managing the Address Book
To register a new destination

1
Click [Register New Destination].
2
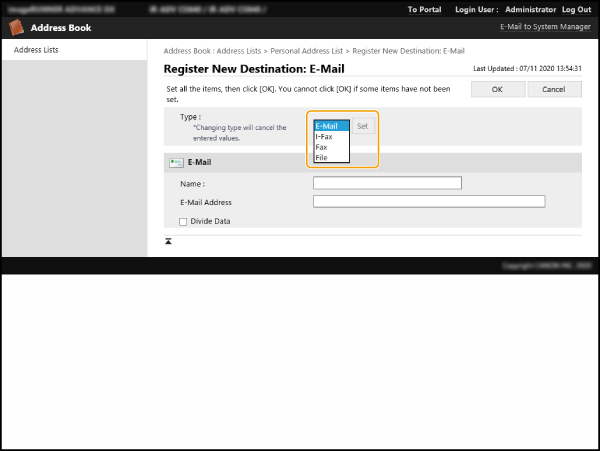
Select the destination type in [Type] and click [Set].
3
Register the required information and click [OK].
e-mail

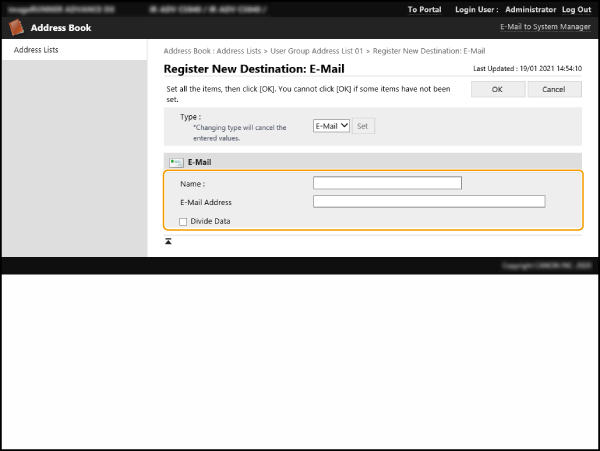
[Name]
Enter the destination name to appear in the Address Book.
[Comments]
Enter the e-mail address.
[Divide Data]
When you select this check box, the file is divided so that it no longer exceeds the limit and is sent as multiple deliveries. The recipient's e-mail software must support a function for re-joining the received file.
I-Fax

[Name]
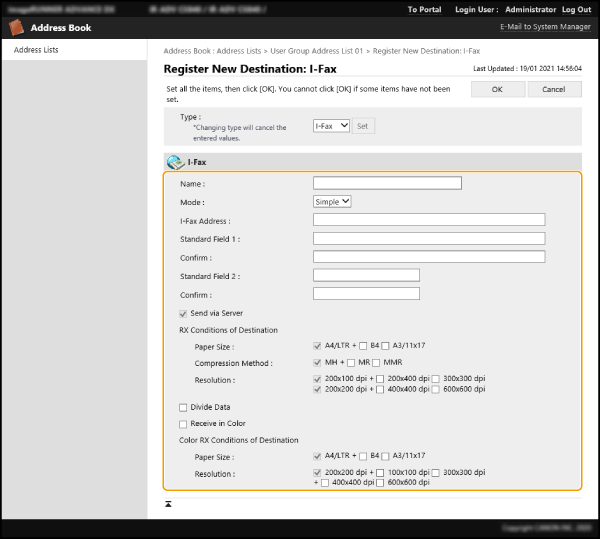
Enter the destination name to appear in the Address Book.
[Mode]
Configure the settings for the TX report shown when you press  (Status Monitor). Select [Full] if you want to check whether an I-Fax was delivered to the recipient's device, or [Simple] if you want to check whether the I-Fax was delivered to a mail server. Note that you cannot check the TX report if the recipient's device does not support the [Mode] function.
 (Status Monitor). Select [Full] if you want to check whether an I-Fax was delivered to the recipient's device, or [Simple] if you want to check whether the I-Fax was delivered to a mail server. Note that you cannot check the TX report if the recipient's device does not support the [Mode] function.
[Mode]
Enter the I-Fax address. Enter a destination in the "adv01@example.com" format.
When sending to a device on the same network, use the following format: "adv01@[192.168.11.100]" (recipient's device name@[IP address]).
[Standard Field 1]/[Standard Field 2]/[Confirm]
Register standard fields when using an Internet fax service. If you do not use such services, you can omit this setting. For more information, contact your Internet service provider.
[Send via Server]
Specify whether to send I-Faxes to destinations via a mail server. Select this check box to send I-Faxes via a mail server, or deselect the check box to send data directly to a device on the same local area network (LAN). Sending directly to the device lets you to send large amounts of data without placing an excessive burden on the mail server.
NOTE
To send an I-Fax using an IP address format other than "user name@[destination IP address]" without using a mail server, settings such as an MX (Mail eXchange) record need to be configured on the DNS server. Check with your network administrator to see whether this setting is available.
Even if you deselect the [Send via Server] check box, I-Fax TX reports sent using Full mode are still checked via the server.
[Paper Size]
Specify the paper size that can be received at the destination. Check that the paper size for the file being sent matches the specifications of the destination device before specifying this setting.
[Compression Method]
Select a file compression method. The compression rate is highest for MMR, followed by MR, and then MH. The higher the compression rate, the shorter the transmission time.
[Resolution]
Select a higher value to increase the resolution and image quality. Note that the higher the resolution, the longer the transmission time.
[Divide Data]
When the size of a file exceeds the limit for I-Fax transmissions, you can choose to divide the file based on either size or pages.
Selecting this check box divides the file so that it no longer exceeds the limit and is sent as multiple deliveries. The recipient's device must support a function for re-joining the received file.
If you deselect the [Send via Server] check box, the data is sent without being divided, even if it exceeds the maximum size limit.
[Receive in Color]
Selecting this check box lets you to send in color if the destination device supports color reception. Specify the [Paper Size] and [Resolution] in [Color RX Conditions of Destination].
NOTE
Depending on your model, this setting may not be available.
Faxes

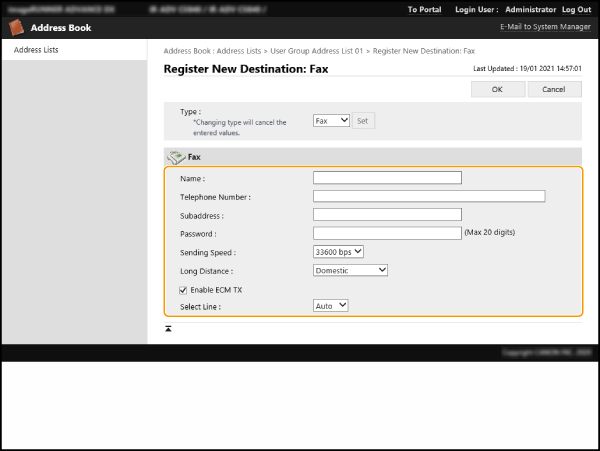
[Name]
Enter the destination name to appear in the Address Book.
[Telephone Number]
Enter the fax number using the numeric keys.
[Subaddress]/[Password]
Specify this setting for confidential communication using subaddresses.
[Sending Speed]
The condition of the line and the destination machine may affect the sending speed and lead to transmission errors. If such errors occur frequently, try lowering the speed in this setting.
[Long Distance]
If communication errors frequently occur when sending to overseas destinations, select [Long Distance (1)]. If errors still persist, specify [Long Distance (2)] and then [Long Distance (3)].
[Enable ECM TX]
Select this check box to correct image corruption. If the destination fax machine does not support ECM transmissions, deselect this check box.
NOTE
To use ECM transmission, you must set  (Settings/Registration)
  <Function Settings>
  <Send>
  <Fax Settings>
  <ECM TX> to <On>.
 (Settings/Registration)
  <Function Settings>
  <Send>
  <Fax Settings>
  <ECM TX> to <On>.
[Select Line]
If there are multiple lines, select the line to be used for transmission.
Files

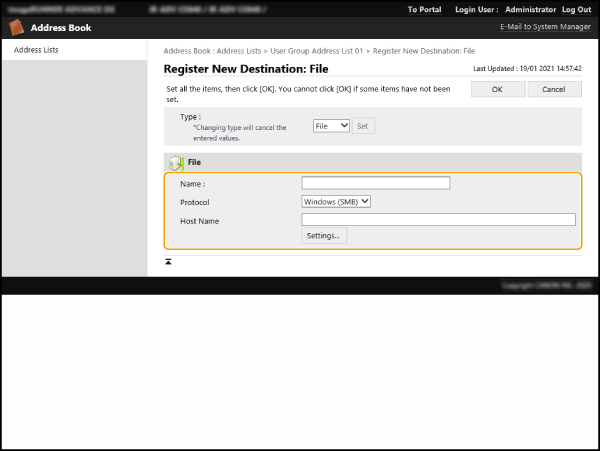
[Name]
Enter the destination name you want to appear in the Address Book.
[Protocol]
Select [Windows (SMB)], [FTP] or [WebDAV] as the file server protocol. When sending to an Advanced Box, select [Windows (SMB)] or [WebDAV].
[Host Name]
Enter the host name for the file server or Advanced Box.
If you selected [FTP] as the protocol, enter the [Host Name] as shown below.
With TLS disabled
E.g.:
When saving to shared space: ftp://host name/share
When saving to personal space: ftp://host name/users
E.g.:
When saving to shared space: ftp://host name/share
When saving to personal space: ftp://host name/users
With TLS enabled
E.g.:
When saving to shared space: ftps://host name/share
When saving to personal space: ftps://host name/users
E.g.:
When saving to shared space: ftps://host name/share
When saving to personal space: ftps://host name/users
When sending to an Advanced Box, enter the [Host Name] as shown below.
If you selected [Windows (SMB)] as the protocol
E.g.:
When saving to shared space: \\192.168.100.50\share
When saving to personal space: \\192.168.100.50\users
E.g.:
When saving to shared space: \\192.168.100.50\share
When saving to personal space: \\192.168.100.50\users
If you selected [WebDAV] as the protocol
With TLS disabled
E.g.:
When saving to shared space: http://IP address or host name
When saving to personal space: http://IP address or host name
With TLS enabled
E.g.:
When saving to shared space: https://IP address or host name
When saving to personal space: https://IP address or host name
With TLS disabled
E.g.:
When saving to shared space: http://IP address or host name
When saving to personal space: http://IP address or host name
With TLS enabled
E.g.:
When saving to shared space: https://IP address or host name
When saving to personal space: https://IP address or host name
[Settings]
Click [Settings] to configure the following settings:
[Folder Path]
To create a folder for sorting on the file server, enter the folder name. You can also send the file without entering a folder name.
[User Name]
Enter the user name used when logging in to the file server.
[Password]
Enter the password for the user name.
[Confirm]
Enter the same password.
NOTE
Even if you select the [Confirm Before Sending] check box, the password input screen does not appears when the file is forwarded. The file is forwarded using the registered password.
When you select the [Sort Files by Creating Sorting Folder] check box, each time you send a file, a new folder is created in the folder specified in [Folder Path], and the file is stored in that folder. When you send a file, you can create a new folder and store the file in that folder at the same time.
* This item is displayed only when [Windows (SMB)] or [FTP] is selected in [Protocol].
* This item is displayed only when [Windows (SMB)] or [FTP] is selected in [Protocol].
Registering a group destination

1
Click [Register New Group...].
2
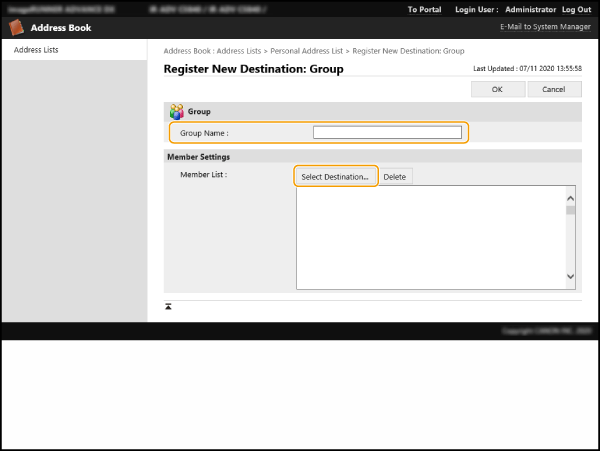
Enter the [Group Name] and click [Select Destination] in [Member List].
3
Select the check box for the destination to be registered in the group, and then click [OK].
4
Click [OK].
Registering an address list name

Click [Register Address List Name...] or [Register/Change Address List Name], enter the name, and then click [OK].
NOTE
You can configure the settings so that, if a user group is renamed, the linked user group address list is also renamed accordingly. Log in from the Remote UI as a user with administrator privileges, and then select the [Apply User Group Name Change to User Group Address List Name] check box in [Settings/Registration]  [Set Destination]
  [Personal Address List/User Group Address List Settings]. The [Apply User Group Name Change to User Group Address List Name] option is only enabled when personal authentication management is used.
 [Set Destination]
  [Personal Address List/User Group Address List Settings]. The [Apply User Group Name Change to User Group Address List Name] option is only enabled when personal authentication management is used.
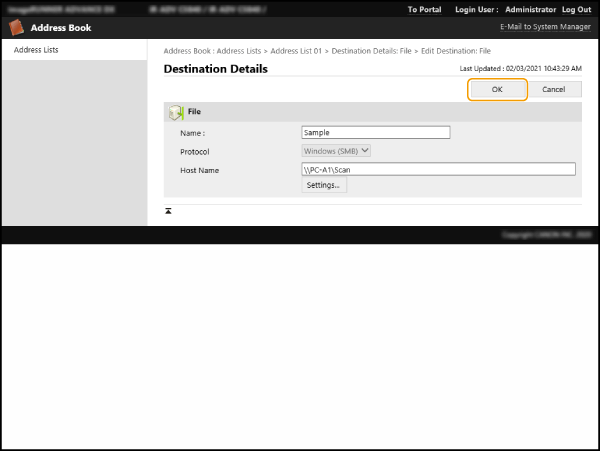
Checking and editing destination details

You can check detailed destination information by clicking the [Type] icon or the destination name. To edit the destination, click [Edit], edit the registered information, and then click [OK].
