CHYE-002
Sending Scanned Documents to a Shared Folder on My Computer (macOS)
This section describes how to send scanned files to a shared folder on your Mac.
Perform steps 1 to 3 in order.
This description is for macOS 10.15.
IMPORTANT
Be sure to set a password for the login user on the destination Mac. If no password is set, a send error may occur.
Step 1: Create a Shared Folder on Your Mac
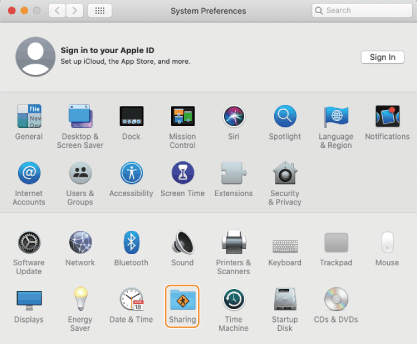
1
Select [ ]
]  [System Preferences].
] 2
Click [Sharing].
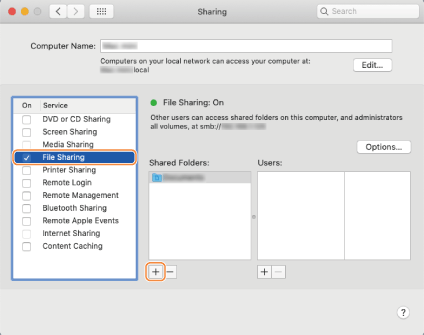
3
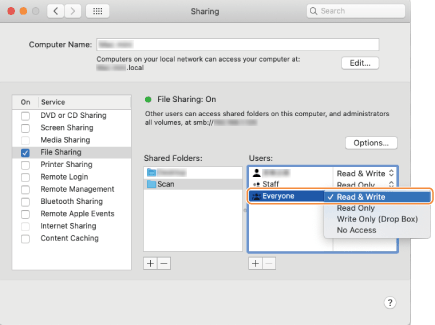
Select the [File Sharing] checkbox and click [+] for [Shared Folders].
4
Create a folder to be shared in any location and click [Add].
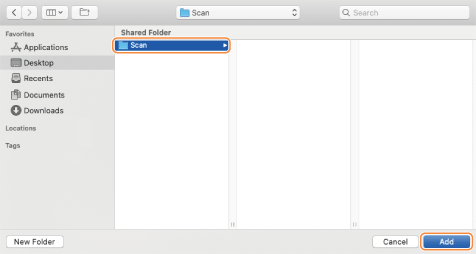
Here, we are creating a "Scan" folder on the desktop.
You can also select an existing folder.
5
Select the "Scan" folder created in [Shared Folders].
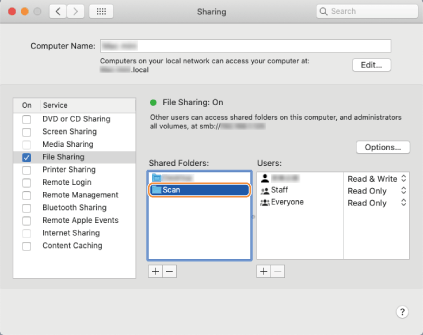
6
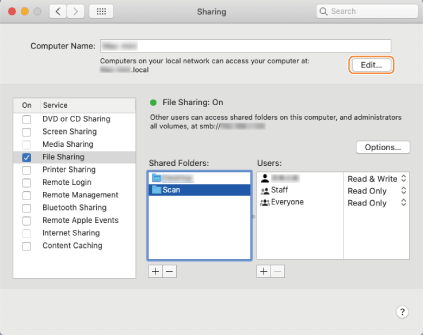
Select [Users] [Everyone] [Read & Write].
7
Close the window.
Step 2: Register the Shared Folder in the Machine's Address Book
1
Check the name of your Mac (local host name).
NOTE
The computer name also appears in [Computer Name] in the Sharing window, but this name may not be usable on a network. Be sure to check using the procedure shown below.
1
Select [] [System Preferences].
] 2
Click [Sharing].

3
Click [Edit].
4
Make a note of the local host name displayed.
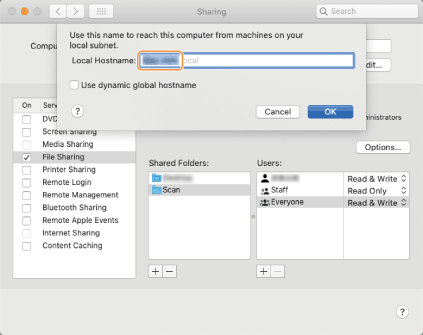
The grayed out portion of the local host name is not included.
The computer name used in this description is "PC-A1."
5
Click [OK].
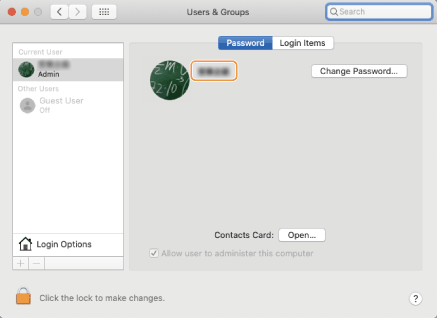
2
Check the login user name for your Mac.
1
Select [] [System Preferences].
] 2
Click [Users & Groups].
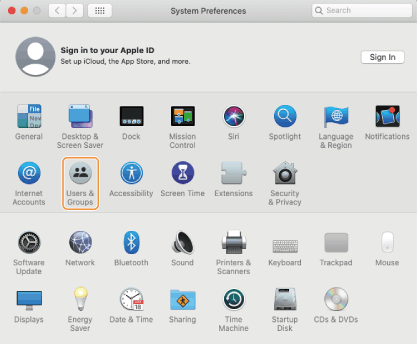
3
With [Current User] selected, make a note of the login user name.
3
On the <Home> screen, press <Dest./Fwd. Settings>.
4
Press <Register Destinations> <Register New Destination> <File>.
5
Configure the destination settings.
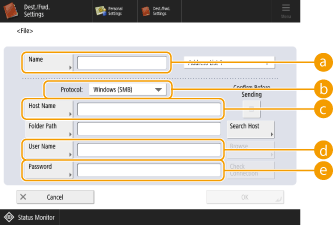
 <Name>
Enter the destination name. Because the name entered here will appear in the Address Book list, use a name that is easy to find.
 <Protocol>
Select <Windows (SMB)>.
 <Host Name>
Enter the computer name and shared folder name as shown below.
\\Computer Name\Shared Folder Name
Example: \\PC-A1\Scan
\\Computer Name\Shared Folder Name
Example: \\PC-A1\Scan
NOTE
If a connection error occurs, enter your computer's IP address in <Host Name>.
\\IP Address\Shared Folder Name
Check your Mac's IP address as shown below.
[ ] [System Preferences] [Network] Check the IP address
]  <User Name>
Enter the login user name for your computer.
 <Password>
Enter the login user password.
6
Press <Check Connection> to check that your computer is connected correctly.
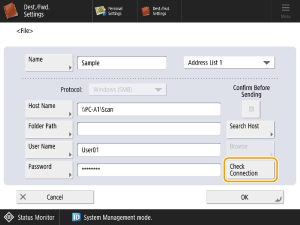
7
Press <OK>.
Step 3: Send Scanned Originals to the Shared Folder
1
Place your originals in the feeder or on the platen glass.
2
On the <Home> screen, press <Scan and Send>.
3
Press <Address Book>.
4
Select the shared folder from the Address Book, and press <OK>.
5
Specify the scan settings as needed.
While there are various scan settings, this description explains how to specify the file format.
1
Press the setting button for file format.
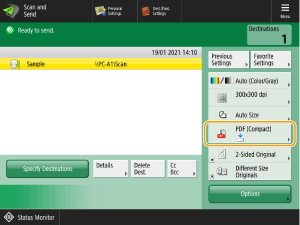
2
Select the file format.
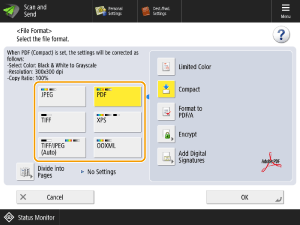
When <PDF>, <XPS>, or <OOXML> is selected, you can also set various additional functions. To specify the settings, select the function to be added.
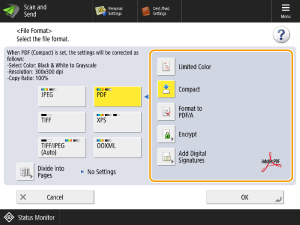
3
Press <OK>.
6
Press  (Start).
(Start).The originals are scanned and the files are saved in the shared folder.