8KAJ-01E
How to Select a Paper Tray with More Paper Loading Capacity for Large Volumes of Printing
You can specify the paper tray for each function. Check the solution below.
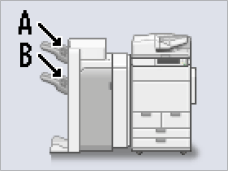
The finisher has more than one paper tray, and the lower tray can stack many more printouts than the upper tray. If you designate the lower tray for large volumes of printing, productivity improves because you do not need to remove the printed paper as often.
Staple Finisher-AG
Paper loading capacity of tray B is larger than that of tray A. For more information on specifying the output tray, see the following.
 "Settings/Registration" > "<Function Settings>" > "<Common>" > "<Paper Output Settings>" in the User's Guide > see the subsection "<Output Tray Settings>"
NOTE
Depending on the finisher you are using, it may have three paper trays. In this case, the paper loading capacity increases in the order of Tray A, Tray B, and Tray C.
High Volume Stack Mode
If you set the High Volume Stack Mode to 'On', the tray order to which printouts are output is fixed. For example, when you print a job to tray A and B on the Staple Finisher-AG with the High Volume Stack Mode 'On', the printouts are stacked on the tray B first, and after the tray B reaches its capacity, the printed paper is stacked on tray A. You can improve productivity by setting the High Volume Stack Mode to 'On' and using tray B first. For more information on the High Volume Stack Mode, see the following.
 "Settings/Registration" > "<Function Settings>" > "<Common>" > "<Paper Output Settings>" in the User's Guide > see the subsection "<High Volume Stack Mode>"
NOTE
Depending on the finisher you are using, the High Volume Stack Mode may not be available.