Uninstalling the Printer Driver
It is recommended that you use the Installer to uninstall an unnecessary driver.
IMPORTANT |
When you upgrade a driver, you can overwrite the old driver with a newer one. Uninstalling the driver is not required before the upgrade. |
1.
Open [System Settings] in macOS → click [Printers & Scanners] in the sidebar.
2.
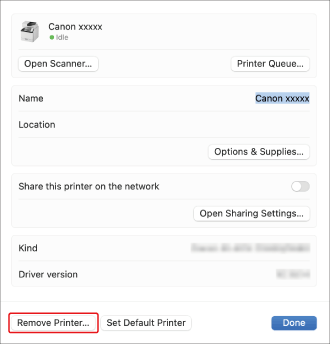
Select the printer to uninstall.
3.
In the displayed dialog box, click [Remove Printer].
4.
Close the [Printers & Scanners] dialog box.
5.
Click "Finder" in "Dock".
6.
Select [Go] → [Go to Folder] from the menu bar.
7.
Enter the following folder locations to go to the desired folder, then delete the files and folders.
Delete Example: You can delete files and folders by dragging them to "Trash" in "Dock".
Location | Files and folders to delete |
/Library/Printers/Canon/ | CUPS_SFP |
/Library/Printers/PPDs/Contents/Resources/ | CNPZN***ZN.ppd.gz |
/usr/libexec/cups/backend/ | canonoipnetzn |
/usr/libexec/cups/backend/ | canonoipusbzn |
/Library/LaunchAgents/ | jp.co.canon.CUPSSFP.BG.plist |
 | Where *** indicates a character string that represents the printer model. |
 When a confirmation dialog box is displayed When a confirmation dialog box is displayedEnter the administrator's name and password, and then click [OK]. |
8.
Close all open windows.
9.
Restart your computer.
The printer driver is uninstalled.