[Options] Menu
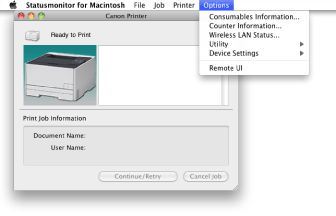
The following are the functions in the [Options] menu of the Statusmonitor.

[Consumables Information]
You can check the statuses of the consumables.
[Counter Information]
Displays the total number of printed pages and so on.
[Wireless LAN Status]
Allows you to check the wireless LAN connection status (signal strength).
[Utility]
Enables you to clean the fixing roller, adjust the printing position, etc.
[Calibration] | Performs calibration of the printer manually. Perform calibration when the colors have changed and the data is not printed in the correct colors (specified colors). |
[Color Mismatch Correction] | When a color mismatch occurs, this option allows you to correct it by adjusting the print start positions of each color. |
[Cleaning]/[Cleaning 1] | If the front or back of the printed paper has smudge marks, clean the fixing roller of the printer. |
[Cleaning 2] | If the transfer belt has dirt, this may result in deterioration in print quality. In this case, clean the transfer belt. |
[Configuration Page Print] | Prints the current printer status such as the settings for [Device Settings] in the [Options] menu. |
[Printing Position Adjustment Print] | You can print a printing position check sheet ("Printing Position Adjustment Print") and check the printing position. |
[User Data List] | Prints the current printer status such as the settings for [Device Settings] in the [Options] menu. |
[PCL Font List] | You can print a list to check the fonts available in PCL mode. |
[Enter/Cancel Firmware Update Mode] | Enters or cancels firmware update mode. |
[Device Settings]
Enables you to specify the printer settings or take measures against problems.
[Switch Paper Feed Method] | When you print on preprinted paper, you need to change the facing of the paper to load each time you perform 1-sided and 2-sided printing. However, if [Switch Paper Feed Method] is set to [Print Side Priority], the facing that you use for loading preprinted paper for 2-sided printing (logo side face down) can also be used for 1-sided printing. | ||||
[Action When Paper Size Mismatch Settings] | Set whether printing goes ahead if a paper size other than the size loaded in the paper source is selected. You can also set the machine not to go ahead with printing and instead display an alert message. | ||||
[Paper Source Settings] | You can perform operations such as registering the paper size and paper type that are set in the paper drawer. When printing on heavy paper with a rough surface, the toner may not be transferred sufficiently, resulting in blurred printing. If this happens, the problem may be improved by selecting the [Use Rough Paper] check box. | ||||
[Multi-purpose Tray Settings] | You can specify whether to prioritize paper feed from the multi-purpose tray when [Paper Source] in the printer driver's [Paper Source] panel is set to [Auto] (automatic paper source selection). | ||||
[Printing Position Adjustment] | You can adjust the printing position if it is skewed. | ||||
[Settings for Cancel Job Key] | You can specify whether to allow the use of the printer's Cancel Job key. | ||||
[Settings to Disable Wi-Fi Key] | You can specify whether to disable the printer's Wi-Fi key. | ||||
[Sleep Settings] | You can specify whether to use the sleep mode and the time until the printer enters the sleep mode. | ||||
[Auto Shutdown Settings] | You can specify whether to use auto shutdown and the time to switch to auto shutdown. | ||||
[Image Quality Adjustment Settings] | You can specify whether image quality adjustment should be performed at the specified time or immediately after the printer is turned ON. | ||||
[Warning Display Settings] | [Display Cartridge Replacement Notice]: Select whether to display a warning message when the consumables are nearing the end of its life. [Display Toner Cartridge Replacement Notice]: You can specify whether to display the message indicating that consumables need to be replaced. [Display End of Toner Cartridge Lifetime Warning]: Select whether to display a warning message when print quality cannot be guaranteed due to the consumables nearing the end of its life and so on. | ||||
[Warning Display Details] | You can specify the amount of remaining consumables to display the consumables replacement notice. | ||||
[Paper Size Override Settings] | You can specify whether to print by overriding the paper size if paper of the size specified in the printer driver is not set in the printer. | ||||
[Assisting Print Settings] | You can specify settings for improving problems in the printing results. | ||||
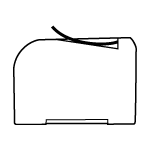
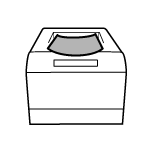
[Perform Curl Correction for Output Paper] | The following problems may occur depending on the operating environment (especially in a high-humidity environment) when 16.0 to 19.7 lb Bond (60 to 74 g/m2) paper is printed. Residual images appear on non-printed areas Printed paper comes out wrinkled Output paper curls as shown in either of the following figures
If any of these happens, the problem may be improved by selecting the check box for this option. When damp paper is printed, the printed paper may curl (the printed side may curl outward). If this happens, the problem may be improved by selecting the check box for this option. | ||||
[Prevent Poor Quality after Long Idle] | When printing after the printer is left unused for a long period of time, or depending on the paper type, thin lateral streaks (or lines) may appear in halftone or blank areas of the printed paper. If this happens, the problem may be improved by selecting the check box for this option. | ||||
[Perform Envelope Cling Prevention When Printing] | When printing envelopes, the flaps may stick to the body of the envelopes depending on the type of the envelopes or the operating environment (especially in a high-humidity environment). If this happens, the problem may be improved by selecting the check box for this option. | ||||
[Perform Envelope Wrinkle Reduction When Printing] | When printing envelopes, the envelopes may crease depending on the type of the envelopes or the operating environment (especially in a high-humidity environment). If this happens, the problem may be improved by selecting the check box for this option. | ||||
[Print in Quiet Mode] | Specify whether or not to print in the quiet mode. If the check box is selected, you can reduce the printing noise compared to when the check box is not selected. | ||||
[Reduce Toner Spots Around Text] | Depending on the paper type (especially for heavy paper) or the operating environment (especially in a low-humidity environment), smudge marks of spattering toner may appear around the text or patterns. If this happens, the problem may be improved by selecting the check box for this option. | ||||
[Fine Line Blur Correction] | If blurred lines or contours appear on the printout, changing the setting for this option may improve the problem. | ||||
[Dark Print Reduction Mode] | If printouts are grayish, changing the setting for this option may improve the problem. Select the appropriate mode for the paper you use. | ||||
[Plain L Adjustment Mode] | If paper jams occur when you perform 1-sided printing with [Plain L] or [Plain L2] selected, changing the setting for this option may improve the problem. Normally, [Mode 1] is selected for automatic adjustment, but you can change the setting to suit your environment. The improving effect is greater with [Mode 3] than with [Mode 2]. | ||||
[Select Line Width] | If printed barcodes cannot be scanned, changing the setting for this option may improve the problem. | ||||
[Special Print Adjustment A] | If vertical streaks appear on the printout, changing the setting for this option may improve the problem. The improving effect is least with [Mode 1] and greatest with [Mode 4]. Try the adjustment starting with [Mode 1]. | ||||
[Use Plain L 2-sided Adjustment Mode] | If paper jams occur when you perform 2-sided printing with [Plain L] or [Plain L2] selected, selecting the check box for this option may improve the problem. | ||||
[Use Transfer Adjustment Mode] | If printouts are faded in stripes, selecting the check box for this option may improve the problem. | ||||
[Remove Dirt] | If the front or back side of the printed paper has smudge marks, selecting the check box for this option may improve the problem. | ||||
[Clean Pressure Roller] | Select whether to always clean the rollers inside the printer. If you mind the operation noise escaping from the printer after printing is completed, you can use the printer with the check box for this option cleared. In this case, however, smudge marks may appear on the printout. | ||||
[Clean Drum] | If thin lateral streaks (or lines) appear in halftone or blank areas of the printout, selecting the check box for this option may improve the problem. | ||||
[Use High Density Mode] | If materials inside the toner cartridge have deteriorated, the printout may be faded as a whole. In this case, selecting the check box for this option may improve the problem. | ||||
[Adjust Standby Temperature] | If the printer does not receive data for a certain length of time, its internal temperature drops and therefore it may take some time for the printer to start printing after receiving the next print command. If the check box for this option is selected, the printer's internal temperature is maintained even during standby state, ensuring no delay in the start of printing. | ||||
[Curl Correction] | If the printed paper curls, selecting the check box for the paper source from which the paper was fed may improve the problem. | ||||
[Special Print Adjustment V] | If the printed paper curls or wrinkles, changing the setting for this option may improve the problem. The improving effect is least with [Mode 1] and greatest with [Mode 3]. Try the adjustment starting with [Mode 1]. | ||||
[Special Print Adjustment] | If vertical streaks appear on the printout, changing the setting for this option may improve the problem. The improving effect is least with [Mode 1] and greatest with [Mode 4]. Try the adjustment starting with [Mode 1]. | ||||
[Special Print Adjustment B] | After replacing the toner cartridge or when using a toner cartridge after a long time, vertical streaks may appear on printed documents. In this case, changing the setting for this option may improve the problem. The improving effect is least with [Mode 1] and greatest with [Mode 3]. Try the adjustment starting with [Mode 1]. | ||||
[Use Special Print Adjustment D] | If vertical streaks appear on the printout, selecting the check box for this option may improve the problem. | ||||
[Use Special Print Adjustment U] | Depending on the paper type (especially for heavy paper) or the operating environment (especially in a low-humidity environment), smudge marks of spattering toner may appear around the text or patterns. In this case, selecting the check box for this option may improve the problem. | ||||
[Use Special Print Adjustment I] | Depending on the paper type (especially when using thin or curled paper), paper jams may occur frequently when performing 2-sided printing. In this case, selecting the check box for this option may improve the problem. | ||||
[Use Special Print Adjustment J] | Printed paper may be spotted when printing thin lines or light images. In this case, selecting the check box for this option may improve the problem. | ||||
[Use Special Print Adjustment K] | Depending on the environment (especially in low temperature environments), toner may not be fixed sufficiently and output may be less clear. In this case, selecting the check box for this option may improve the problem. | ||||
[Use Special Print Adjustment G] | Printing paper with a lot of paper dust may cause the image to be faint or streaks to appear. In this case, selecting the check box for this option may improve the problem. | ||||
[Use Special Print Adjustment Q] | Depending on the paper type (especially for rough surface), images may be faded. In this case, selecting the check box for this option may improve the problem. | ||||
[Use Special Print Adjustment T] | Depending on the environment (especially in a humid environment), printing may be uneven. In this case, selecting the check box for this option may improve the problem. | ||||
[Use Special Print Adjustment L] | Printing paper with dust or dirt on it may cause dirt to appear in print results. In this case, selecting the check box for this option may improve the problem. | ||||
[Mobile Print Settings] | You can specify the image processing when printing from a mobile device with Mopria®, etc. Select [Gradation] for photos and illustrations, and [Error Diffusion] for mostly text documents for more attractive printouts. | ||||
[Select Language for User Data List] | You can select the display language used for User Data List. |
[Remote UI]
Starts the Remote UI.
The Remote UI is software that allows you to manage the printer using a web browser.
For details on the Remote UI, refer to the manuals provided with the device.
The Remote UI is software that allows you to manage the printer using a web browser.
For details on the Remote UI, refer to the manuals provided with the device.
NOTE |
If the printer is registered with a Bonjour connection, the Remote UI cannot be started up from the [Options] Menu. Start up the Remote UI using either of the following methods. Select the printer you use in the [Printers & Scanners] dialog box, click [Options & Supplies], and then click [Show Printer Web Page] in the [General] tab. |

