ScanGear MF Settings
In ScanGear MF, you can set and adjust the intended use of the scanned image etc.
When scanning, you can configure settings in either the [Simple Mode] pane or the [Advanced Mode] pane.
Toolbar
In the preview, you can specify and manipulate the scan area (cropping frame).
If you manipulate the cropping frame with the mouse, you can change the size of and move the scanning area. Also, to specify multiple cropping frames, click outside the cropping frame and drag to enclose the area you want to additionally specify. You can set up to 10 cropping frames.
[ ]
]
Sets a cropping frame the same size as the image (auto crop).
The cropping frame narrows when you click the icon.
[ ]
]
Deletes the selected cropping frame.
[ ]/[
]/[ ]
]
Rotates the image 90 degrees to the right or left.
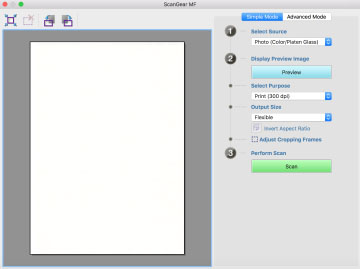
[Simple Mode] Pane
This pane combines the basic settings of the ScanGear MF scan settings. If you operate them in order of [1] to [3] in the pane, you can configure and scan with all the necessary settings.
[Select Source]
Sets the type, color, and where the original has been set. The image settings are adjusted according to the state of the original. If you select [Magazine (Color/Platen Glass)], you can reduce inconsistencies in contrast and moire patterns that occur when scanning printed materials.
[Preview]
When the original is set on the platen, this previews the current settings. The cropping frame that indicates the scanning area is displayed as dotted lines in the preview. In the preview, you can adjust the settings while checking the image.
If the cropping frame is not displayed, specify the area you want to scan in the previewed image by dragging the mouse.
[Select Purpose]
Specifies the intended use of a scanned image. The resolution is set according to the intended use.
[Output Size]
Specifies the printed size or displayed size of the image according to the purpose of use in [Select Purpose]. If you select [Flexible], you can change the size by dragging the cropping frame displayed in the preview.
If you select [Add/Delete], you can register the output size. You can register a maximum of 10 output sizes for each purpose of use in [Select Purpose].
Clicking [ Invert Aspect Ratio] switches the cropping frame between horizontal and vertical and switches the orientation of the output size. You cannot operate this if [Flexible] is selected.
Invert Aspect Ratio] switches the cropping frame between horizontal and vertical and switches the orientation of the output size. You cannot operate this if [Flexible] is selected.[Scan]
Scans the original with the current settings. When cropping frames have not been set, it scans the entire original.
[Advanced Mode] Pane
Adjusts the image quality in more detail than the [Simple Mode] pane.
[Input Settings]
Sets the setting method, size, and color mode of the original.
[Original Placement]
Specifies the method of setting the original in the device.
[Scan Size]
Specifies the scan size when scanning an original. The same size as the original is normally selected.
If you select [Add/Delete], you can set any desired size.
If [Flexible] is selected, scanning will be performed according to the size of the originals loaded in the feeder.
[Orientation]
If you set the original in the feeder, this is set to match the orientation of the original, Also, when you set a double-sided original, you can also set [Book Opening].
[Color Mode]
Specifies the color mode of the original to be scanned.
[Output Settings]
Sets the output resolution and output size.
[Resolution]
Specifies the resolution according to the purpose of the image.
[Output Size]
Specifies the print size or display size of the scanned image.
If you select [Add/Delete], you can set any desired size.
Clicking [] changes the direction of the cropping frame and switches the orientation of the output size.
] changes the direction of the cropping frame and switches the orientation of the output size.When [Flexible] is selected, you can drag and select the part you want to scan in the image displayed in the preview to set the output size.
If you select [Add/Delete], you can register the output size. You can register a maximum of 10 output sizes for each [Purpose] in [Add/Delete].
[Data Size]
In the [Resolution] and [Output Size] settings, the image data size is displayed when scanning an original.
[Image Settings]
When scanning a photographic original, this corrects scratches and color fade.
You can set this when color or [Grayscale] is selected in [Input Settings] > [Color Mode].
[Use Unsharp Mask]
Emphasizes the contours of images to give them a sharp effect. This is effective when scanning photographs etc. that are out of focus.
[Use Descreen]
Reduces density inconsistencies and moire (striped) patterns that occur when scanning printed photographs, color magazines, etc.
[Correct Black Text]
Clarifies the contours of black text.
[ ](Threshold)
Adjusts the threshold value for black and white images.
You can set this when [Black and White] is selected in [Input Settings] > [Color Mode].
[Threshold Level]
When scanning with two tones of black and white, changes the threshold value and adjusts the contrast.
[Color Settings]
Configures settings relating to color matching and gamma adjustment.
[Color Correction]
Specifies the color adjustment method.
[Color Matching]: Automatically matches the colors of the scanner, monitor, and color printer. You can set this when color is selected for the [Advanced Mode] pane > [Color Mode].
[None]: Does not perform color matching. You can set this when color or [Grayscale] is selected in the [Advanced Mode] pane > [Color Mode].
[Display Gamma]
Sets the gamma value of the display so that the image is displayed with a brightness that is faithful to the original.
When color or [Grayscale] is selected for the [Advanced Mode] pane > [Color Mode], the gamma value setting is reflected in the image.
[Preview]
When the original is set on the platen, this previews the current settings. The cropping frame that indicates the scanning area is displayed as dotted lines in the preview.
In the preview, you can adjust the settings while checking the image.
If the cropping frame is not displayed, specify the area you want to scan in the previewed image by dragging the mouse.
[Scan]
Scans the original with the current settings. When cropping frames have not been set, it scans the entire original.