Adding a Self-Signed Certificate
You can create and add a self-signed certificate with Desktop Editor.
|
NOTE
|
|
For information on the screen transition of Desktop Editor, see the following.
|
1.
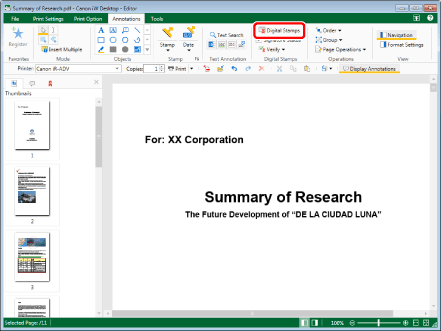
Click  (Digital Stamps) on the ribbon.
 (Digital Stamps) on the ribbon.
The Digital Stamps Mode starts and the [Digital Stamps] tab is displayed on the ribbon.
|
NOTE
|
|
This operation can also be performed with the tool buttons on the toolbar. If tool buttons are not displayed on the toolbar of Desktop Editor, see the following to display them.
While the Digital Stamps Mode is running, tabs other than the [Digital Stamps] tab are not displayed on the ribbon.
The [Annotation List] tab on the Navigation Window is hidden while the Digital Stamps Mode is running.
|
2.
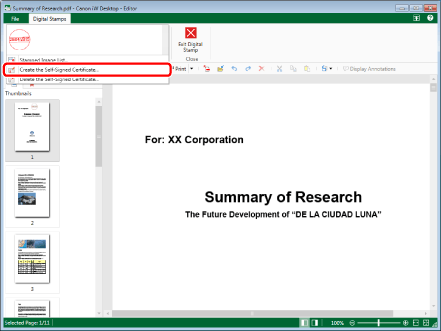
Click  in the list of digital stamps on the ribbon, and select [Create the Self-Signed Certificate].

The [Create the Self-Signed Certificate] dialog box is displayed.
3.
Enter the issuer name of the self-signed certificate in [Issuer] and click [OK].

The self-signed certificate is added.
|
NOTE
|
|
By default, the login user name of your computer is displayed in [Issuer].
A maximum of 64 characters can be entered in [Issuer].
A self-signed certificate cannot be created if [Issuer] is blank or composed entirely of spaces.
The first and last spaces entered in [Issuer] are deleted when creating the certificate.
The information of the self-signed certificate created in Desktop Editor can be checked using the method indicated below.
1. Start Internet Explorer.
2. Select [Tools] > [Internet Options].
3. Select the [Content] tab.
4. Click [Certificates].
5. When you double-click a certificate to check the information for, the [Certificates] dialog box is displayed.
6. Select the [Details] tab, and confirm the detailed information for the certificate.
The following properties are displayed for a certificate created with Desktop Editor.
[Field]: 1.2.392.20046.101.6.1
[Value]: 0c 03 31 2e 30
A self-signed certificate created in Desktop Editor is valid for five years from the time of creation.
|