Encrypting and Printing Data
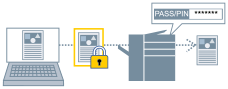
You can send print data to the device in an encrypted state. This alleviates the risk of data manipulation and information leakage occurring in the communication path through which the print data is being sent. This function is called Encrypted Secure Print.
The saved data can be printed by entering the password in the control panel of the device.
Prerequisites
Configure the following items relating to Encrypted Secure Print in the default settings.
You can configure the default settings by displaying the print settings screen from the icon of the device in [Devices and Printers]. For details about how to configure the settings, refer to the help in the print settings screen displayed by the default settings.
Enable the Encrypted Secure Print function
Set the PIN (or password)
If you register the PIN as a default setting, you can avoid the effort of setting it when you print.
 NOTE
NOTEIn a shared printer environment, it is necessary to enable the CSR (Client Side Rendering) function of Windows on the server side. You can enable the CSR function by the following method.
(1) Right-click the icon of the printer you are using → click [Printer properties].
(2) Display the [Sharing] sheet → check that [Share this printer] is selected → select [Render print jobs on client computers].
Procedures
1.
Display the [Main] sheet.
2.
Select [Secure Print] from [Output Method].
3.
In the [Secure Print Settings] screen, select [Use a PIN/password for Encrypted Secure Print] → click [OK].
If you can enter a PIN or password in [PIN/Password], do so and click [OK].
NOTEIf you printed without setting a password, the print job is cancelled.
When registering Encrypted Secure Print settings as a favorite, check that [Preferences] > [Store authentication information in favorite settings] in the [Support/Device] sheet is enabled. If [Store authentication information in favorite settings] is disabled, the password is not stored in favorites.