Using an Address Book Created in Excel
When you fax documents using the [Fax Sending Settings] dialog box of Desktop, you can use an address book created in Excel.
|
NOTE
|
|
The following file types can be used for address books.
Excel (.xlsx/.xlsm/.xlsb/.xls)
CSV (.csv)
For other ways to set destinations, see the following.
To send faxes with the IP fax function, your device must support the IP fax function.
|
1.
Prepare an address book created in Excel.

The address items to enter in each column of the address book is indicated below.
|
Column A
|
Destination Name
|
|
Column B
|
Company Name
|
|
Column C
|
Department
|
|
Column D
|
Fax Number 1
|
|
Column E
|
Fax Number 2
|
|
Column F
|
Enter the following number corresponding to [Communication Mode] for the IP fax function.
1: Intranet
4: VoIP Gateway
|
|
Column G
|
Enter the following number corresponding to [Fax Number/URI] for the IP fax function.
0: Fax Number
1: URI
|
|
Column H
|
A maximum of 120 characters can be entered for the IP fax number.
|
|
NOTE
|
|
The first line in an Excel address book is the header. The header is not imported as an address.
Set [Format Cells] to [Text] for each column.
For the G3/G4 fax function, column D must be entered. Column F to column H are not required.
For the IP fax function, column F to column H must be entered.
If more than one of Fax number 1, Fax number 2, or IP fax number are included in the address book, the addresses are displayed on separate lines in [Address List].
If you entered something other than "1" (Intranet) in column F, enter "0" (Fax Number) in column G.
|
2.
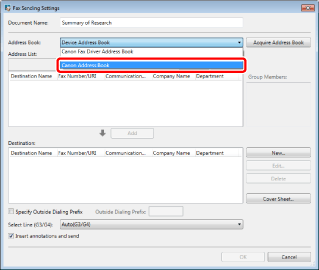
From the [Address Book] pull-down list in the [Fax Sending Settings] dialog box, select [Canon Address Book].

3.
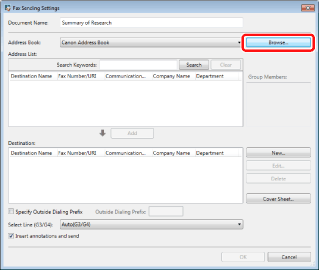
Click [Browse].

The [Open] dialog box is displayed.
4.
Select a file to import into the address book and click [Open].
The selected file is loaded and the addresses read from it are displayed in [Address List].
|
NOTE
|
|
If you selected an Excel file with multiple sheets, select the sheet to use as the address book in the [Select Sheet] dialog box.
If the address book you created is currently open in Excel, it is not imported.
|
5.
Select a destination address in [Address List] and click [Add].
The selected destination address is shown in [Destination].
|
NOTE
|
|
You can select more than one address from [Address List] to add as destination addresses.
When you enter a keyword in [Search Keywords], the search results are displayed in [Address List]. Clicking [Clear] will clear the search result.
When you select an address added to [Destination] and click [Edit], the [Edit New Destination Addresses] dialog box is displayed and you can edit the selected address.
When you select an address added to [Destination] and click [Delete], the selected address is deleted.
You can click item names in the [Address List] and [Destination] lists to sort the items in ascending or descending order.
|
6.
Set any other destination addresses if necessary.