Forwarding to a Mobile Computing Device
You can forward faxes via e-mail to a mobile computing device (laptop) with e-mail access, enabling the recipient to view the file on their mobile device while out of the office.
A total of 256 e-mail addresses, shared computer folders and other forwarding destinations can be registered, and you can perform a sequential broadcast transmission to all destinations (Universal Send). This enables users both in and out of the office to view the same document, on desktop computers and laptops respectively.
If you receive an urgent fax while out of the office, even if the fax is forwarded, you may have limited opportunities to check your laptop while out of the office and you have no way of knowing precisely when you receive a forwarded fax. However, you can set to receive automatic e-mail notification to your mobile phone when you receive a forwarded fax to your laptop.
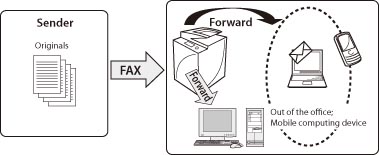
By setting a group address as the forwarding destination, you can perform a sequential broadcast transmission.
Number of Destinations Able to Be Registered in the Address Book
|
Address lists 1 to 10
|
Total of 1,600 destinations
|
|
One-touch buttons
|
200 destinations
|
|
Destinations (incl. group addresses)
|
Maximum of 1,800 destinations
|
|
Each group address
|
256 destinations
|
|
Sequential broadcast transmission
|
256 destinations
|
|
Required Condition
|
|
To forward a fax via e-mail, you must have e-mail access and specify e-mail settings on the machine.
|
Setting the Forwarding Done Notice
You can set to send a forwarding done notice to a specified e-mail address according to the original sender.
This is useful when you want to prevent nonessential notification.
This is useful when you want to prevent nonessential notification.
You can perform this procedure using the touch panel display or the Remote UI.
The screens may differ, depending on the model of the machine and on attached optional products.
Using the Touch Panel Display
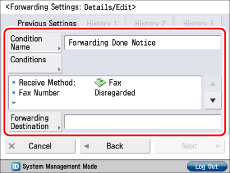
1.
Press  (Settings/Registration) → [Function Settings] → [Receive/Forward] → [Common Settings] → [Forwarding Settings] → [Register] → specify each setting.
 (Settings/Registration) → [Function Settings] → [Receive/Forward] → [Common Settings] → [Forwarding Settings] → [Register] → specify each setting.
2.
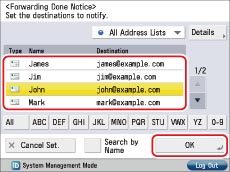
Press [Next] → [Fwd Done Notice] → select a registered e-mail address → press [OK].
3.
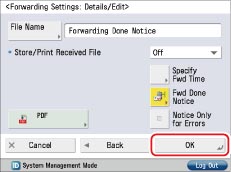
When you return to the screen for registering forwarding settings, the [Fwd Done Notice] button will have changed colour indicating that the setting is enabled. Press [OK] to complete the setting.
4.
Select the registered forwarding settings → set [Validate/Invalidate] to 'On'.
|
NOTE
|
|
The notification e-mail is sent at the same time as the fax is forwarded.
You can set to send a notification e-mail only when a forwarding error occurs.
You can select only one destination for a forwarding done notice. To send to multiple destinations, register the destinations under a single group address.
Forwarding done notices viewed on a mobile phone may have different layouts depending on the model of your phone.
Fax sender information is not included in the notification e-mail. Also, you cannot edit the content of the notification e-mail.
The notification e-mail also includes a link to the folder in which the forwarded document is stored.
It is recommended that you send a test mail prior to use.
|
Using the Remote UI
These settings can also be specified from the Remote UI.
1.
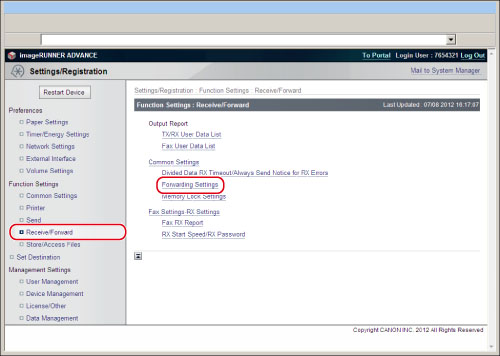
Access the Remote UI → click [Settings/Registration] → [Receive/Forward] → [Forwarding Settings].
2.
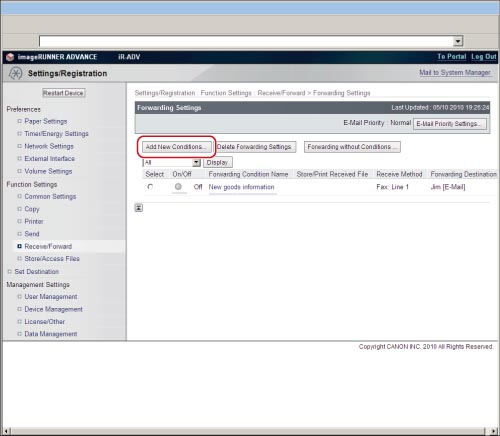
Register forwarding settings via [Add New Conditions]. These settings can also be specified from the Remote UI.
|
NOTE
|
|
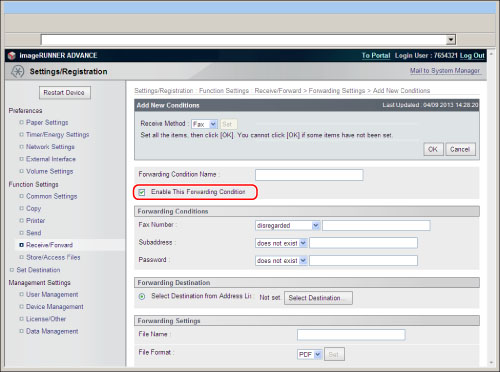
[Enable This Forwarding Condition] is equivalent to the [Validate/Invalidate] button in the forwarding settings screen on your imageRUNNER ADVANCE machine.
|
Reference Information
Forwarding File Format
You can receive forwarded documents in the following formats:
|
via Fax/Internet Fax/Intranet Fax
|
TIFF, PDF, XPS
|