Performing a Scan Using a Shortcut Key
Register destinations and frequently used settings in shortcut keys in advance, to perform a scan easily without needing to manually enter a destination and specify required settings.
Registering a Shortcut Key/Confirming the Destination Registered in the Shortcut Key
1
Press [ ] (Menu).
] (Menu).2
Select <Scan Settings> using [ ]or [
]or [ ] and press [OK].
]or [] and press [OK].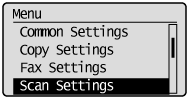
3
Select <Shortcut Key Settings> using [] or [] and press [OK].
] or [] and press [OK].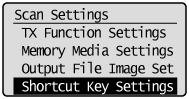
To store a new shortcut:
|
(1)
|
Select <Register> using [
] or [] and press [OK]. 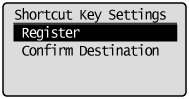 |
|||||||||||||||||||||||||
|
(2)
|
Select the shortcut key that you want to register using [
] or [] and press [OK].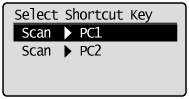 |
|||||||||||||||||||||||||
|
(3)
|
Select the connection method, using [
] or [] and press [OK].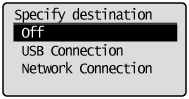 |
|||||||||||||||||||||||||
|
(4)
|
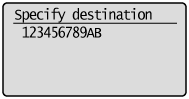
Select the destination using [
] or [] and press [OK].When one computer is connected to the machine via a USB cable:
This screen is not displayed. When more than ten computers are connected to the machine simultaneously.
Up to ten computers can be displayed as a list of computers connected to the machine. (Scanning cannot be performed otherwise). Reduce the number of computers connected to the machine over the network.
 |
|||||||||||||||||||||||||
|
(5)
|
Specify the scan settings using [
] or []and press [OK].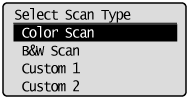
|


To confirm the destination registered in the shortcut key:
|
(1)
|
Select <Confirm Destination> using [
] or [] and press [OK]. 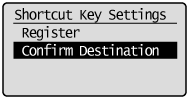 |
|
(2)
|
Select the destination that you want to confirm using [
] or [] and press [OK].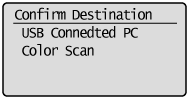 |
4
Press [] (Menu) to close the menu screen.
] (Menu) to close the menu screen.Performing a Scan Using a Shortcut Key
1
Place your document.
|
NOTE
|
When scanning from the operation panelYou cannot scan more than one document at a time.
|
2
Press [ ].
].
].
3
Press [ ] (Scan > PC1, Scan > PC2) into which the destination that you want to select is registered.
] (Scan > PC1, Scan > PC2) into which the destination that you want to select is registered.Scanning starts. When scanning is complete, the screen returns to the scan mode screen after the scanned document is saved.
|
 When scanning cannot be performed
 ] to close the screen before starting a scan.
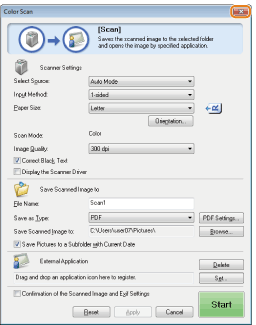
|
NOTE
|
To specify a location where the scanned images are saved:Once scanning is complete, a folder is automatically displayed to which the scanned images are saved. By default, a folder bearing the scanning date is created inside the [My Pictures] folder in [My Documents]. (On Windows Vista/Windows 7, the folder is created in the [Pictures] folder.)
To change the scan settings:You can re-specify the save location, file format, resolution, and other settings from a computer.
See "Using the MF Toolbox" for more information.
|