Setting a PIN for the Address Book
Set a PIN for the address book. Once the PIN is set, you need to enter it to register, edit, or delete destinations.
1
Press [ ] (Menu).
] (Menu).2
Select <System Settings> using [ ] or [
 ] and press [OK].
] or [] and press [OK].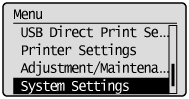
When the system manager ID and system manager PIN are specified
Use the numeric keys to enter the ID and number, and then press [ ] (Log In/Out).
] (Log In/Out).
3
Select <Restrict TX Function> using [] or [] and press [OK].
] or [] and press [OK].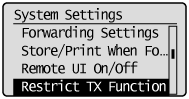
4
Select <Address Book PIN> using [] or [] and press [OK].
] or [] and press [OK].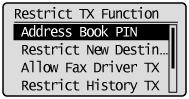
5
Enter the PIN using the numeric keys and press [OK].
The PIN can be up to 7 digits.
Press [OK] to display the confirmation screen. When the screen appears, enter the PIN again and press [OK].
Press [OK] to display the confirmation screen. When the screen appears, enter the PIN again and press [OK].
To clear the entered PIN
Press [ ] (Clear) to delete the PIN, and then press [OK].

6
Press [] (Menu) to close the menu screen.
] (Menu) to close the menu screen.