Setting Up the Fax Configuration (PC Fax)
In order to use this product correctly, be sure to set the options in the fax driver.
The fax configuration can be set up automatically while installing the driver. If the machine cannot be configured during the installation, follow the procedure below.
|
NOTE
|
|
To configure the fax option settings, you must log on to your computer as a member of the Administrators group.
The display may differ according to the operating system and fax driver version.
|
1.
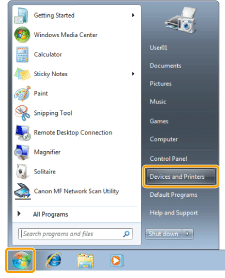
Click [ ] (Start) -> [Devices and Printers].
 ] (Start) -> [Devices and Printers].
|
NOTE
|
|
For Windows 8 and Server 2012: From the desktop, display the charm bar to the right of the screen, and click or tap [
 Settings] -> [Control Panel] -> [Devices and printers]. Settings] -> [Control Panel] -> [Devices and printers].For Windows Vista, click [
 ] (Start) -> [Control Panel] -> [Printers]. ] (Start) -> [Control Panel] -> [Printers].For Windows XP Professional/Server 2003, click [Start] -> [Printers and Faxes].
For Windows XP Home Edition, click [Start] -> [Control Panel] -> [Printers and Other Hardware] -> [Printers and Faxes].
For Windows Server 2008, on the [Start] menu, click [Control Panel] and then double-click [Printers].
|
2.
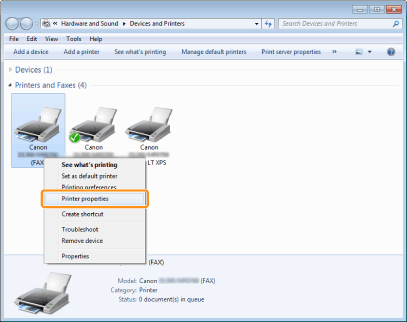
Right-click the icon of the fax whose settings you want to configure -> click [Printer properties] (or [Printer properties]) on the displayed menu.

3.
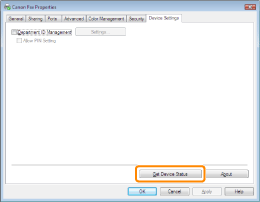
Select the [Device Settings] tab -> click [Get Device Status].

|
NOTE
|
|
If you want to share the fax, installing the Canon Driver Information Assist Service in the print server will enable you to use the [Get Device Status] function. To install [Canon Driver Information Assist Service], select [Custom Installation] when installing the driver.
If the fax and computer are connected via USB or a WSD (Web Services on Devices) port, the [Get Device Status] function is unavailable. You need to configure the settings manually.
|
4.
Confirm the settings -> click [OK].