Inside the Front Cover
Follow the procedure described below, and the procedure that appears on the touch panel display, to remove the jammed paper.
|
NOTE
|
|
The following illustration indicates the location of the paper jam. Please refer to it to remove the jammed paper.
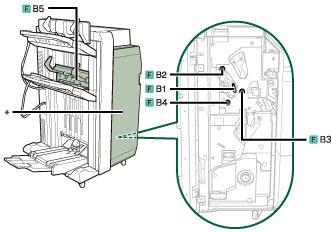 *Front Cover
|
1.
Open the front cover of the finisher.

2.
Open the guide (F-B1).

3.
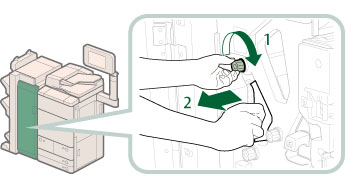
Turn the dial (F-B2) in the direction of the arrow (clockwise) and remove any jammed paper.
4.
Close the guide (F-B1).
 CAUTION CAUTION |
|
When closing the guide, be careful not to get your fingers caught, as this may result in personal injury.
|
5.
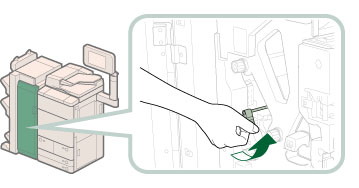
Turn the dial (F-B4) in the direction of the arrow (clockwise) and then the dial (F-B3) in the direction of the arrow (clockwise) to feed the jammed paper to the output slot.
 |
1. Turn the dial (F-B4) to feed the jammed paper to the output slot. |
2. Turn the dial (F-B3) to feed the jammed paper to the output slot. |
6.
Open the output slot (F-B5), and remove any jammed paper.

7.
Close the front cover of the finisher.
|
CAUTION |
|
When closing the cover, be careful not to get your fingers caught, as this may result in personal injury.
|
8.
Follow the instructions on the touch panel display.
|
NOTE
|
|
The screen indicating the directions on how to clear the paper jam is displayed repeatedly until the paper jam is cleared.
|