Stack Bypass Alignment Tray-C1
By using the Stack Bypass Alignment Tray-C1, you can reduce the amount of skew of paper (i.e. paper is transported diagonally) which is fed from the Stack Bypass-B1, and prevent the image misalignment.
Parts and Their Functions
 CAUTION CAUTION |
|
If the POD Deck Lite-B1 is attached, be careful not to get your hands caught in the gap between the Stack Bypass Alignment Tray-C1 and the POD Deck Lite-B1 when clearing paper jams.
|
|
IMPORTANT
|
|
You cannot pull out the auxiliary tray of the Stack Bypass-B1 when the Stack Bypass Alignment Tray-C1 is attached.
|
|
NOTE
|
|
For information on paper weight and paper size that can be used with the Stack Bypass Alignment Tray-C1, see items for the Stack Bypass-B1 in "Available Paper Stock."
|
|
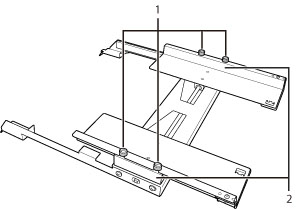
1.
|
Fixing Roulette Screws
Tighten or loosen the screws to adjust the paper alignment guides.
|
|
2.
|
Paper Alignment Guides
Stabilize the position of the loaded paper.
|