Adjusting the Saddle Stitch Fold Placement
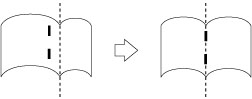
If you notice that the folds of the paper are not in the centre of the booklet, but the stitches are in the centre, you can make adjustments to the saddle stitch fold placement on the custom paper type.
This mode can be set when the Saddle Finisher-AM2 is attached. (See "Finisher-AM1/Saddle Finisher-AM2/Puncher Unit-BS1/Puncher Unit-BT1/Puncher Unit-BU1.")
|
IMPORTANT
|
|
This function is displayed only if the settings are made available by your local authorized Canon dealer. Even if this function is displayed, do not allow anyone to change the settings except for the system manager. For more information on changing the settings, contact your local authorized Canon dealer.
|
|
NOTE
|
|
If both the folds and stitches are not in the centre of the booklet, adjust the stitching position first in [Change Fold/Stitch Position], and then adjust the folding position in [Adj. Saddle Stitch Fold Pos.].
|
1.
Press  .
.
.2.
Press [Preferences] → [Paper Settings] → [Paper Type Management Settings].
3.
Select the paper type that you want to edit from the list → press [Details/Edit].
4.
Press [Change] for <Adj. Saddle Stitch Fold Pos.>.
5.
Press [ ] or [
 ] to adjust the saddle stitch fold placement → [OK].
] or [] to adjust the saddle stitch fold placement → [OK].If you want the saddle fold to shift to the right, increase the setting value.
If you want the saddle fold to shift to the left, decrease the setting value.
6.
Press [OK].