Pausing Print Jobs to Change Settings (Hold)
Job Hold Function enables you to temporarily store the data of print jobs in a queue in the Hold Inbox (Hold Queue) specialized for this function.
When submitting a job, you can select to print it directly or hold it in the Hold Queue.
|
Print
|
Sends a job directly to the Print Queue and prints it immediately. You must make sure that the submitted job is available for direct printing beforehand. Print jobs are submitted from the printer driver. You cannot change the job settings once after submitting print jobs.
|
|
Hold
|
Stores a submitted job in the Hold Queue. When the job is held in the Hold Queue, you can select it from the Hold Job List to print. By holding a job, you can change the job order. If the job has the JDF job ticket, you can check and change the finishing settings before printing.
|
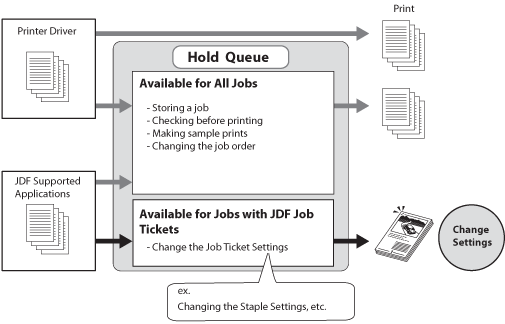
Practical Use of the Job Hold function
The Job Hold function enables you to create seamless workflow solutions between the main office and the factory.
By holding jobs, you can send jobs at any time.
The efficient work distribution is achieved by checking the current job conditions of each office.
Making a sample print and adjusting settings before printing enable you to prevent misprint.
The job order can be changed freely. Reducing the time to replace paper in the paper drawers provides you the efficient workflow.
When paper stock runs out, you can change the paper type before printing.
You can easily stop/restart the current job.
Settings Which Allow Job Ticket Editing
Part of a job with a job ticket can be edited with the machine.
Available settings are as follows.
|
Settings That Apply to the Whole Job
|
Settings That Only Apply to Certain Pages
of a Job
|
|
Number of Copies
Finishing
Collate
Group
Offset
Staple
Face Up/Face Down
|
Select Paper (Paper Type/Paper Source)
Gutter (Gutter Position/Gutter Width)
Shift Print Area
Halftones*
Adjust Toner Density*
Gradation Smoothing*
Color Mode*
* Only color print production has these settings.
|
Job Hold function and JDF job ticket editing ensure efficient workflows. This section explains the following two cases as examples to use the Job Hold function and JDF job ticket editing efficiently.
Submitting a Job from a Printer Driver
Editing Submitted Jobs with the JDF Job Ticket
Submitting a Job from a Printer Driver
This case explains how to submit multiple jobs in the Hold Queue, and change the job order before printing.
The screens may differ, depending on the model of the machine and on attached optional products.
Follow the procedures below.
Submitting a Job in the Hold Queue from a Printer Driver
Changing the Job Order in the Hold Queue before Printing
Submitting a Job in the Hold Queue from a Printer Driver
1.
Select [Print] from the [File] menu of the application software you are using for the file (job) to print → select the printer to use and click [Properties] on the [Print] dialog box.
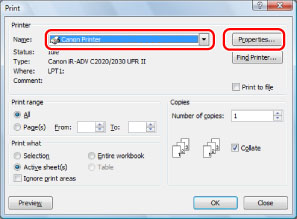
2.
Specify the desired settings on the printer driver screen.
Click [Page Setup], [Finishing], [Paper Source], and [Quality] tabs to specify the necessary settings.
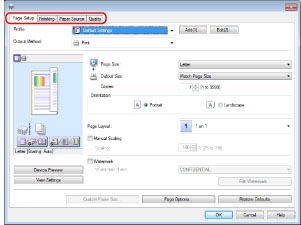
3.
Select [Hold] for [Output Method] → click [OK].
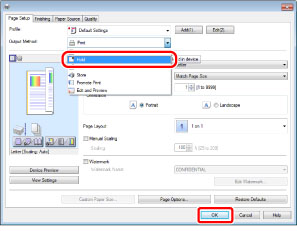
4.
Click [OK].
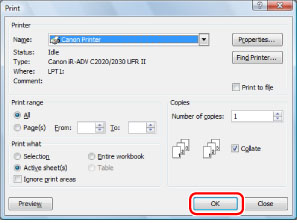
A job is sent to the Hold Queue.
Changing the Job Order in the Hold Queue before Printing
1.
Select jobs from the Hold Job List in the order you want to print → press [Start Printing].
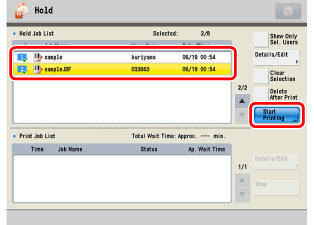
Jobs are printed in the specified order.
Editing Submitted Jobs with the JDF Job Ticket
This case describes the procedure according to the following situations.
|
1.
|
When checking a saddle stitch booklet job (with the JDF job ticket), the specified type of paper is running out so you changed the paper type.
|
|
2.
|
After that, changing the numbers of copies is required so you edit the job ticket.
|
|
3.
|
This job might be printed again later so that you store the job in the Mail Box.
|
|
4.
|
After storing the job, you start printing.
|
The screens may differ, depending on the model of the machine and on attached optional products.
|
Required Condition
|
|
The Booklet Finisher is attached to the machine.
A saddle stitch booklet job (with the JDF job ticket) is stored in the Hold Queue.
|
Follow the procedures below.
Making a Sample Print to Check the Finishing Settings
Changing a Paper Type for the Main Document
Changing the Number of Copies
Storing a Job in the Mail Box
Printing a Job in the Hold Queue
|
NOTE
|
|
For more information on the application software to submit a job with a JDF job ticket, contact your local authorized Canon dealer.
|
Making a Sample Print to Check the Finishing Settings
1.
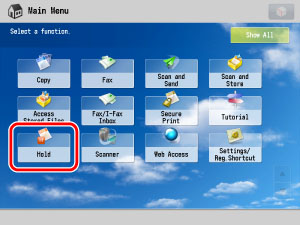
Press [Hold] on the Main Menu screen.
2.
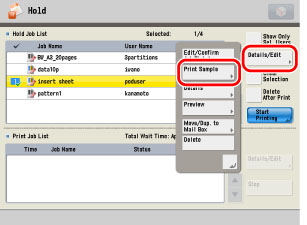
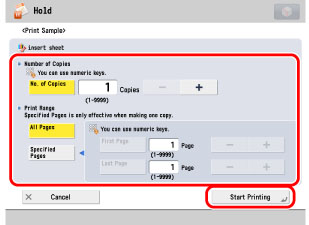
Select the desired job from the Hold Job List → press [Details/Edit] → [Print Sample].
3.
Specify the number of prints and the print range → press [Start Printing].
4.
Press [Close].
5.
Check the output sample.
Changing the Paper Type for the Main Document
1.
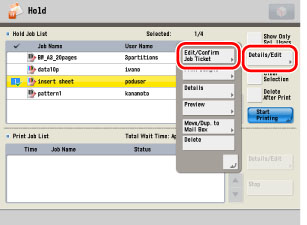
Select the job which you made a sample print in the previous step → press [Details/Edit] → [Edit/Confirm Job Ticket].
2.
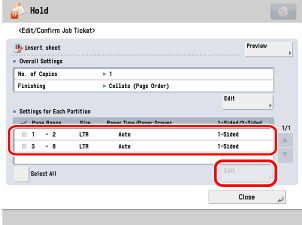
Select the page range for the main document → press [Edit] under <Settings for Each Partition>.
3.
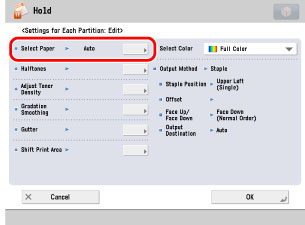
Press [Select Paper].
4.
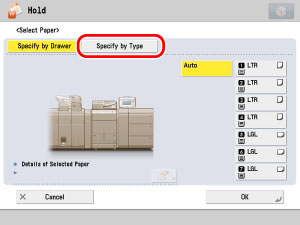
Press [Specify by Type].
5.
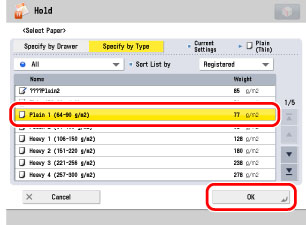
Select the paper type to use from the list → press [OK].
6.
Press [OK].
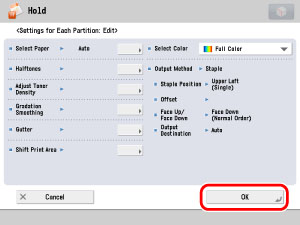
The paper type for the main document is changed.
Changing the Number of Copies
1.
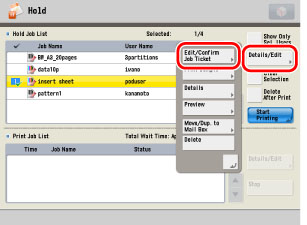
Select the job which you changed the paper type in the previous step → press [Details/Edit] → [Edit/Confirm Job Ticket].
2.
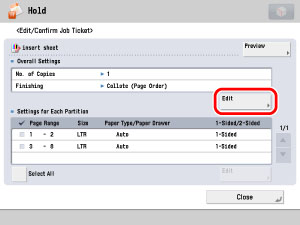
Press [Edit] under <Overall Settings>.
3.
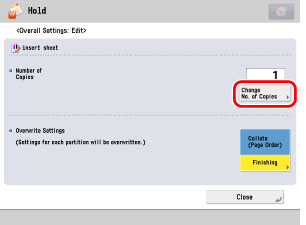
Press [Change No. of Copies].
4.
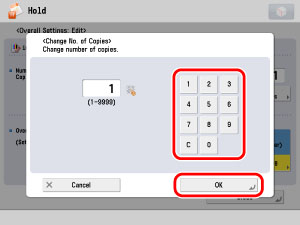
Enter the number of copies → press [OK].
5.
Press [Close].
The number of copies is changed.
Storing a Job in the Mail Box
1.
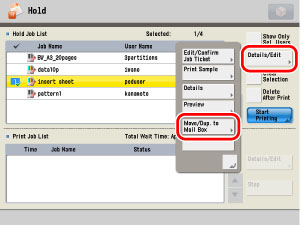
Select the job which you changed the number of copies in the previous step → press [Details/Edit] → [Move/Dup. to Mail Box].
2.
Select the mail box in which you want to store the job → press [Duplicate].
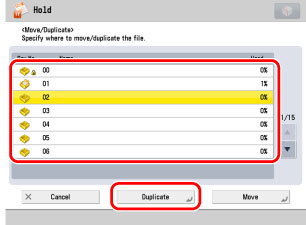
The job is stored in the mail box.
Printing a Job in the Hold Queue
1.
Select the job which you specified settings in the previous steps → press [Start Printing].
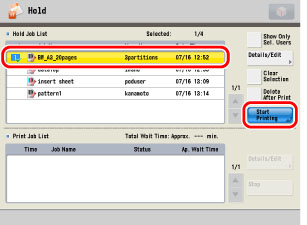
The job is printed with the specified paper type and the number of copies.
Reference Information
Job Hold Function and Practical Use of JDF (Job Definition Format)
Job Hold function of this machine is compliant with JDF job ticket proposed by the International Cooperation for the Integration of Processes in Prepress, Press and Postpress Organization (CIP4). Combinations of this function with other printing application systems offer you the workflow one step ahead.
CIP4
CIP4 (The International Cooperation for the Integration of Processes in Prepress, Press, and Postpress Organization) is a not-for-profit standards association, whose mission is to foster the adoption of process automation in the printing industry.
CIP4 suggests JDF (Job Definition Format) to make a seamless connection between a process control system and each process in prepress, press, and postpress. By also using JDF, information exchange in each device becomes possible.
CIP4 suggests JDF (Job Definition Format) to make a seamless connection between a process control system and each process in prepress, press, and postpress. By also using JDF, information exchange in each device becomes possible.
JDF
JDF (Job Definition Format) is a standard data exchange format used in and around the Graphic Arts industry.
JDF job ticket
A JDF job ticket is an electronic file format that contains all the instructions needed to properly handle and print a file. It is based on XML and the instructions in the ticket can be added or edited. This enables users to control the printing process consistently. In addition, a JDF job ticket can be cooperated with MIS (Management Information System) which controls physical distribution management and production management of the whole printing process.