Setting Custom Paper Sizes
If the paper size you require is not displayed in [Paper Sizes], you can register a new paper size.
1.
Select [Page Setup] from the [File] menu of the application.
|
NOTE
|
|
In Mac OS X 10.5 and later, the [Page Setup] dialog box may not be displayed, depending on the application you are using. If this is the case, specify the following settings from the [Print] dialog box displayed by selecting [Print] from the [File] menu.
|
2.
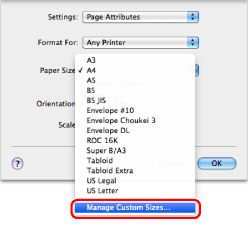
Select [Manage Custom Sizes] from [Paper Size].

3.
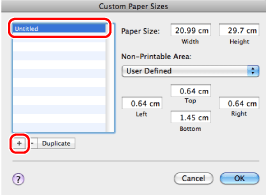
Click [+] → double-click [Untitled] → enter a name.

4.
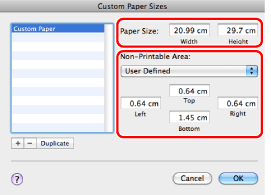
Set a paper size and margins → click [OK].

You can set a paper size from 100.0 x 148.0 to 330.2 x 630.0 (mm) in [Page Size] .
You can select the registered paper size from [Paper Size] in the [Page Setup] or [Print] dialog box.
|
NOTE
|
|
To edit the registered paper size, select it from the list in the [Custom Paper Sizes]/[Custom Page Sizes] dialog box and edit the content.
To delete the registered paper size, select it from the list in the [Custom Paper Sizes]/[Custom Page Sizes] dialog box and click [-].
The display may vary according to the operating system, as well as the type and version of the printer driver.
|