Sending E-Mail
"I want to send colour documents, but I am using a black-and-white fax machine."
"I am sending paper documents from a computer via e-mail. It is too much trouble to use a personal scanner each time."
Have you ever had such problems?
Using the Scan and Send function of your imageRUNNER ADVANCE machine, you can send colour documents from a computer via e-mail, with a simple operation similar to sending a fax.
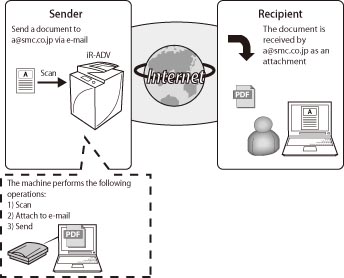
|
NOTE
|
|
imageRUNNER ADVANCE machines do not support e-mail reception.
|
Features of Sending Documents by E-Mail
imageRUNNER ADVANCE machines can send high-quality colour data.
The machine generates PDF data with fine text and image areas processed and compressed separately.
This enables clear text and a compact size, even though the data is in colour.
Benefits of Sending Documents by E-Mail
You can send images including fine lines, such as CAD data and maps, sharply and cleanly.
Since e-mail uses an internet or intranet environment, you can reduce communication costs*, regardless of the time or distance. (*: When using an in-company LAN or fixed rate connection service, and in comparison to variable cost systems such as for fax communication.)
The e-mail sending function can be used without requiring other hardware or software, as long as you have an internet connection.
The system for sending e-mail is the same for computers and imageRUNNER ADVANCE machines.
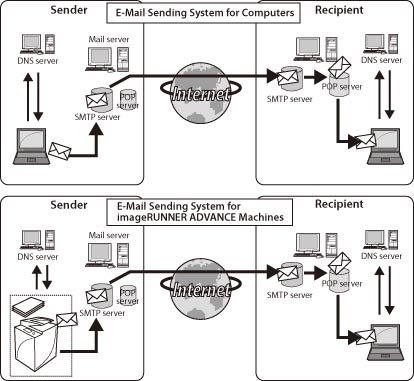
Comparison of Sending Methods for the imageRUNNER ADVANCE
|
Fax
|
E-Mail
|
I-Fax with
Simple Mode |
I-Fax with
Full Mode |
Intranet
Fax |
|
|
Transmission Cost
|
Per transmission
|
Fixed rate
(leased line) |
Fixed rate
(leased line) |
Fixed rate
(leased line) |
Fixed rate
(office LAN) |
|
Speedy
|
Yes
|
No
|
No
|
No
|
Yes
|
|
Confirm Transmission
|
Yes
|
No
|
No
|
Yes
|
-
|
|
Resolution
|
Approx. 200 dpi
|
Up to 600 dpi
|
Up to 600 dpi
|
Up to 600 dpi
|
Up to 600 dpi
|
|
Paper Size
|
Up to A3
|
Up to A3
|
Up to A3
|
Up to A3
|
Up to A3
|
|
File Format
|
TIFF
|
JPEG, TIFF, PDF, XPS, OOXML
|
TIFF
|
TIFF
|
TIFF
|
E-Mail Transmission Settings
Settings to Check Before Installation
The settings required for an imageRUNNER ADVANCE machine to send internet faxes are the same as the e-mail transmission settings for a computer. The following E-Mail Settings must be checked in advance, either in your agreement with your internet provider, or with your network administrator if there is a DNS/mail server inside your company.
|
E-Mail Settings
|
Example Setting
|
imageRUNNER ADVANCE
Setting |
|
Primary DNS Server
|
10.120.5.11
|
Press
 (Settings/Registration) → [Preferences] → [Network] → [TCP/IP Settings] → [DNS Settings]. (Settings/Registration) → [Preferences] → [Network] → [TCP/IP Settings] → [DNS Settings]. |
|
Secondary DNS Server
|
10.120.10.55
|
|
|
Host Name
|
IRADV
|
|
|
Domain Name
|
example.co.jp
|
|
|
E-Mail Address Acquired for the imageRUNNER ADVANCE Machine
|
01xxx@example.co.jp
|
Press
 (Settings/Registration) → [Function Settings] → [Send] → [E-Mail/I-Fax Settings] → [Communications Settings]. (Settings/Registration) → [Function Settings] → [Send] → [E-Mail/I-Fax Settings] → [Communications Settings]. |
|
SMTP Server
|
SMTPSV.example.co.jp
|
|
|
POP Server
|
POPSV.example.co.jp
|
|
|
POP Login Name
|
IRADV
|
|
|
POP Password
|
ACC123
|
|
|
Transmission Authentication Method
|
POP before SMTP
|
|
|
Maximum Data Size for Sending
|
2 MB
|
Press
 (Settings/Registration) → [Function Settings] → [Send] → [E-Mail/I-Fax Settings] → [Maximum Data Size for Sending]. (Settings/Registration) → [Function Settings] → [Send] → [E-Mail/I-Fax Settings] → [Maximum Data Size for Sending]. |
|
Required Condition
|
|
The Send function is available for use.
Network settings are set
E-mail settings are specified.
|
Steps for Setting Internet Fax Transmission
This section describes the procedure for specifying the internet fax settings.
The screens may differ, depending on the model of the machine and on attached optional products.
Settings/Registration Settings
Registering the Destination's Address
Sending an E-Mail from the imageRUNNER ADVANCE Machine
Settings/Registration Settings
Using the Remote UI, you can perform this operation with ease.
1.
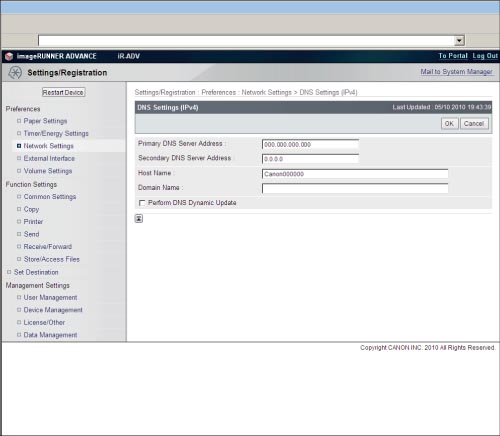
Specify the DNS settings. Click [Settings/Registration] → [Preferences] → [Network Settings] → [DNS Settings (IPv4)].
|
Primary DNS Server Address, Secondary DNS Server Address:
|
Enter the IP address of the primary server and secondary server.
|
|
Host Name:
|
Enter a name of your choice. This is equivalent to the computer name of a computer.
|
|
Domain Name:
|
Enter the name of the network domain that the imageRUNNER ADVANCE machine belongs to. (The part of the e-mail address after the "@.")
|
|
Perform DNS Dynamic Update
|
Select this if you have a dynamic DNS server.
Deselect this if you do not have a dynamic DNS server. |
|
NOTE
|
|
To specify these settings from the control panel of the machine, press
 (Settings/Registration) → [Preferences] → [Network] → [TCP/IP Settings] → [DNS Settings]. (Settings/Registration) → [Preferences] → [Network] → [TCP/IP Settings] → [DNS Settings].If the continual issuing of packets from the imageRUNNER ADVANCE machineto the DNS server is causing excessive network traffic, you can disable dynamic DNS updating after communication is complete.
However, this is only if you have a server in your company, and your environment is not a DHCP environment (your environment must use a fixed IP address and host names). |
2.
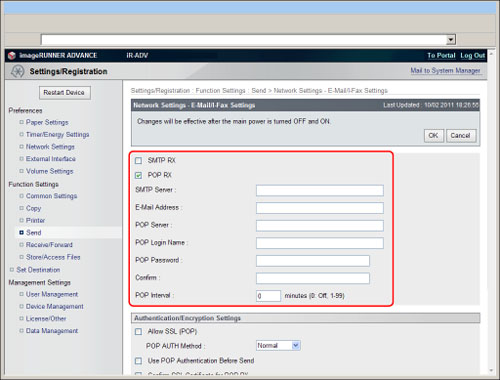
Set the mail server information. Click [Settings/Registration] → [Function Settings] → [Send] → [Network Settings - E-Mail/I-Fax Settings].
|
Receive SMTP:
|
Not required to be set. This setting is for Intranet Fax.
|
|
Receive POP:
|
Set this to 'On' for environments sending with POP before SMTP or when using a POP server to receive I-faxes.
|
|
SMTP Server:
|
The IP address or host name of the mail server used for sending.
|
|
E-Mail Address:
|
The e-mail address to set for the imageRUNNER ADVANCE machine.
|
|
POP Server:
|
The IP address or host name of the mail server (POP server) used in environments sending with POP before SMTP.
|
|
POP Login Name
|
The log in name used to access the POP server (the part of the e-mail address before the "@").
|
|
POP Password:
|
The password used to access the POP server.
|
|
Confirm
|
Reenter the POP password for confirmation.
|
|
POP Interval:
|
Set the interval for automatically accessing the POP server to perform POP reception.
(This refers to the interval that the imageRUNNER ADVANCE machine goes to the mail server to check for e-mail.) |
|
NOTE
|
|
To specify these settings from the control panel of the machine, press
 (Settings/Registration) → [Functions Settings] → [Send] → [E-Mail/I-Fax] → [Communication Settings]. (Settings/Registration) → [Functions Settings] → [Send] → [E-Mail/I-Fax] → [Communication Settings].The I-fax function of imageRUNNER ADVANCE machines uses the SMTP protocol for transmission.
|
3.
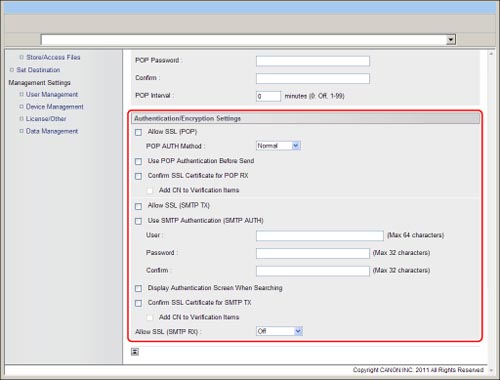
Specify the transmission authentication method. In Authentication/Encryption Settings, set the transmission authentication method to use according to the agreement with your internet provider or according to the security policy of the DNS/mail server in your company.
|
NOTE
|
|
It is not necessary to specify the settings on this page when accessing a server that does not require transmission authentication.
|
In recent times, internet providers have strengthened security measures using transmission authentication to prevent "spoofing" and the spread of viruses. Transmission authentication methods include "POP before SMTP" and "SMTP AUTH," etc.
Check the agreement you have with your internet provider, and specify these settings according to the transmission authentication method the provider has adopted.
|
Allow SSL (POP):
|
Select this to use SSL for POP communication. Select the POP authentication method from the drop-down list, according to your internet provider.
|
|
Use POP Authentication Before Send *:
|
Select this for mail server environments that require POP before SMTP.
|
|
Confirm SSL Certificate for POP RX
|
Select this to confirm whether the SSL server certificate is valid when receiving with POP. Select [Add CN to Verification Items] if you want to confirm the CN (Common Name).
|
|
Allow SSL (SMTP Send):
|
Select this to use SSL for SMTP transmission.
|
|
Use SMTP Authentication (SMTP AUTH)**:
|
Select this for mail server environments that require SMTP authentication (SMTP AUTH).
|
|
User Name:
|
Enter the user name to use for logging in to the SMTP server.
|
|
Password, Confirm:
|
Enter the password to use for logging in to the SMTP server.
|
|
Display Authentication Screen When Searching:
|
Select this to enter the authentication information each time sending is performed.
|
|
Confirm SSL Certificate for SMTP TX
|
Select this to confirm whether the SSL server certificate is valid when sending with SMTP. Select [Add CN to Verification Items] if you want to confirm the CN (Common Name).
|
|
Allow SSL (SMTP Receive):
|
Set this to 'On' for mail server environments that require communicated data to be encrypted.
|
*: If your internet provider is using the "POP before SMTP" transmission authentication system, this setting is required.
**: If your internet provider is using the "SMTP AUTH" transmission authentication system, this setting is required.
|
NOTE
|
|
If the SMTP server does not support encryption, data is not encrypted even when you select [On] for <Allow SSL>.
|
4.
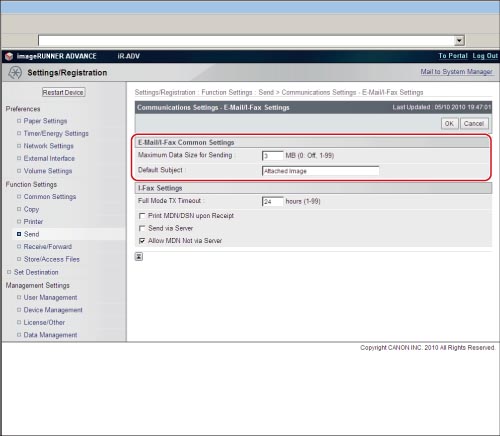
Set the maximum data size. Click [Settings/Registration] → [Function Settings] → [Send] → [Communication Settings - E-Mail/I-Fax Settings].
|
Maximum Data Size for Sending:
|
You can set the maximum data size for outgoing e-mail messages and I-fax documents. If an e-mail message exceeds this data size limit, it is split up into several e-mail messages before being sent.
Set the maximum data size for sending lower than the data limit for the mail server. If you enter '0' MB as the data size, there is no size limit on the data that is sent. |
|
Default Subject:
|
You can enter a default subject to use whenever you do not enter a subject when sending a job.
The default setting is 'Attached Image'. |
|
NOTE
|
|
To specify these settings from the control panel of the machine, press
 (Settings/Registration) → [Functions Settings] → [Send] → [E-Mail/I-Fax Settings]. (Settings/Registration) → [Functions Settings] → [Send] → [E-Mail/I-Fax Settings]. |
Reference Information
Transmission Method for Divided Data
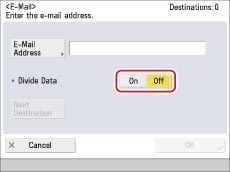
You can select the method for dividing attached data that exceeds the maximum size using the [Divide Data] setting. Specify this setting after pressing [E-Mail] for a new destination.
|
On:
|
Select this to divide the attached data by its size. This setting requires the e-mail software to have a "merging function."
|
|
Off:
|
Select this to divide the attached data by its page boundaries. This setting does not require the e-mail software to have a "merging function."
|
|
NOTE
|
|
If a single page of an attached image exceeds the value set for Maximum Data Size for Sending, an error occurs and sending cannot be performed.
|
Registering the Destination's Address
1.
Start your Web browser → enter the IP address of the machine in [Address].
http://<IP address of the machine>
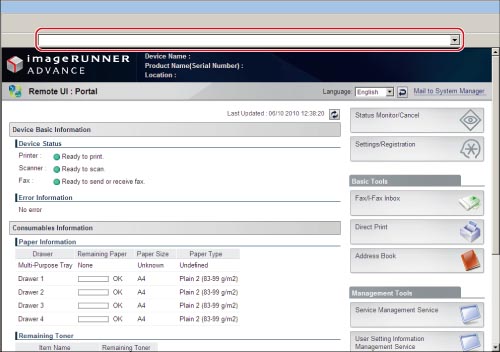
The portal page of the Remote UI is displayed.
2.
Click [Address Book] → select [Address Book 01] on the address book screen → click [Register New Destination].
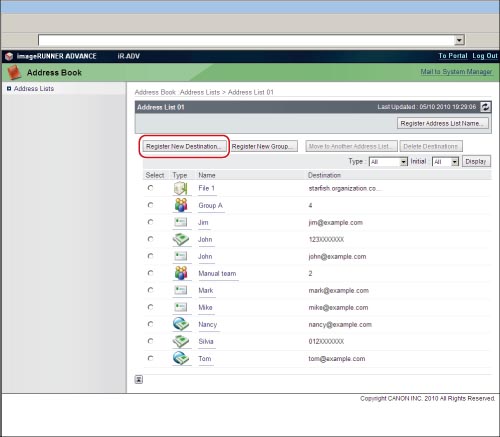
A screen for registering a new destination is displayed.
3.
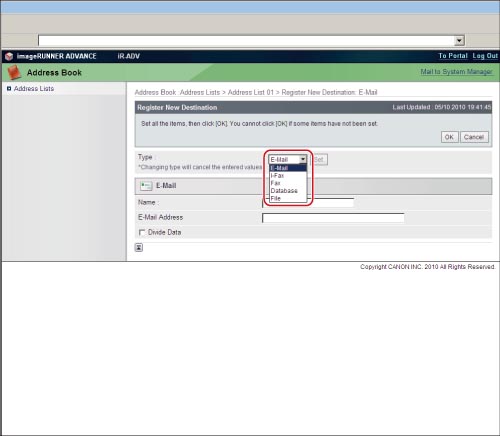
Select [E-Mail] from the Type drop-down list → click [Set]. Enter the information each item on the Register New Destination: E-Mail screen.
4.
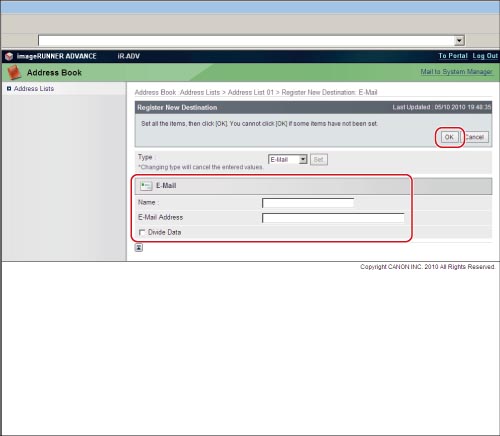
Specify each item → click [OK].
Sending an E-Mail from the imageRUNNER ADVANCE Machine
1.
Place the original on the feeder or the platen glass.
2.
From the touch panel display, press [Scan and Send] → [Address Book].
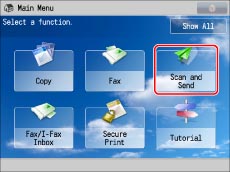
|
NOTE
|
|
If the Main Menu screen is not displayed, press [Main Menu].
|
3.
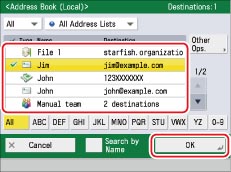
Select a registered destination → press [OK].
4.
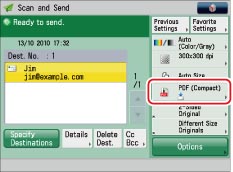
Select a file format of the image to send.
|
NOTE
|
|
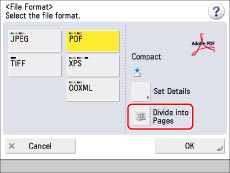
If you select [PDF], [XPS], [TIFF], or [OOXML], you can use the Divide into Pages mode.
You can select the following PDF, XPS, or OOXML types:
Trace & Smooth*
Compact
OCR (Text Searchable)
Encrypted*
Add Digital Signatures
Storing a Reader Extensions Compatible PDF*
* This is only valid for PDF file format.
For more information, see Scanning the Original and Sending to a Computer in "Digitizing Paper Documents."
You can specify e-mail address destinations for the Cc and Bcc addresses. You can specify a maximum of 256 destinations at the same time for the Cc and Bcc addresses.
|
Divide into Pages:
|
On:
|
Select this to send each page as a separate file when sending a multiple page original. TIFF images are sent as single TIFF images.
|
|
Off:
|
Multiple pages are sent as a single file. TIFF images are sent as multi TIFF images.
|
|
NOTE
|
|
If JPEG format is selected, [Divide into Pages] is set to 'On'.
|
Reference Information
How Does the Recipient Receive an E-Mail?
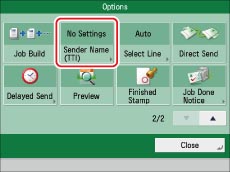
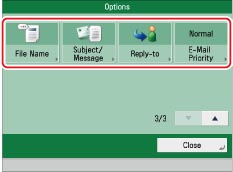
Normally when sending an e-mail, you enter the recipient's name and a subject. E-mail that does not contain this information can be regarded as spam, and may be deleted. When sending e-mail with your imageRUNNER ADVANCE machine, you can set the following items. Check how the recipient receives this information.
|
Settings
|
Sample Setting
|
Default Setting
|
|
Sender Name
|
CANON MJ INC.
|
Address of your machine
|
|
File Name
|
"Notification"
|
Time string (200909051530)
|
|
Subject
|
"Notification Message"
|
Attached Image
|
|
Body
|
"To whom it may concern"
|
Empty
|
|
Reply to
|
01xxx@example.co.jp
|
Address of your machine
|
|
NOTE
|
|
You can only select settings stored in advance for "Sender Name" and "Reply to." You cannot enter a new destination on the Options Screen. Store the destination in Settings/Registration. The "Sender Name" displayed on the reception screen is the unit name set for the imageRUNNER ADVANCE machine that is sending. The "Sender Name" setting is not reflected.
When you send documents that always have the same "Subject" or "Body", such as monthly reports or order forms, it is useful to store the send settings in favorite settings. You can also register a destination in the favorite settings.
|