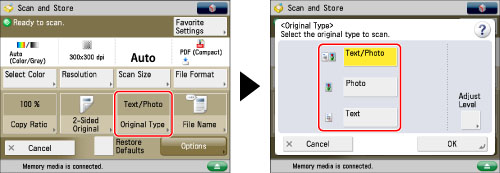
Selecting the Original Type
You can manually select the original type according to the type of image.
|
Text/Photo Mode
|
Photo Mode
|
Text Mode
|
 |
 |
 |
Text/Photo Mode
This mode is best suited for scanning originals containing both text and photos, such as magazines or catalogues.
Photo Mode
This mode is best suited for images printed with halftone dots.
Text Mode
This mode is best suited for originals containing text only, or handwritten characters and diagrams. Blueprints or pencil drawn originals can also be scanned clearly.
As an example, the procedure for selecting memory media as the storage location is explained in this section.
1.
Press [Scan and Store] → [Memory Media].

2.
Select the memory media → select the destination folder → press [Scan].

3.
Press [Original Type] → select the original type.

To adjust the text/photo processing priority level, press [Text/Photo].
Then press [Adjust Level] → select [Text Priority] or [Photo Priority] → press [OK].
[Text Priority]: Priority is given to the faithful reproduction of text.
[Photo Priority]: Priority is given to the faithful reproduction of photos, with as little moiré effect as possible.
You can adjust the text/photo priority level. If you want to reproduce text as faithfully as possible, press [Text Priority] → move the indicator to the left. If you want to reproduce photos as faithfully as possible, press [Photo Priority] → move the indicator to the right.
4.
Press [OK].
|
IMPORTANT
|
|
For information on the modes which cannot be set in combination with this mode, see "Unavailable Combination of Functions."
If you scan an original containing halftones, such as a printed photo, the moiré effect (a shimmering, wavy pattern) may occur. If this happens, you can lessen the effect by using [Sharpness]. (See "Adjusting the Image Sharpness.")
|
|
NOTE
|
|
If the original is a transparency, select the original type → adjust the exposure to the most appropriate level for the original.
|