Switching the Colour Mode
You can set the colour mode for printing.
As an example, the procedure for printing JPEG and TIFF files that are stored in memory media is explained in this section.
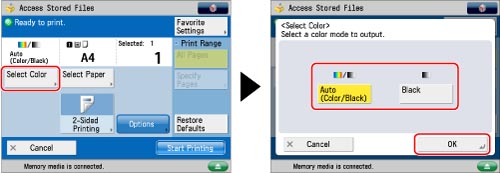
Auto (Color/Black)
If the Auto (Color/Black) mode is selected, the machine automatically recognizes whether the file is in colour or black-and-white. Colour files are printed in the Color mode, while black-and-white files are printed in the Black mode.
Black
The Black mode always prints in black-and-white regardless of whether the file is in colour or black-and-white.
1.
Press [Access Stored Files] → [Memory Media].

2.
Select the desired memory media → select the location where the file you want to print is stored.

3.
Slect the desired file → press [Print].

If you select a PDF or XPS file, proceed to step 5.
4.
Select the paper size → press [OK].
5.
Press [Select Color] → select the colour mode → press [OK].

To change the paper source, see "Paper Selection."
|
IMPORTANT
|
|
For information on the modes which cannot be set in combination with this mode, see "Unavailable Combination of Functions."
|
|
NOTE
|
|
The default setting is 'Auto (Color/Black).'
printing will start when the message disappears.
You can store the colour mode in [Change Default Settings]. (See "Changing/Initializing the Default Settings for the Copy Function.")
If a black-and-white file is printed in the Auto (Color/Black) mode, it is counted as a colour print.
|