The Group Address feature enables you to create a group. You can register different types of destinations (such as e-mail, I-fax, or file server destinations) as a single group.
You can register up to 256 destinations in a group address.
Registering a Group Address
|
IMPORTANT
|
|
If you want to store a group address, the destinations must be stored beforehand, such as fax numbers, e-mail addresses, and file server addresses.
|
1.
Press  (Settings/Registration).
(Settings/Registration).2.
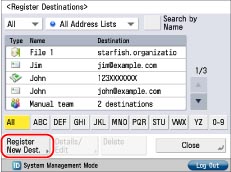
Press [Set Destination] → [Register Destinations] → [Register New Dest.].
3.
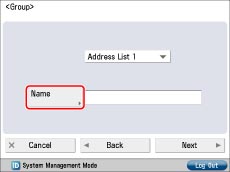
Press [Group].
4.
Select an address list from Address List 1 to 10.
Address lists are a convenient way to classify destinations.
The group address that you enter will be stored in the selected address list.
5.
Press [Name].
6.
Enter a name for the group → press [OK].
7.
Press [Next].
8.
Press [Add from Address Book].
To store destinations in a group address, the destinations must be stored in the address list that contains the group address.
To delete a destination, select the destination that you want to delete → press [Delete].
9.
Select the destination to register from the address book → press [OK].
If you want to select a destination that is stored with an access number, press [Access No.] → enter the access number. (See Registering an E-Mail Address and "Storing Fax Numbers.")
To cancel a selected destination, select the destination again.
You can restrict the types of destinations displayed in the results list by selecting the desired type of destination from the drop-down list.
To check the detailed information for a selected destination, select the destination → press [Details]. Press [OK] to return to the previous screen.
Repeat step 8 to register other addresses as necessary.
|
NOTE
|
|
[Access No.] appears on the screen only if [Manage Address Book Access Numbers] is set to 'On' in [Set Destination] (Settings/Registration). (See "Managing the Address Book with Access Numbers.")
|
10.
Press [OK] → [Close].
If you are performing Access Number Management for the Address Book, perform the following operation.
Press [Next] → [Access No.] → [Access No.].
Enter the access number using  -
-  (numeric keys) → press [Confirm].
- (numeric keys) → press [Confirm].Enter the access number again for confirmation → press [OK] → [OK].
|
NOTE
|
|
If you want to store a group address, you can only select destinations registered in the same Address List.
You can register e-mail addresses, fax numbers, I-fax addresses, file server addresses, and locations to store the file in a group address.
If you try to send to a file server in which [Confirm Before Sending] is set to 'On', a screen appears prompting you to enter a user name and password. In this case, enter the previously set password. If you want to register a file server in a group address, set [Confirm Before Sending] to 'Off'. You cannot send to a group address including a file server in which [Confirm Before Sending] is set to 'On'. (See "Registering a File Server Address.")
|