Before You Start the Remote UI
Before starting the Remote UI, the administrator should perform the following:
Specify the Network Settings
Specify the settings for [Network] in [Preferences] (Settings/Registration), and check the IP address or host name of the machine. (See "Network Environment Setup Procedures.")
Enable the Remote UI
Set [Remote UI] to 'On' in [Management Settings] (Settings/Registration). It is also recommended that [Device Information Settings] in [Device Management] (Settings/Registration) is configured.
|
IMPORTANT
|
|
Before changing the settings of the machine, set your Web browser to enable all cookies and use JavaScript.
|
|
NOTE
|
|
By setting [Remote UI] to 'On', you can open a necessary port. However, it is recommended that it is set to 'Off', if a port is not used. If you leave the port open, an unauthorized user may access the machine.
|
Enabling the Remote UI
You must use the machine's control panel to enable the Remote UI.
1.
Press  (Settings/Registration).
(Settings/Registration).2.
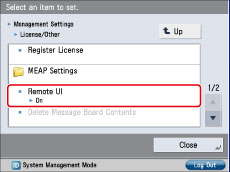
Press [Management Settings] → [License/Other] → [Remote UI].
If the System Manager ID and System Manager PIN have already been set, press [Log in] → enter the System Manager ID and System Manager PIN using  -
-  (numeric keys) → press
  (Log In/Out).
- (numeric keys) → press (Log In/Out).3.
Press [On] → select to use SSL.
If a screen prompting you to change a System Manager PIN is displayed, change a PIN by following the procedures described in "Specifying the System Manager Settings," and then set this function to 'On'.
Select [Off] →[OK] to disable the Remote UI.
Select [On] for <Use SSL> to allow secured transmission using SSL.
|
NOTE
|
|
Any changes made to <Use SSL> are also applied to <Use SSL> in <Use HTTP> in [MEAP Settings] in [Management Settings] (Settings/Registration).
|
If Default Authentication is set as the login service and a System Manager ID is set without setting [Department ID Management]:
Specify each setting → press [Next].
Specify the settings related to the access of general users → press [OK].
Press [Allow] to allow access by general users, or [Do Not Allow] to not allow access by general users.
If you pressed [Allow] and you want to set a PIN, press [Access PIN] → set a PIN.
In other cases:
Specify each setting → press [OK].
4.
Press [OK] repeatedly until the Top screen appears → turn Off the main power of the machine → turn On the main power of the machine.
|
IMPORTANT
|
|
The Remote UI setting is made effective only after turning the machine's main power Off, and then On.
|
|
NOTE
|
|
For instructions on turning On/Off the machine, see "Before You Start Using This Machine."
|
|
IMPORTANT
|
|
Connection via a proxy server is not possible. If your system environment has a proxy server, perform the following setting.
(As these settings differ depending on the network environment, contact your network administrator.) Enter the IP address of the machine into Exceptions in the Web browser proxy server settings.
If the control panel of the machine is being used for a particular operation and if you use the same operation on the Remote UI, the last setting is activated.
If multiple Remote UIs are running simultaneously, the latest setting that was made is enabled. It is recommended that only one Remote UI be running at a time.
To enter characters from a Web browser, use the characters that you can enter from the touch panel display of the machine. If you use the other characters, they may not be displayed/recognized properly on the machine.
|