Loading Paper into a Paper Drawer
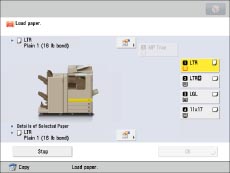
If the selected paper runs out, or the selected paper drawer runs out of paper during printing, a screen prompting you to load paper appears on the touch panel display.
Follow the procedure below to load paper into the paper drawers.
 CAUTION CAUTION |
|
When handling paper, take care not to cut your hands on the edges of the paper.
|
|
IMPORTANT
|
|
A screen prompting you to load paper also appears if the selected paper drawer is not fully inserted into the machine. Make sure that the paper drawer is properly in place.
Do not load the following types of paper into the paper drawers. Doing so may cause a paper jam.
Severely curled or wrinkled paper
Thin straw paper
Transparencies
Paper which has been printed on using a thermal transfer printer
The reverse side of paper which has been printed on using a thermal transfer printer
Make sure that you fan the sheets of paper well before placing them. Recycled paper, pre-punched paper, and heavy paper should be fanned particularly well before loading it.
Never place paper or any other items in the empty part of the drawer next to the paper stack. Doing so may cause paper jams.
|
|
NOTE
|
|
The following paper sizes can be loaded into Paper Drawers 1, 2, 3, and 4:
Paper Drawer 1: LGL, LTR, LTRR, STMTR, EXEC
Paper Drawers 2, 3, and 4: 11" x 17", LGL, LTR, LTRR, STMTR, EXEC, Custom (5 1/2" x 7 1/8" to 11 3/4" x 17" (140 mm x 182 mm to 297 mm x 431 mm))
Envelopes can be loaded into Paper Drawer 2 only if the Envelope Feeder Attachment-D1 is attached.
Paper Drawers 3 and 4 are available for use only if the Cassette Feeding Unit-AF1 is attached.
For more information on the paper types that can be loaded in Paper Drawers 1, 2, 3, and 4, see "Available Paper Stock."
If a message prompting you to load paper appears during printing, the remaining prints are automatically made after you load the correct paper. If you select a different paper drawer, the remaining prints are made after you press [OK].
Press [Stop] to cancel printing.
|
1.
Open the paper drawer.
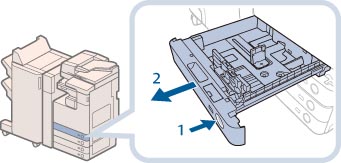 |
1. Press the open button on the paper drawer in which you want to load paper. |
2. Grip the handle, and pull out the paper drawer until it stops. |
2.
Prepare the paper to load.
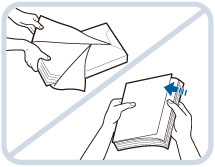 |
Open the packaging for the paper, and remove the paper stack. |
|
NOTE
|
|
For high-quality printouts, use paper recommended by Canon.
Before loading paper, always fan the sheets several times, and align the edges to facilitate feeding.
|
3.
Load the paper stack into the paper drawer.
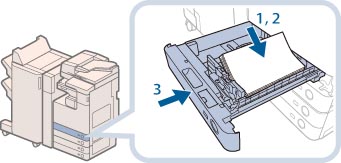 |
1. Make sure that the paper size setting of the paper drawer matches the size of the paper to load in the paper drawer. |
2. Load the paper stack against the right wall of the paper drawer. |
|
3. Gently push the paper drawer back into the machine until it clicks into place in the closed position. |
 CAUTION CAUTION |
|
When returning the paper drawer to its original position, be careful not to get your fingers caught, as this may result in personal injury.
|
|
IMPORTANT
|
|
Paper which is curled must be straightened out before loading it into the paper deck unit.
You will not be able to make copies or print if you load paper that exceeds the loading limit mark (
 ), or if the paper drawer is not completely pushed into the machine. ), or if the paper drawer is not completely pushed into the machine.Make sure that the height of the paper stack does not exceed the loading limit mark (
).Always check that the paper drawers are in place.
|
|
NOTE
|
|
When loading paper into the paper drawer for the first time, set the paper size dial to match the paper size being loaded. (See "Adjusting a Paper Drawer to Hold a Different Paper Size.")
The number of sheets that can be loaded in the paper drawers is 550 sheets (21 lb bond (80 g/m2)).
If there are instructions on the paper package about which side of the paper to load, follow those instructions.
When the paper is loaded into the paper drawer, the side facing up is the one printed on.
If problems, such as poor print quality or paper jams occur, try turning the paper stack over and reloading it.
For more information on the print direction of preprinted paper (paper which has logos or patterns already printed on it), see "Relationship Between the Original Orientation and Paper Orientation."
Rewrap any remaining paper in its original package, and store it in a dry place, away from direct sunlight.
If paper runs out and printing is stopped, load a new paper stack. Printing restarts after the new paper stack is loaded.
 |