Main Unit
Check the location of the paper jam, and follow the procedure described below, while referring to the directions that appear on the touch panel display, to remove the jammed paper.
|
NOTE
|
|
If the Paper Deck Unit-B2 is attached, move the paper deck unit away from the main unit before proceeding with this procedure.
If paper is loaded in the multi-purpose tray, remove the loaded paper.
This section uses illustrations of the machine with the Inner Finisher-D1 attached.
|
1.
Open the right cover of the machine.
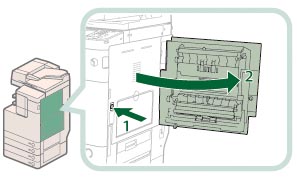
|
1. Press the open button of the right cover of the machine. |
2. Open the upper right cover of the machine. |
2.
Remove any paper jammed in the output unit.
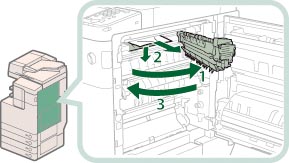 |
1. Pull out the output unit. |
2. Press down and hold the inner guide, and remove any jammed paper. |
|
3. Close the output unit. |
|
NOTE
|
||||
|
If the Inner Finisher-D1 and Inner 2 Hole Puncher-A1/Inner 2/3 Hole Puncher-A1/Inner 2/4 Hole Puncher-A1, or Staple Finisher-G1/Booklet Finisher-G1 and Buffer Pass Unit-H1 are attached, remove any jammed paper following the procedure below.
|

3.
Remove any jammed paper from the upper part of the fixing unit.
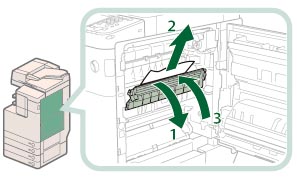 |
1. Open the upper cover of the fixing unit. |
2. Remove any jammed paper. |
|
3. Close the upper cover of the fixing unit. |
 CAUTION CAUTION |
|
The fixing unit and its surroundings inside the machine may become hot during use. When removing jammed paper or when inspecting the inside of the machine, do not touch the fixing unit and its surroundings, as doing so may result in burns.
|
4.
Remove any jammed paper from the lower part of the fixing unit and the area near the registroller.
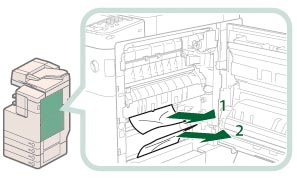 |
1. Remove any jammed paper from the lower part of the fixing unit. |
2. Remove any jammed paper from the area near the registroller. |
|
CAUTION |
|
The fixing unit and its surroundings inside the machine may become hot during use. When removing jammed paper or when inspecting the inside of the machine, do not touch the fixing unit and its surroundings, as doing so may result in burns.
|
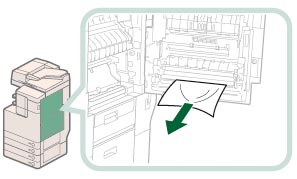
5.
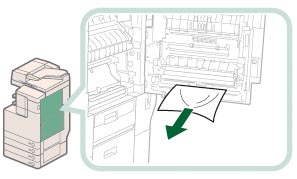
Remove any jammed paper from the lower part of the right cover of the machine.
 |
6.
Remove any jammed paper protruding from the first output tray.
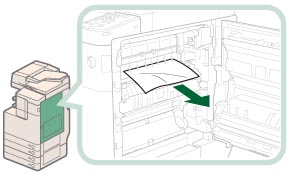 |
If you cannot remove the jammed paper, remove it from below.
|
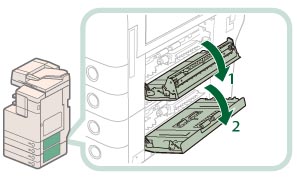
7.
Remove any jammed paper protruding from the second output tray or reversing unit.
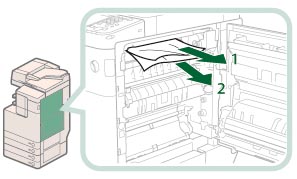 |
1. Remove any jammed paper from the second output tray. |
2. Remove any jammed paper from the reversing unit. |
8.
Remove any jammed paper from behind the right cover of the machine.
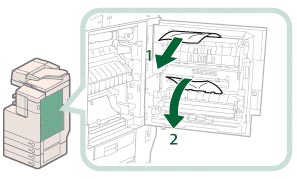 |
1. Remove any jammed paper from the upper part behind the right cover of the machine. |
2. Remove any jammed paper from the central part behind the right cover of the machine. |
|
CAUTION |
|
The lower part behind the right cover of the machine may become hot during use. When removing jammed paper or when inspecting the inside of the machine, do not touch this area of the machine, as doing so may result in burns.
|
9.
Remove any jammed paper from the feeding unit of the multi-purpose tray.
|
NOTE
|
|
If you cannot remove the jammed paper from the bottom side of the feeding unit of the multi-purpose tray, remove it from the multi-purpose tray side.
|
10.
Open the paper drawer's upper right cover and lower right cover, and check whether there is any jammed paper inside.
 |
1. Open the paper drawer's upper right cover. |
2. Open the paper drawer's lower right cover. |
Remove any paper jammed, and close the covers.
|
CAUTION |
|
When closing the covers, be careful not to get your fingers caught, as this may result in personal injury.
|
|
NOTE
|
|
Gently close the covers until they click into place in the closed position.
|
11.
Close the right cover of the machine.
|
CAUTION |
|
When closing the cover, be careful not to get your fingers caught, as this may result in personal injury.
|
|
NOTE
|
|
Gently close the cover until it clicks into place in the closed position.
If the Paper Deck Unit-B2 was moved away from the main unit, reconnect it to the main unit.
|
12.
Follow the instructions on the screen.
|
NOTE
|
|
The screen indicating the directions on how to clear the paper jam is displayed repeatedly until the paper jam is cleared.
|