Storing Scanned Originals in the Advanced Space
|
IMPORTANT
|
|
To use the Advanced Space, it is necessary to set it in advance according to your needs. For more information, see "Advanced Space/Network Settings."
If Authentication Management is set for users of the Advanced Space, after you finish using the Advanced Space, ensure that you press
 (Log In/Out) to log out. (Log In/Out) to log out. |
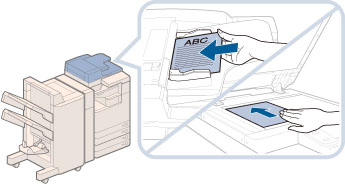
1.
Place your originals.
|
NOTE
|
|
For instructions on placing originals, see "Placing Originals."
|
2.
Press [Scan and Store] → [Advanced Box].
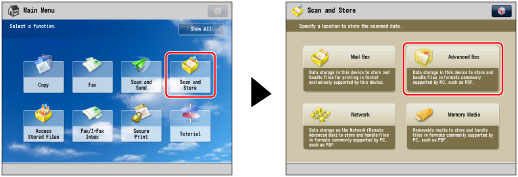
If the desired function is not displayed on the Main Menu screen, press [Show All].
3.
Select [Shared Space] or [Personal Space] → select the destination folder.
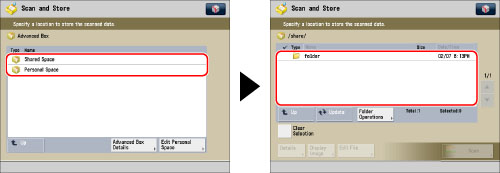
If the Log In screen appears, press [User Name] and [Password] → enter the user name and password → press [OK].
If the Log In screen is does not appear, you cannot access the Personal Space.
|
NOTE
|
|
If you are using SSO-H, press [Store Password] to store your user name and password. Storing your user name and password enables you to save time by eliminating the need to enter them each time you open the Advanced Space.
The 'folder' folder is located in the Shared Space by default.
|
4.
Press [Scan].

5.
Specify the desired scan settings.
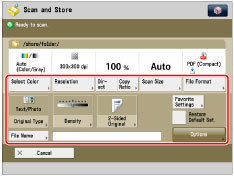
You can press [Options] to select useful scanning modes. You can also use modes in combination.
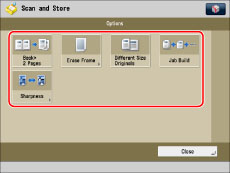
For more information on setting each mode, see the corresponding section.
Follow the procedure below to save the file with a new filename.
Press [File Name].
Enter a name → press [OK].
|
IMPORTANT
|
|
You cannot use the following characters in a file name: \ / : , * ? " < > |
You cannot use a . (period) or space for the first or last character of the file name.
The full pathname, including folders and the file name, must not exceed 256 characters in length.
|
|
NOTE
|
|
If you create a file without assigning it a name, the machine automatically assigns the file a name using the year, month, day, and time the file was created.
For example, if a file is created at 1:35 PM, 41 seconds, on 01.15.13, its name will be <20130115133541>. If you enter a file name that already exists, (1) to (9) is added to the file name.
Example: a(1).pdf If [Divide into Pages] is set for file format, consecutive three digit numbers are added to the file names.
Examples: a_001.pdf, a_002.pdf, a_003.pdf |
6.
Press  (Start).
(Start).If the following screen is displayed, after the last batch of originals is scanned, press [Start Storing].
If you place your original on the platen glass, press (Start) to scan each original. Your original is scanned.
(Start) to scan each original. Your original is scanned.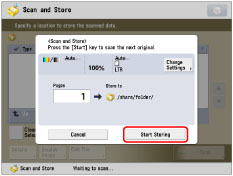
|
NOTE
|
|
To cancel scanning, press [Cancel] or
 (Stop). (Stop). |
7.
Remove the original.
|
NOTE
|
|
If you want to use the following resolution settings to scan a colour image, it is necessary to expand the memory capacity of the machine with the Additional Memory Type A (512MB).
200 x 400 dpi
400 x 400 dpi
600 x 600 dpi
You can scan and store up to 999 pages at one time. If two-sided originals are scanned using the feeder, you can store up to 1,000 pages. Once the maximum number of originals you can scan is reached, a message asking whether to store appears.
To check whether the file was stored correctly, press
 (Status Monitor/Cancel) → [Store] → [Log]. If the result is displayed as "NG," press [Details] to check the error code. For more information on the causes and remedies for each error code, see "List of Error Codes without Messages." (Status Monitor/Cancel) → [Store] → [Log]. If the result is displayed as "NG," press [Details] to check the error code. For more information on the causes and remedies for each error code, see "List of Error Codes without Messages." |