Date Printing
This mode enables you to print the date on the output.
|
IMPORTANT
|
|
This mode can be used only for printing a file stored in a mail box.
|
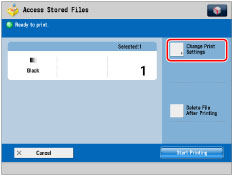
1.
Press [Access Stored Files] → [Mail Box].

2.
Select the desired Mail Box → select the desired file → press [Print].

3.
Press [Change Print Settings].
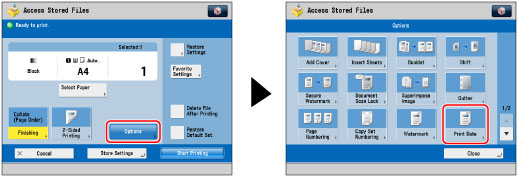
4.
Press [Options] → [Print Date].
5.
Set the image orientation and print position.

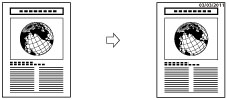
Orientation:
|
[Upright Image]:
|
Prints the image upright on the paper.
|
|
[Sideways Image]:
|
Prints the image sideways on the paper.
|
|
Upright Image
|
Sideways Image
|
||
 |
 |
 |
 |
You can press [Set Details] to adjust the printing position.
To adjust the printing position, press [X] or [Y] → adjust the printing position with [-] or [+] → press [OK].
To adjust the printing position, press [X] or [Y] → adjust the printing position with [-] or [+] → press [OK].
|
NOTE
|
|
If you set any two of [Page Numbering], [Copy Set Numbering], or [Watermark] to print in the same position, a confirmation message appears when you press
 (Start). (Start). |
6.
Specify the print settings for the date.

Press the <Size> drop-down list → select the size of the date.
Press the <Date Format> drop-down list → select the format of the date.
Enter the desired date using  -
-  (numeric keys).
- (numeric keys).|
NOTE
|
|
If no date is set, the date set in [Date/Time Settings] is printed. Confirm that the settings for [Date/Time Settings] are correct. (See "Current Date and Time.")
|
Press [Print Type].
Select the print type → press [OK].
If you select [Transparent], press [Light] or [Dark] to adjust the halftone density.
7.
Press [OK] → [Close].
|
IMPORTANT
|
|
For information on the modes which cannot be set in combination with this mode, see "Unavailable Combination of Functions."
Printing performance may not be optimal, depending on the file content and combination of settings.
If you use [Print Date] with [Add Cover], [Insert Sheets], or [Job Separator], the watermark will not be printed on the inserted pages.
|
|
NOTE
|
|
The Date Printing mode cannot be used with files including images with resolutions of less than 600 x 600 dpi.
You can also adjust the position of the date. (See "Registering/Editing/Deleting User-Defined Text for Page Numbers and Watermarks.")
|