Configuring Printing Protocols and WSD Functions
Configure the protocols that are used for printing documents from a networked computer. The protocols supported by the machine include LPD, RAW, and WSD (Web Services on Devices).
 |
|
To change protocols' port numbers, see Changing Port Numbers.
|
1
Start the Remote UI and log on in System Manager Mode. Starting Remote UI
2
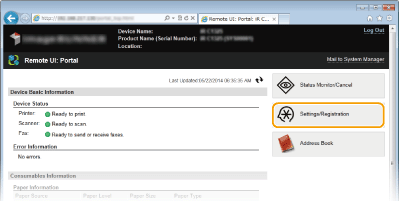
Click [Settings/Registration].

3
Click [Network Settings]  [TCP/IP Settings].
 [TCP/IP Settings].
4
Configure printing protocols.
 Configuring LPD or RAW
|
1
|
Click [Edit] in [LPD Settings] or [RAW Settings].
 |
|
2
|
Configure the settings as necessary.
 [Use LPD Printing]
Select the check box to print via LPD. When not using LPD printing, clear the check box. [Use RAW Printing]
Select the check box to print via RAW. When not using RAW printing, clear the check box. [RX Timeout]
Specify the time period from reception of data until the machine times out. |
|
3
|
Click [OK].
|
 Configuring WSD
|
1
|
Click [Edit] in [WSD Settings].
 |
|
2
|
Configure the settings as necessary.
 [Use WSD Printing]
Select the check box to print via WSD. When not using WSD printing, clear the check box. [Use WSD Browsing]
Select the check box to obtain information about the machine from a computer via WSD. This check box is automatically selected when the [Use WSD Printing] check box is selected. [Use WSD Scanning]
Available for Windows Vista/7/8/8.1, WSD scanning enables you to scan documents to a computer without installing the scanner driver. Select the check box to scan documents via WSD. When not using WSD scanning, clear the check box. [Use Computer Scanning]
Select the check box to use WSD scanning by operating the machine with the operation panel. This check box can only be selected when the [Use WSD Scanning] check box is selected. To perform scanning, tap <Scan> and specify a computer as a scan destination (Scanning from the Machine). [Use Multicast Discovery]
Select the check box to set the machine to reply to multicast discovery messages. If the check box is cleared, the machine stays in sleep mode even when multicast discovery messages are flowing on the network. |
|
3
|
Click [OK].
|
5
Restart the machine.
Turn OFF the machine, wait for at least 10 seconds, and turn it back ON.
 |
Using the operation panelLPD, RAW, and WSD settings can also be accessed from <Menu>.
Setting up WSD network devices on Windows Vista/7/8/8.1The WSD printer and scanner can be added from the printer folder. Open the printer folder (Displaying the Printer Folder)
 click [Add a device] or [Add a printer] and follow the on-screen instructions. For more information about how to install MF Drivers for the WSD network printer, see MF Driver Installation Guide. click [Add a device] or [Add a printer] and follow the on-screen instructions. For more information about how to install MF Drivers for the WSD network printer, see MF Driver Installation Guide. |