1-sided Printing and 2-sided Printing
You can select whether to print on one side or both sides of each sheet of paper. If the machine you are using supports 2-sided printing, the default setting is 2-sided printing.
|
IMPORTANT
|
||
Precautions on 2-sided printingDo not touch your document when making 2-sided printing until the process is complete. After printing on the front side is complete, the document is partially output, reserved, and fed into the machine again for printing on the back side.
Be sure to close the sub-output tray before making 2-sided printing.
Printing to the back side of printed document (Manual 2-sided printing)Two-sided printing can be performed manually using a printed document. Place a printed document in the multi-purpose tray to print on the back side*.
To print on the back side of a printed document, smooth out the curling edges of the sheets and place them one by one in the multi-purpose tray.
|
1.
According to the paper size for 2-sided printing, ensure to set the paper size switch lever accurately.
 |
If not securely attached, documents may not be fed properly, or jammed.
|
|
1.
|
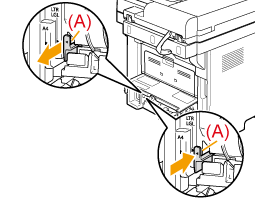
Open the lower rear cover.
 |
||||
|
2.
|
Securely place the blue color paper size switch lever (A).
 |
||||
|
3.
|
Close the lower rear cover.
|
2.
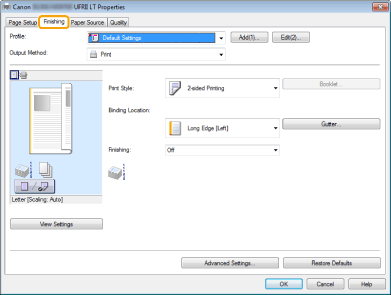
Click [Basic Settings].
|
NOTE
|
|
For instructions on how to display the printer driver screen, see "Printing" or "Configuring the Default Print Settings."
|
3.
Select [1-sided Printing] or [2-sided Printing] from [1-sided/2-sided/Booklet Printing].

4.
Select the binding edge from [Binding Location].

The output image is displayed in the preview area.
5.
Click [OK].
|
NOTE
|
|
You can also configure this function in the [Finishing] tab.
The display may differ according to the operating system, as well as the type and version of the printer driver.
|