Performing a Scan Using a Shortcut Key
Register destinations and frequently used settings in shortcut keys in advance, to perform a scan easily without needing to manually enter a destination and specify required settings.
Registering a Shortcut Key/Confirming the Destination Registered in the Shortcut Key
1
Press [ ] (Menu).
] (Menu).2
Select <Scan Settings> using [ ]or [
]or [ ] and press [OK].
]or [] and press [OK].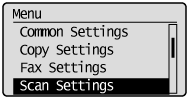
3
Select <Shortcut Key Settings> using [] or [] and press [OK].
] or [] and press [OK].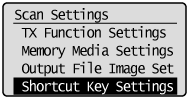
To store a new shortcut:
|
(1)
|
Select <Register> using [
] or [] and press [OK]. 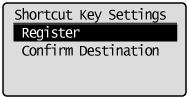 |
|||||||||||||||||||||||||
|
(2)
|
Select the shortcut key that you want to register using [
] or [] and press [OK].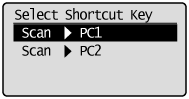 |
|||||||||||||||||||||||||
|
(3)
|
Select the connection method, using [
] or [] and press [OK].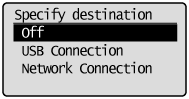 |
|||||||||||||||||||||||||
|
(4)
|
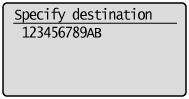
Select the destination using [
] or [] and press [OK].When one computer is connected to the machine via a USB cable:
This screen is not displayed. When more than ten computers are connected to the machine simultaneously.
Up to ten computers can be displayed as a list of computers connected to the machine. (Scanning cannot be performed otherwise). Reduce the number of computers connected to the machine over the network.
 |
|||||||||||||||||||||||||
|
(5)
|
Specify the scan settings using [
] or []and press [OK].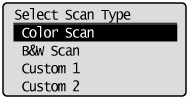
|


To confirm the destination registered in the shortcut key:
|
(1)
|
Select <Confirm Destination> using [
] or [] and press [OK]. 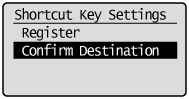 |
|
(2)
|
Select the destination that you want to confirm using [
] or [] and press [OK].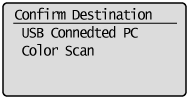 |
4
Press [] (Menu) to close the menu screen.
] (Menu) to close the menu screen.Performing a Scan Using a Shortcut Key
1
Place your document.
|
NOTE
|
When scanning from the operation panelYou cannot scan more than one document at a time.
|
2
Press [ ].
].
].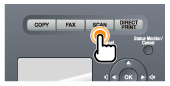
3
Press [ ] (Shortcut Scan) into which the destination that you want to select is registered.
] (Shortcut Scan) into which the destination that you want to select is registered.Scanning starts. When scanning is complete, the screen returns to the scan mode screen after the scanned document is saved.
|
 When scanning cannot be performed
 ] to close the screen before starting a scan.
|
NOTE
|
To specify a location where the scanned images are saved:Once scanning is complete, a folder is automatically displayed to which the scanned images are saved. By default, a folder bearing the scanning date is created inside the [My Pictures] folder in [My Documents]. (On Windows Vista/Windows 7, the folder is created in the [Pictures] folder.)
To change the scan settings:You can re-specify the save location, file format, resolution, and other settings from a computer.
See "Using the MF Toolbox" for more information.
|