Special Mode
Use the Special Mode settings to fix print quality problems.
Read the following carefully before changing the settings.
|
IMPORTANT
|
Use default settings in normal operationChange the settings only when the problems noted below occur.
|
Settings That Can Be Specified From the Operation Panel
Settings
 |
Default settings are highlighted in bold.
|
|
Special mode
|
Options
|
Details
|
||||||||||||||
|
Special Mode U
|
Off, On
|
Due to the paper type (for example, heavy paper) or usage conditions (for example, dry conditions), toner smudges and spatters appear on the output. When this occurs, set this setting to <On>.
|
||||||||||||||
|
Special Mode V
|
Off, Mode 1, Mode 2
|
If damp paper is used to print, the ejected paper may curl up (the printed side may curl up). In this case, change this setting. The improvement effect is increased in the following order.
|
||||||||||||||
|
Special Mode X (only for media printing and printing from PS/PCL printer driver) (D1370 only)
|
Off, Mode 1, Mode 2, Mode 3
|
Depending on the paper type or the usage environment, liner ink stains may appear on the printed document. If it happens, change the setting of this item.
The improvement effect is increased in the following order.
|
||||||||||||||
|
Special Mode Z (only for copying)
|
Off, Mode 1, Mode 2, Mode 3, Mode 4
|
Due to the paper type or usage conditions, vertical streaks appear on the output. When this occurs, change this setting.
The improvement effect is increased in the following order.
|
||||||||||||||
|
Special Mode B
|
Off, Mode 1, Mode 2, Mode 3, On
|
Vertical streaks appear on the output after the toner cartridge was replaced recently, or the machine has not printed anything for an extended period of time.
When this occurs, change this setting. The effect becomes greater as the number goes up.
|
||||||||||||||
|
Special Mode C
(only for printing received fax and report printing) |
Off, On
|
Due to the paper type or usage conditions, vertical streaks appear on the output. When this occurs, set one of the following settings to <On>. Noise can also be minimized.
|
||||||||||||||
|
Special Mode D
|
Off, On
|
|||||||||||||||
|
Special Mode G
|
Off, On
|
Depending on the paper type (rough-textured paper, especially 16K size), the output capacity may deteriorate. When this occurs, change the setting to <On>.
|
||||||||||||||
Specifying Special Mode Settings From the Operation Panel
1
Press [ ] (Menu).
] (Menu).2
Press [ ] or [
 ] to select <Adjustment/Maintenance> and press [OK].
] or [] to select <Adjustment/Maintenance> and press [OK].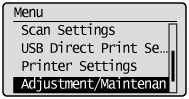
3
Press [] or [] to select <Special Processing> and press [OK].
] or [] to select <Special Processing> and press [OK].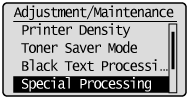
Settings That Can Be Specified In the Printer Driver
Settings
|
|
Default settings are highlighted in bold.
|
|
Special mode
|
Setting options
|
Details
|
||||
|
Special Print Adjustment
|
Off, Mode 1, Mode 2, Mode 3
|
Due to the paper type or usage conditions, vertical streaks appear on the output. When this occurs, change this setting.
The effect becomes greater as the number goes up. [Off] -> [Mode 1] -> [Mode 2] -> [Mode 3]
(low) (high)
|
Specifying Special Mode Settings In the Printer Driver
1
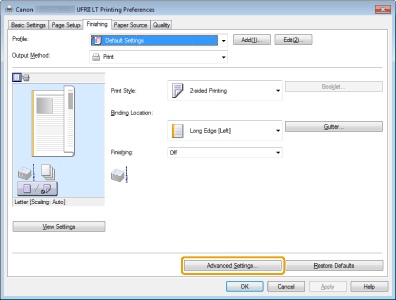
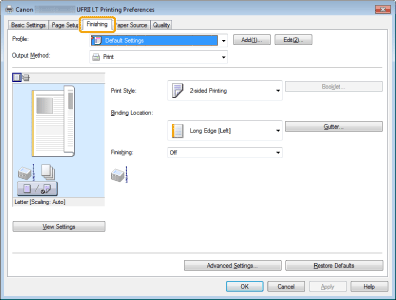
Click the [Finishing] tab.
|
NOTE
|
|
For the instructions on how to access the printer driver screen, see "Printing" and "Configuring the Default Print Settings."
|
2
Click [Advanced Settings].