Special Mode
Use the Special Mode settings to fix print quality problems.
Read the following carefully before changing the settings.
|
IMPORTANT
|
Maintain the default settings under normal conditions:Change the settings only when the problems mentioned below occur.
|
Settings That Can Be Specified From the Operation Panel
Settings
 |
Default settings are highlighted in bold.
|
|
Special Mode
|
Options
|
Details
|
||||||||||||||||
|
Special Mode U
|
Off, On
|
Depending on the paper type (especially when using thick paper) or environment (especially in dry environments), you could see the spots of scattered toner around the text or patterns. In this case, set this setting to <On>.
|
||||||||||||||||
|
Special Mode V
|
Off, Mode 1, Mode 2, Mode 3
|
Depending on the paper type or environment, vertical streaks may appear on printed paper. In this case, change this setting.
The effect becomes greater as the number goes up.
|
||||||||||||||||
|
Special Mode Z
|
Copy: Off, Mode 1, Mode 2, Mode 3, Mode 4
Fax:
Off, Mode 1,
Mode 2,
Mode 3,
Mode 4
|
Depending on the paper type or environment, vertical streaks may appear on printed paper. In this case, change this setting.
The level of improvement according to the setting option is as following.
|
||||||||||||||||
|
Special Mode B
|
Off, Mode 1, Mode 2, Mode 3
|
After replacing the toner cartridge or when using a toner cartridge after a long time, vertical streaks may appear on printed documents. In this case, change this setting.
The level of improvement according to the setting option is as following.
|
||||||||||||||||
|
Special Mode C
(Only when printing received fax documents)
|
Off, On
|
Depending on the paper type or environment, vertical streaks may appear on printed documents. In this case, set one of these settings to <On>.
You can also reduce the printing noise by set these settings to <On>.
|
||||||||||||||||
|
Special Mode D
|
Copy: Off, On
Print: Off, On |
|||||||||||||||||
|
Special Mode I
|
Off, On
|
Depending on the paper type (especially when using thin or curled paper), paper jams may occur frequently when performing 2-sided printing. In this case, set this setting to <On>.
|
||||||||||||||||
|
Special Mode J
|
Off, On
|
Printed paper may be spotted when printing thin lines or light images. In this case, set this setting to <On>.
|
||||||||||||||||
|
Special Mode K
|
Off, On
|
Depending on the environment (especially in low temperature environments), toner may not be fixed sufficiently and output may be less clear. In this case, set this setting to <On>.
|
||||||||||||||||
Specifying Special Mode Settings From the Operation Panel
1
Press [ ] (Menu).
] (Menu).2
Press [ ] or [
 ] to highlight <Adjustment/Maintenance>, and then press [OK].
] or [] to highlight <Adjustment/Maintenance>, and then press [OK].
3
Press [] or [] to highlight <Special Processing>, and then press [OK].
] or [] to highlight <Special Processing>, and then press [OK].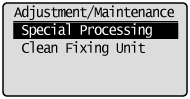
Settings That Can Be Specified In the Printer Driver
Settings
|
|
Default settings are highlighted in bold.
|
|
Special Mode
|
Setting options
|
Details
|
||||||
|
Special Print Adjustment
|
Off, Mode 1, Mode 2, Mode 3, Mode 4
|
Depending on the paper type or environment, vertical streaks may appear on printed documents. In this case, change this setting.
The effect becomes greater as the number goes up. [Off] -> [Mode 1] -> [Mode 2] -> [Mode 3] -> [Mode 4]
(low) (high)
|
||||||
|
Special Print Mode
|
Off, Special Settings1, Special Settings 2
|
[Off]
Prints without applying the special print mode. [Special Settings 1] If barcodes printed with your machine cannot be read, set this setting to [Special Settings 1] to reduce the problem.
[Special Settings 2]
When printing high contrast documents, outlines of printed text or image may become white. Set this setting to [Special Settings 2] to reduce the problem.
|
Specifying Special Mode Settings In the Printer Driver
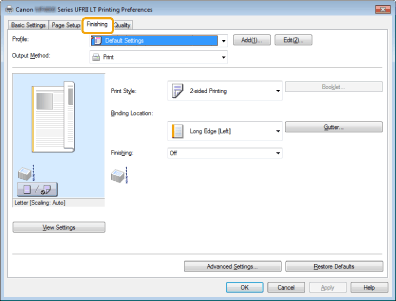
1
Click the [Finishing] tab.
|
NOTE
|
|
For the instructions on how to access the printer driver screen, see "Printing" and "Configuring the Default Print Settings."
|
2
Click [Advanced Settings].
