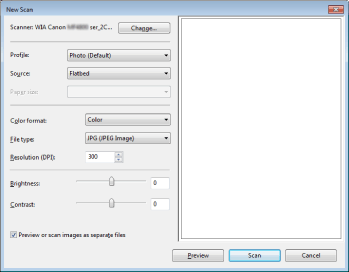
[New Scan] Dialog Box

|
[Scanner]
|
The scanner currently being used is displayed. Click [Change] to select a different scanner.
|
||||||
|
[Profile]
|
Select a document type from the following settings.
[Photo (Default)]
[Last used settings]
[Documents]
[Add profile]
|
||||||
|
[Source]
|
Select a location where documents are to be placed.
[Flatbed] (platen glass)
[Feeder (Scan one side)]
[Feeder (Scan both sides)] (MF4890dw only)
|
||||||
|
[Color format]
|
Select a color type used for scanning from the following settings.
[Color]
[Grayscale]
[Black and white]
|
||||||
|
[File type]
|
Select a file format from the following settings.
[BMP (Bitmap Image)]
[JPG (JPEG Image)]
[PNG (PNG Image)]
[TIF (TIFF image)]
|
||||||
|
[Resolution]
|
Specify the scanning resolution in dpi.
|
||||||
|
[Brightness]
|
Specify the brightness (-100 to 100).
|
||||||
|
[Contrast]
|
Specify the contrast (-100 to 100) (for color and grayscale scanning only).
|
||||||
|
[Preview or scan images as separate files]
|
The images scanned from [Flatbed] (Paten glass) are automatically cropped and saved as separate files.
|
 ] to specify the scanning area.