Adding a New Security Policy
|
NOTE
|
Number of security policies that can be registeredYou can register up to 10.
If you cannot register one, delete unnecessary security policies. |
1
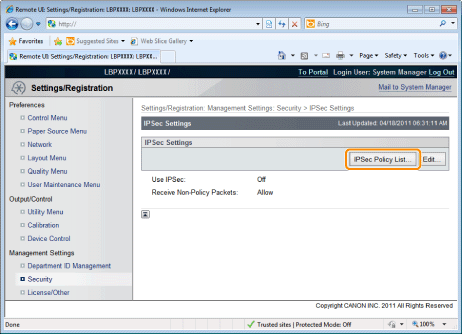
Click [IPSec Policy List...] on the [IPSec Settings] page.
2
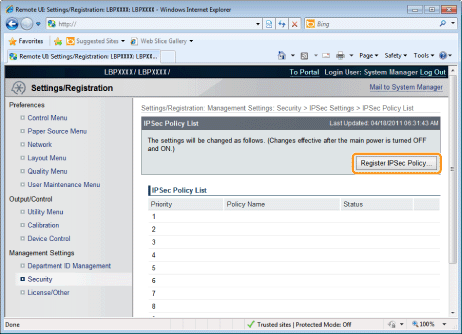
Click [Register IPSec Policy...].
3
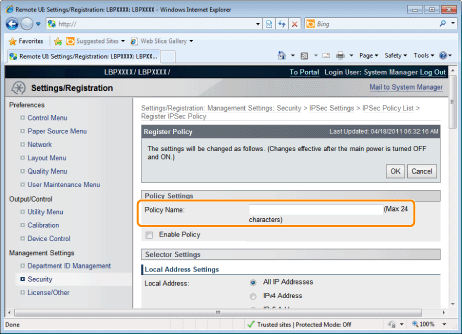
Enter the name of the new security policy to be registered.
Up to 24 alphanumeric characters can be entered.
4
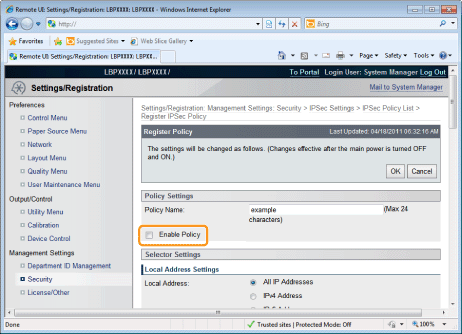
Select the [Enable Policy] check box.
 |
If the check box is cleared, the security policy cannot be used.
|
5
Set [Local Address Settings] and [Remote Address Settings].
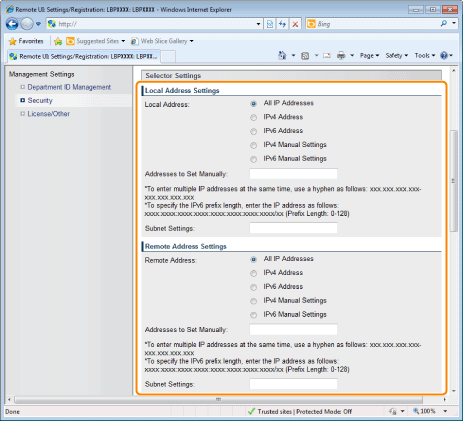
The packets setting the security policy are specified as follows.
|
Transmission
|
Packets Applying the Security Policy
|
|
|
[Local Address]
|
RX
|
Packets with "destination IP addresses" that match IP addresses specified here
|
|
TX
|
Packets with "departure IP addresses" that match IP addresses specified here
|
|
|
[Remote Address]
|
RX
|
Packets with "departure IP addresses" that match IP addresses specified here
|
|
TX
|
Packets with "destination IP addresses" that match IP addresses specified here
|
When [IPv4 Manual Settings]/[IPv6 Manual Settings] is selected
Enter the IP address in the [Addresses to Set Manually] field.
You can enter the IP address in the following way.
|
IP Address Entry Example
|
IP Address Entry Method
|
|
192.168.0.1-192.168.0.10
fe80::1000-fe80::2000 |
If you want to enter the IP addresses of consecutive numbers, place "-" (hyphen) between the address of the smallest number and that of the largest number.
|
|
192.168.0.0/16
fe80::0000/64 |
In order to specify the subnet range (prefix length), enter a "/" (slash) after the normal IP address symbol, and then enter another prefix length (maximum 32 for IPv4 and maximum 128 for IPv6).
|
6
Set [Port Settings].
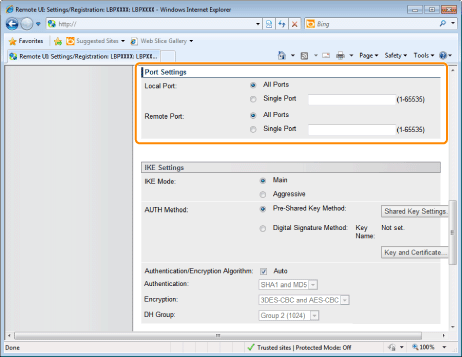
The packets setting the security policy are specified as follows.
|
Transmission
|
Packets Applying the Security Policy
|
|
|
[Local Port]
|
RX
|
Packets with "destination ports" that match IP addresses specified here
|
|
TX
|
Packets with "departure ports" that match IP addresses specified here
|
|
|
[Remote Port]
|
RX
|
Packets with "departure ports" that match IP addresses specified here
|
|
TX
|
Packets with "destination ports" that match IP addresses specified here
|
If you want to select all ports
Select the [All Ports] check box.
If you want to select a single port
|
(1)
|
Select the [Single Port] check box.
|
|
(2)
|
Enter the port number (0 to 65535).
|
7
Set [IKE Mode] and [AUTH Method] under [IKE Settings].
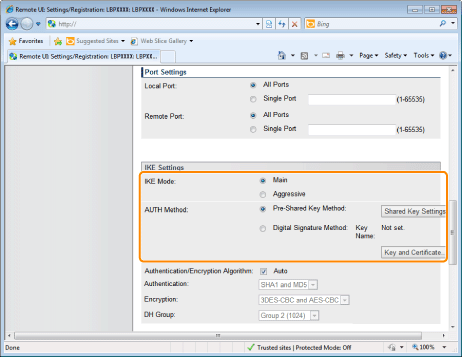
|
(1)
|
Select [Main] or [Aggressive] under [IKE Mode].
|
|
(2)
|
Select [AUTH Method].
If you want to specify [Pre-Shared Key Method]a. Select the [Pre-Shared Key Method] check box.
b. Click [Shared Key Settings...].
c. Enter the name of the shared key (up to 24 characters), and then click [OK].
If you want to specify [Digital Signature Method]a. Select the [Digital Signature Method] check box.
b. Click [Key and Certificate...].
c. Select the key to use, and then click [Default Key Settings].
|
|
NOTE
|
[AUTH Method] SettingsIn order to set [Pre-Shared Key Method], the SSL encrypted communication function must be enabled.
We recommend that network settings be performed by the network administrator.
|
8
Set [Authentication/Encryption Algorithm] under [IKE Settings].
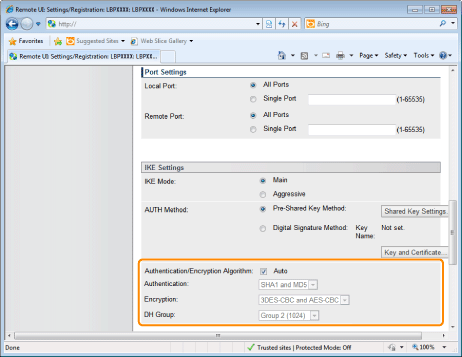
When setting automatically
Select the [Auto] check box.
When setting manually
Set the following items.
|
[Authentication]
|
Select the authentication algorithm from [SHA1], [MD5] or [SHA1 and MD5].
|
|
[Encryption]
|
Select the encryption algorithm from [3DES-CBC], [AES-CBC] or [3DES-CBC and AES-CBC].
|
|
[DH Group]
|
Select the Diffie-Hellman group from [Group 1 (768)], [Group 2 (1024)] or [Group 14 (2048)].
|
9
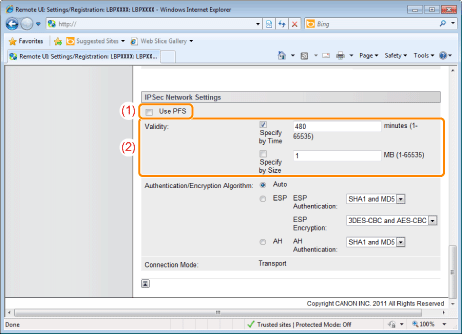
Set the PFS for [IPSec Network Settings] and [Validity].
|
(1)
|
When using PFS, select the [Use PFS] check box.
|
|
(2)
|
Set [Validity].
When specifying by timea. Select the [Specify by Time] check box.
b. Enter the time (1 to 65535 minutes).
When specifying by sizea. Select the [Specify by Size] check box.
b. Enter the size (1 to 65535 MB).
|
|
NOTE
|
About PFSIf PFS is used, the key generation process becomes complex. Even assuming one key is deciphered, it does not mean that later keys will be deciphered easily.
|
10
Set [Authentication/Encryption Algorithm] under [IPSec Network Settings].
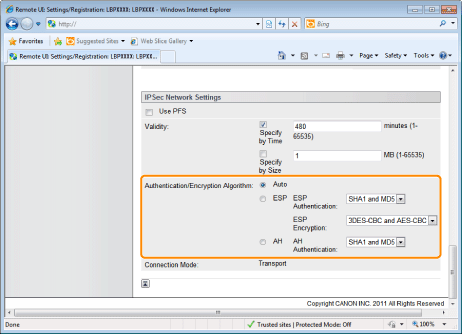
When setting automatically
Select the [Auto] check box.
When setting authentication using ESP protocol
|
(1)
|
Select the [ESP] check box.
|
|
(2)
|
Select the authentication algorithm from [SHA1], [MD5], [SHA1 and MD5] or [NULL] under [ESP Authentication].
|
|
(3)
|
Select the encryption algorithm from [3DES-CBC], [AES-CBC], [3DES-CBC and AES-CBC] or [NULL] under [ESP Encryption].
|
When setting authentication using AH protocol
|
(1)
|
Select the [AH] check box.
|
|
(2)
|
Select the authentication algorithm from [SHA1], [MD5] or [SHA1 and MD5] under [AH Authentication].
|
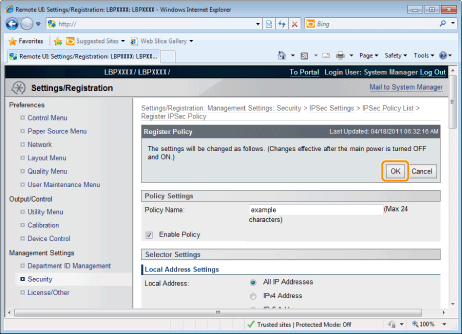
11
Click [OK].
12
Perform a hard reset or restart the printer.
|
→
|
After performing a hard reset or restarting the printer, the settings are effective.
|
|
NOTE
|
||||||
To perform a hard resetYou can perform a hard reset using the following procedure.
|